Table of Contents
Advertisement
Quick Links
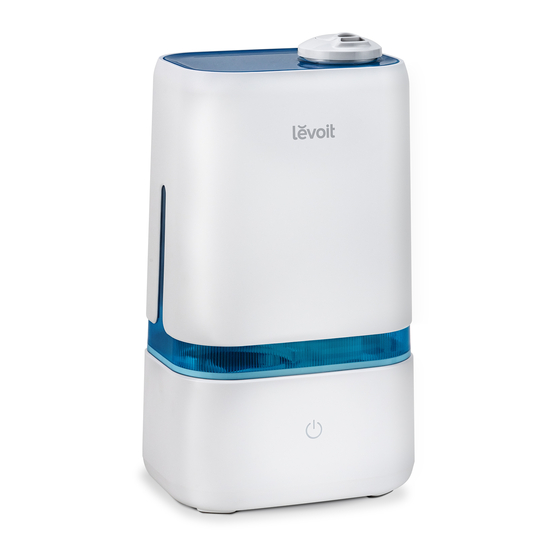
U SER M ANUA L
Ultrasonic Cool Mist Humidifier
Model: Classic 200
Questions or Concerns?
Please contact us Mon–Fri, 9:00 am–5:00 pm PST/PDT
at support@levoit.com or at (888) 726-8520.
02.02_ML_HTHOHIHC03DL_Classic200_UltrasonicCoolMistHumidifier.indd 1
02.02_ML_HTHOHIHC03DL_Classic200_UltrasonicCoolMistHumidifier.indd 1
2/10/20 12:58 PM
2/10/20 12:58 PM
Advertisement
Table of Contents

Related Manuals for Levoit Classic 200


Summary of Contents for Levoit Classic 200
- Page 1 U SER M ANUA L Ultrasonic Cool Mist Humidifier Model: Classic 200 Questions or Concerns? Please contact us Mon–Fri, 9:00 am–5:00 pm PST/PDT at support@levoit.com or at (888) 726-8520. 02.02_ML_HTHOHIHC03DL_Classic200_UltrasonicCoolMistHumidifier.indd 1 02.02_ML_HTHOHIHC03DL_Classic200_UltrasonicCoolMistHumidifier.indd 1 2/10/20 12:58 PM 2/10/20 12:58 PM...
- Page 2 M I S T H U M I D I F I E R BY L E VO I T. If you have any questions or concerns, please reach out to us at support@levoit.com. We hope you enjoy your new humidifier! Find Us Online...
-
Page 3: Table Of Contents
Table of Contents Package Contents Package Contents Ultrasonic Humidifier Specifications Aroma Pads (1 Pre-Installed) Safety Information Cleaning Brush • General Safety User Manual • Plug & Cord Quick Start Guide Getting to Know Your Humidifier Getting Started • Filling & Refilling Specifications Using Your Humidifier •... -
Page 4: Safety Information
S A F E T Y I N F O R M AT I O N To reduce the risk of fire, electric shock, or other injury, follow all instructions and safety guidelines. General Safety Only use the humidifier as described in Do not use other items as replacement •... -
Page 5: Plug & Cord
SAFETY INFORMATION (CONT.) Plug & Cord Ensure that the plug fits properly into • a polarized socket. Do not handle the power cord or • plug with wet hands. Keep the plug and power cord away from liquids. Your humidifier has a polarized plug •... -
Page 6: Getting To Know Your Humidifier
G E T T I N G TO K N O W YO U R H U M I D I F I E R Nozzles Insulation Ring Water Tank Cap Nozzle Cover Transducer Silicone Sealing Ring Water Tank Handle Float Housing Water Valve Mist Outlet... -
Page 7: Getting Started
G E T T I N G S TA R T E D Remove all packaging. Mist should be directed away from walls, furniture, bedding, and Choose a hard, flat location for the appliances. [Figure 1.2] humidifier at least 12 in / 30 cm away from any walls. -
Page 8: Filling & Refilling
Filling & Refilling Remove the nozzle cover from the Fill the tank with room-temperature water tank. Use the handle to lift the water. [Figure 1.5] Do not fill with hot water tank from the base. [Figure 1.3] water. Note: We recommend using purified or distilled water to fill the tank. - Page 9 Filling & Refilling (cont.) Replace the water tank cap and align CAUTION the arrow with the lock. [Figure 1.9] • Do not add water directly into the base chamber. [Figure 1.6] Figure 1.6 • Do not add water through the mist tube. •...
-
Page 10: Using Your Humidifier
U S I N G YO U R H U M I D I F I E R Plug in the humidifier. Rotate the nozzles to adjust the direction of the mist. [Figure 2.2] to turn your humidifier on. Tap repeatedly to change the mist setting. -
Page 11: Important Tips
Important Tips Your humidifier must have the correct level of water in the base chamber to work properly. If there is too much water in the base chamber, the humidifier cannot create mist. • Never pour water directly into the base chamber. -
Page 12: Using The Aroma Box
Using the Aroma Box Preventing Leaks Your humidifier can be used as an aroma The water tank may leak if not placed diffuser. properly. Push the aroma box at the back of the Make sure the silicone sealing ring • base and pull it out. -
Page 13: Care & Maintenance
C A R E & M A I N T E N A N C E Note: Remove the water tank from the base. Pour out any water from the tank and • All maintenance should be done on a water- base chamber. - Page 14 Cleaning (cont.) To descale the humidifier: Place the tank on the base and soak for 15–20 minutes. Vinegar Fill the tank with 3 US cups / will drain into the base chamber 710 mL of distilled white vinegar. and loosen scale (mineral buildup) [Figure 3.4] in the tank and in the base...
- Page 15 Cleaning (cont.) Flip the tank over and remove the Use a soft cloth and the included tank cap and noise silencer. To cleaning brush to remove scale. remove the noise silencer, press [Figure 3.10] the release tab and gently pull away from the humidifier.
-
Page 16: Cleaning The Aroma Pad
Cleaning the Aroma Pad Press the aroma box to release it from Dry with a clean cloth and place it back the base, and pull it out. [Figure 3.12] into the aroma box. [Figure 3.14] Figure 3.12 Figure 3.14 Remove the aroma pad and rinse under Note: Do not pour liquid cleaners or detergents warm, running water. -
Page 17: Reassembling
Reassembling Flip the water tank over and replace the Store the brush in the brush storage noise silencer on the tank. [Figure 3.15] slots in the base. [Figure 3.17] Figure 3.17 Figure 3.15 Place the tank properly on the base and replace the nozzle cover onto the water Refill the tank, if necessary. -
Page 18: Troubleshooting
T R O U B L E S H O OT I N G Problem Possible Solution Plug in the humidifier and turn it on. Humidifier doesn’t turn on. Add purified or distilled water to the water tank. Turn the mist level to a higher setting. Fill the water tank. - Page 19 TROUBLESHOOTING (CONT.) Problem Possible Solution Make sure the water tank is properly in place (see Getting Started, page 7). Set mist level to a lower setting. Humidifier makes a loud or unusual noise. The humidifier may be malfunctioning. Stop using the humidifier and contact Customer Support (see page 21).
-
Page 20: Warranty Information
Customer Support does not extend to any product that has been via support@levoit.com with your order ID. Do not used for commercial, rental, or any other use for dispose of your product before contacting us. Once which the product is not intended. -
Page 21: Customer Support
Customer Support Team. Arovast Corporation 1202 N. Miller St., Suite A Anaheim, CA 92806 Email: support@levoit.com Toll-Free: (888) 726-8520 Support Hours Mon–Fri, 9:00 am–5:00 pm PST/PDT *Please have your order invoice and order ID ready before contacting Customer Support. - Page 22 02.02_ML_HTHOHIHC03DL_Classic200_UltrasonicCoolMistHumidifier.indd 22 02.02_ML_HTHOHIHC03DL_Classic200_UltrasonicCoolMistHumidifier.indd 22 2/10/20 12:58 PM 2/10/20 12:58 PM...
- Page 23 Connect with us @LevoitLifestyle 02.02_ML_HTHOHIHC03DL_Classic200_UltrasonicCoolMistHumidifier.indd 23 02.02_ML_HTHOHIHC03DL_Classic200_UltrasonicCoolMistHumidifier.indd 23 2/10/20 12:58 PM 2/10/20 12:58 PM...
- Page 24 AU0120CY-M1_0120Classic200 02.02_ML_HTHOHIHC03DL_Classic200_UltrasonicCoolMistHumidifier.indd 24 02.02_ML_HTHOHIHC03DL_Classic200_UltrasonicCoolMistHumidifier.indd 24 2/10/20 12:58 PM 2/10/20 12:58 PM...
Need help?
Do you have a question about the Classic 200 and is the answer not in the manual?
Questions and answers