Table of Contents
Advertisement
Available languages
Available languages
Quick Links
Advertisement
Table of Contents

Related Manuals for auna multimedia TT-992E

Summary of Contents for auna multimedia TT-992E
- Page 1 TT-992E Plattenspieler 10030435 www.auna-multimedia.com...
- Page 2 Sehr geehrter Kunde, zunächst möchten wir Ihnen zum Erwerb Ihres Gerätes gratulieren. Bitte lesen Sie die folgenden Anschluss- und Anwendungshinweise sorgfältig durch und befolgen Sie diese um möglichen technischen Schäden vorzubeugen. Sicherheitshinweise • Diese Bedienungsanleitung dient dazu, Sie mit der Funktionsweise dieses Produktes vertraut zu ma- chen.
-
Page 3: Technische Daten
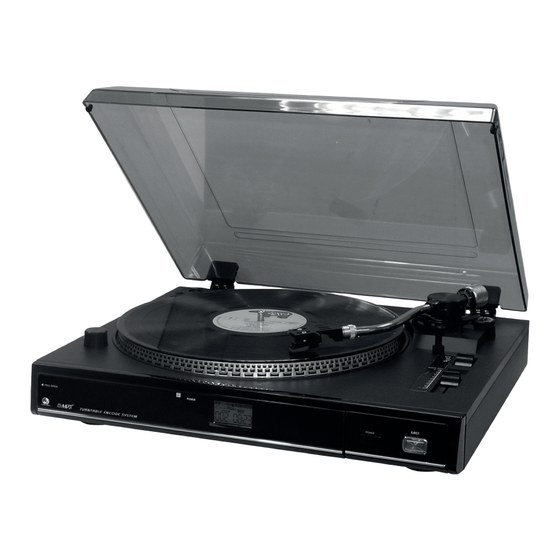
Technische Daten Artikelnummer 10030435 Stromversorgung Netzbetrieb AC 230V ~ 50Hz Antrieb Riemenantrieb Maße ca. 42,8 x 12 x 37,8 cm Lieferumfang USB Plattenspieler, Fernbedienung, Bedienungsanleitung Bedienelemente Front/Bedienpanel: Abdeckung (Play/Pause / Stop) Power LED PHONO IR-Sensor POWER ON/OFF SD Slot Ton-Arm: RETURN USB-Anschluss Abdeckung Control-Panel USB/SD... - Page 4 Plattenspieler: Spindel-Adapter („Puck“) CUE Schalter Strobo-Linse für RPM-Justage Tonarm-Verschluss Stellschraube (mit Gummiabdeckung) RPM-Schalter Gegengewicht Pitch-Regler Anti-Skating Einstellung Rückseite: Line-Out Verbinden Sie das System per Stereo-Cinch- Netzkabel Kabel an Ihrer HiFi- oder PA-Anlage...
- Page 5 Nutzung Anschluss • Packen Sie das Gerät und alle Zubehör-Teile vorsichtig aus und entfernen Sie das Verpackungsmaterial. • Verbinden Sie das Netzkabel mit einer gewöhnlichen Haushaltssteckdose. Drücken Sie POWER, um das Gerät einzuschalten. Die Power-LED leuchtet, wenn das Gerät eingeschaltet ist. Plattenspieler •...
- Page 6 USB / SD • Stecken Sie einen USB- oder SD-Datenträger mit MP3-Dateien ein. • Drücken Sie USB/SD (mehrfach, falls beide eingesteckt), zum Auswählen des gewünschten Modus. • Steuern Sie mit den Tasten Play/Pause/Stop, Vor und Zurück. • Drücken Sie FOLDER UP, um den nächsten Dateiordner (falls vorhanden) auszuwählen.
- Page 7 • Spielen Sie einen Track (oder die gesamte Schallplatte) ab. Drücken Sie vor Beginn des Abspielens RECORD. • Das Display zeigt & , um anzuzeigen, dass das Gerät in den Aufnahmemodus übergeht. • Zum Unterbrechen der Aufnahme drücken Sie REC; zum Beenden der Aufnahme halten Sie REC ge- drückt, bis das Display nicht mehr blinkt und PHONO anzeigt.
-
Page 8: Hinweise Zur Entsorgung
Einstellungen • Anti Skating: Stellen Sie mit dem Anti-Skating-Regler den Druck der Nadel auf die Platte ein. • Einstellung d. Dreh-Geschwindigkeit: Beobachten Sie während des Abspielens von Platten den je- weils passenden Strobe-Kalibrierstreifen (der obere Streifen gilt für 33RPM-Platten, der untere für 45RPM). -
Page 9: Important Safety Advice
Dear Customer, Congratulations on purchasing this product. Please read and follow these instructions, in order to avoid damaging the item. We do not cover any damages that may arise from improper use of the item or the disregard of the safety instructions. Important Safety Advice •... -
Page 10: Technical Data
Technical Data Item # 10030435 Power supply Netzbetrieb AC 230V ~ 50Hz Technology Belt drive Dimensions ~ 42.8 x 12 x 37.8 cm Scope of delivery Device, RC, user manual Overview Front: Cover (Play/Pause / Stop) Power LED PHONO IR sensor POWER ON/OFF SD slot Tone arm: RETURN... - Page 11 Phono deck: Spindle adaptor ("Puck") CUE lever Strobe lens Tone arm lock Aligment screw (w/ rubber cover) RPM switch Counter weight Pitch control Anti Skating adjustment Rear: Line-Out Connect to your home hifi or PA unit with a Mains cable stereo RCA cable...
-
Page 12: Operation
Operation Connection • Unpack all parts and remove protective material. • Connect the Power Cord to AC outlet. Press the power On/Off knob to switch the system on. Phono Deck • Slide the counter weight (25, see depicted below) onto the tone arm, until it reaches the end. Turn clockwise until it clicks with pit inside. - Page 13 Please note: If an MP3 track has no ID3 tag assigned, the display shows "NOFILE". Encoding: Vinyl -> MP3 You can use the TT-992E to digitalize your vinyl records to MP3. You need a USB or SD drive with some space left (2GB min. recommended).
- Page 14 MP3: Additional Functions • Copy Tracks (USB <-> SD) • Copy one track: During playback, press REC to copy the current track. After the copy process, the playback will be stopped. • Copy all tracks: Press REC in STOP mode, to copy all files on the drive to the other drive. After the copy process ended, the playback will be stopped.
-
Page 15: Environment Concerns
Environment Concerns According to the European waste regulation 2002/96/EG this symbol on the product or on its packaging indicates that this product may not be treated as household waste. Instead it should be taken to the appropriate collection point for the recycling of electrical and electronic equipment. -
Page 16: Consignes De Sécurité
Chère cliente, cher client, Toutes nos félicitations pour l’acquisition de ce nouvel appareil. Veuillez lire attentivement et respecter les consignes suivantes de branchements et d’utilisation pour éviter d’éventuels dommages techniques. Consignes de sécurité • Ce mode d’emploi sert à vous familiariser aux fonctions de ce produit. Conservez-le bien afin de pouvoir vous y référer à... -
Page 17: Fiche Technique
Fiche technique Numéro d’article 10028652 Alimentation électrique Fonctionnement sur secteur AC 230 V ~ 50 Hz Moteur Transmission par courroie Dimensions Env. 42,8 x 12 x 37,8 cm Contenu de la livraison Platine vinyle USB, télécommande, mode d’emploi Éléments de commande Avant / panneau de commande Couvercle (Play/Pause / Stop) - Page 18 Platine vinyle: Centreur de disque (« Puck ») Interrupteur CUE Lentille stroboscopique pour ajustement RPM Attache du bras de lecture Vis d’ajustement (avec protection en caoutchouc) Bouton RPM Contrepoids Régleur du pitch Réglage anti-patinage Arrière: Line Out Brancher l’appareil à une chaîne Hi-Fi ou à Cordon d’alimentation un appareil de sonorisation avec le câble stéréo-RCA...
- Page 19 Utilisation Branchement • Sortir l’appareil et tous les accessoires de la boîte et retirer tous les éléments d’emballage. • Brancher le cordon d’alimentation à une prise de courant domestique. Appuyer sur POWER pour allumer l’appareil. Le voyant LED de marche s’éclaire lorsque l’appareil est allumé. Platine vinyle •...
- Page 20 USB / SD • Insérer un support de stockage USB ou SD contenant des fichiers MP3. • Appuyer sur USB/SD (plusieurs fois si les deux sont insérés) pour sélectionner le mode souhaité. • Commander l’appareil à l’aide des touches Lecture/Pause/Stop, avance et retour. •...
- Page 21 • L’écran affiche & , pour indiquer que l’appareil a basculé en mode enregistrement. • Appuyer sur REC pour interrompre l’enregistrement ; rester appuyer sur REC pour interrompre l’enregistrement jusqu’à ce que l’écran ne clignote plus et affiche PHONO. • Le support de stockage cible crée un dossier « Audio » dans lequel les enregistrements seront mémorisés selon l’ordre numérique.
-
Page 22: Information Sur Le Recyclage
Réglages • Anti-patinage : régler la pression du diamant sur la platine à l’aide du bouton de réglage anti- patinage. • Réglage de la vitesse de rotation : surveiller les bandes de calibrage stroboscopique pendant la lecture du vinyle (la bande du haut vaut pour un disque 33 tours, celui du bas pour un disque 45 tours). Si les points stroboscopiques «...
Need help?
Do you have a question about the TT-992E and is the answer not in the manual?
Questions and answers