Table of Contents
Advertisement
Quick Links
Welcome to your new Betaflight F7 flight controller. This guide is intended to give you the basic
understanding of what your new flight controller can do, and more importantly, we're going to show you
how to do it. Let's start out with a general overview of your new Betaflight F7 flight controller:
Specifications:
3s-6s battery input
STM32F7 processor
Built in Power Distribution Board
Dual Gyro Support onboard mpu6000 and soft mounted ICM20608 (32k support with ICM20608)
CLI for Gyro: set gyro_to_use = 0 (MPU6000), set gyro_to_use = 1 (ICM20608)
5v Regulator rating of 1.2 Amps
Board size is 36x36mm with 30.5x30.5 OC mounting
Current Sensor 145 Amps
16MB Flash Memory
Betaflight Target, BetaflightF7
4 uarts, no inverter requirement.
Betaflight F7 Quick Setup Guide
By Philipp Seidel, Click to Enlarge
Copyright © 2018 FPVMODEL LIMITED
1
Advertisement
Table of Contents

Summary of Contents for FPVModel BETAFLIGHTF7 RV1
- Page 1 5v Regulator rating of 1.2 Amps Board size is 36x36mm with 30.5x30.5 OC mounting Current Sensor 145 Amps 16MB Flash Memory Betaflight Target, BetaflightF7 4 uarts, no inverter requirement. Copyright © 2018 FPVMODEL LIMITED...
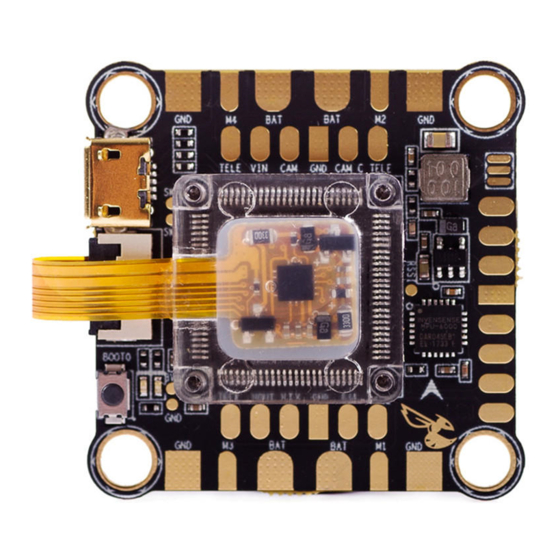
- Page 2 To get started on the build process with your new Betaflight F7 please take a moment to familiarize yourself with the wiring of the flight controller. Click on the picture above to direct yourself to an expandable view of the flight controller. Copyright © 2018 FPVMODEL LIMITED...
- Page 3 Two, your betaflight F7 RV1 FC comes with a soldering pad for camera control. This gives the user the ability to control their compatibile FPV camera menu settings via osd and transmitter sticks. This location is simply labeled CAM_C for Camera Control. Copyright © 2018 FPVMODEL LIMITED...
- Page 4 Your betaflight F7 has 4 uart connections. SMART AUDIO/TRAMP Telemetry (S/A location on the FC) and ESC Telemetry are are connected to the UART1. If using ESC telemetry, the Vtx Smart Audio/Tramp Telemetry wire should be connected to UART3 Tx. Copyright © 2018 FPVMODEL LIMITED...
- Page 5 3.3v power input use the pad labeled 3V3 if your receiver requires 5V use the pad that says 5V. Signal pad can accept SBUS, IBUS, DSM2. The signal pad is UART6 RX. Copyright © 2018 FPVMODEL LIMITED...
- Page 6 Connecting a beeper to Betaflight F7 couldn’t be easier. With very little effort you can help protect your quad by setting up a switch for those times when you may need a lost model alarm to help you find you quad. Copyright © 2018 FPVMODEL LIMITED...
Need help?
Do you have a question about the BETAFLIGHTF7 RV1 and is the answer not in the manual?
Questions and answers