PIONEER DJ DJS-1000 Operating Instructions Manual
Dj sampler
Hide thumbs
Also See for DJS-1000:
- Service manual (64 pages) ,
- Operating instructions manual (56 pages) ,
- Operating instructions manual (16 pages)
Table of Contents
Advertisement
Available languages
Available languages
Quick Links
DJS-1000
pioneerdj.com/support/
For FAQs and other support information for this product, visit the above site.
Pour les FAQ et autres informations de support sur ce produit, consultez le site ci-dessus.
Häufig gestellte Fragen und weitere Support-Informationen für dieses Produkt finden Sie auf der oben
genannten Seite.
Per la sezione FAQ e altre informazioni di supporto per questo prodotto, visitare il sito indicato sopra.
Bezoek de bovenstaande website voor vaak gestelde vragen en andere informatie over ondersteuning voor dit
product.
Para consultar las preguntas más frecuentes y otras informaciones de asistencia para este producto, visite el
sitio indicado anteriormente.
Para obter informações sobre as FAQs e outras informações de apoio relativas a este produto, consulte o site
indicado acima.
О
а а
а а а
а
а а
а
.
Operating Instructions (Quick Start Guide)
Mode d'emploi (Guide de démarrage rapide)
Bedienungsanleitung (Kurzanleitung)
Istruzioni per l'uso (Guida di avvio veloce)
Handleiding (Snelstartgids)
Manual de instrucciones (Guía de inicio rápido)
Manual de instruções (Guia de início rápido)
И
(К а
DJ SAMPLER
SAMPLER DJ
DJ-SAMPLER
DJ SAMPLER
DJ SAMPLER
SAMPLER DJ
DJ SAMPLER
DJ СЭМПЛЕР
а а
а
а
а
.
)
Advertisement
Chapters
Table of Contents

Related Manuals for PIONEER DJ DJS-1000


Summary of Contents for PIONEER DJ DJS-1000
- Page 1 DJ SAMPLER SAMPLER DJ DJ-SAMPLER DJS-1000 DJ SAMPLER DJ SAMPLER SAMPLER DJ DJ SAMPLER DJ СЭМПЛЕР pioneerdj.com/support/ For FAQs and other support information for this product, visit the above site. Pour les FAQ et autres informations de support sur ce produit, consultez le site ci-dessus.
- Page 2 If you want to dispose this product, do not mix it with general household waste. There is a separate collection system for used electronic products in accordance with legislation that requires proper treatment, recovery and recycling. Private households in the member states of the EU, in Switzerland and Norway may return their used electronic products free of charge to designated collection facilities or to a retailer (if you purchase a similar new one).
- Page 3 This product satisfies electromagnetic noise regulations when it is connected to other equipment through shielded cables and connectors. Use only the furnished accessory connecting cables. D44-8-2_A1_En Recording equipment and copyright: Recording equipment should be used only for lawful copying and you are advised to check carefully what is lawful copying in the country in which you are making a copy.
- Page 4 AFTER-SALES SERVICE FOR PIONEER PRODUCTS Please contact the dealer or distributor from where you purchased the product for its after-sales service (including warranty conditions) or any other information. In case the necessary information is not available, please contact the Pioneer’s subsidiaries (regional service headquarters) listed below: PLEASE DO NOT SHIP YOUR PRODUCT TO THE COMPANIES at the addresses listed below for repair without advance contact, for these...
-
Page 5: Table Of Contents
Thank you for purchasing this Pioneer DJ product. Read this manual and the Operating Instructions that is available on the Pioneer DJ site before using the product. Both contain important infor- mation that you should understand to properly use the product. -
Page 6: Before Start
1 Launch a web browser on a computer and access the following Pioneer DJ site. pioneerdj.com 2 Click [Support]. 3 Click [FIND TUTORIALS & MANUALS]. 4 Click the [DJS-1000] icon in the [DJ SAMPLER] category. 5 Click on the desired language on the download page. Accessories ! Power cord... -
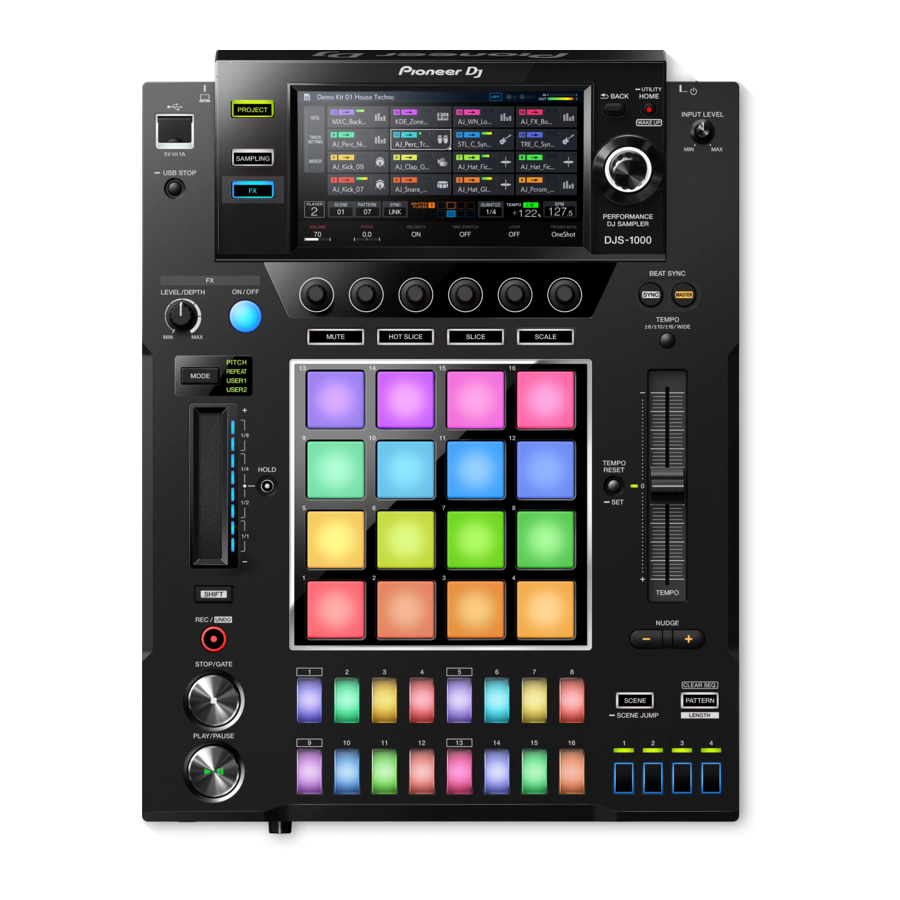
Page 7: Part Names
Part names For more detailed, refer to the Operating Instructions of this product that is available on the Pioneer DJ website. Top panel 1 PLAY/PAUSE f button f SAMPLING button 2 STOP/GATE button g Touch display 3 REC/UNDO button h BACK button... -
Page 8: Front Panel
s TEMPO RANGE button x SCENE/SCENE JUMP button t TEMPO slider y PATTERN/LENGTH/CLEAR SEQ. button u TEMPO RESET button and TEMPO RESET indicator z Bar selection keys v Performance pads A 16-step keys w NUDGE button Front panel 1 PHONES terminals 2 LEVEL control... -
Page 9: Connections
Connections Turn off this unit and disconnect the power cord from the power outlet ! When using a LAN cable to connect the components, be sure to before connecting components or changing the connections. use either the LAN cable included with this product or an STP Connect the power cord to a power outlet after all the connections are (shielded twisted pair) cable. -
Page 10: Example Of Connections
Example of connections When using with external devices Audio cable MIDI cable LAN cable Audio cable Synthesizer, etc. PRO DJ LINK compatible DJ system Cautions Match the audio cable channel input to the mixer and the player number. If a different player number is set, change the [PLAYER No.] setting on the [UTILITY] screen. = For instructions on changing the settings on the [UTILITY] screen, refer to this product’s Operating Instructions. -
Page 11: Operation
2 Press the [PATTERN] button. The unit enters the pattern switching mode and the [PATTERN] button Operation lights up in white. The 16 step keys are lit in the currently selected scene colors during pattern switching mode. ! 16 patterns can be assigned to each scene. One pattern is Start each procedure in the following sections from the home screen. -
Page 12: Creating A Pattern
Saving a project A project can be saved to a USB device. When saving a project, connect a USB device to the unit. 1 Press the [PROJECT] button. The PROJECT screen appears. You can perform operations such as load- ing and saving projects on the PROJECT screen. 2 Turn the rotary selector to select [SAVE] and then press the rotary selector. -
Page 13: Additional Information
Changing the settings For more information, refer to the Operating Instructions of this product that is available on the Pioneer DJ website. Cleaning the touch display Do not use organic solvents, acids or alkalis for cleaning the surface of the touch display. Wipe clean with a dry soft cloth or a cloth immersed in neu- tral detergent and properly wrung. - Page 14 Si vous souhaitez vous débarrasser de cet appareil, ne le mettez pas à la poubelle avec vos ordures ménagères. Il existe un système de collecte séparé pour les appareils électroniques usagés, qui doivent être récupérés, traités et recyclés conformément à la législation. Les habitants des états membres de l’UE, de Suisse et de Norvège peuvent retourner gratuitement leurs appareils électroniques usagés aux centres de collecte agréés ou à...
- Page 15 Comment lire ce manuel Merci d’avoir acheté ce produit Pioneer DJ. Lisez ce manuel et le mode d’emploi disponible sur le site de Pioneer DJ avant d’utiliser le produit. Ces deux documents contiennent des infor- mations importantes que vous devez comprendre pour utiliser correcte- ment le produit.
-
Page 16: Informations Préliminaires
Pioneer DJ suivant. pioneerdj.com 2 Cliquez sur [Support]. 3 Cliquez sur [FIND TUTORIALS & MANUALS]. 4 Cliquez sur l’icône [DJS-1000] dans la catégorie [DJ SAMPLER]. 5 Cliquez sur la langue souhaitée sur la page de téléchargement. -
Page 17: Noms Des Éléments
Noms des éléments Pour des informations plus détaillées, consultez le mode d’emploi de ce produit qui est disponible sur le site Web de Pioneer DJ. Panneau supérieur 1 Touche PLAY/PAUSE f f Touche SAMPLING 2 Touche STOP/GATE g Écran tactile... -
Page 18: Face Avant
s Touche TEMPO RANGE x Touche SCENE/SCENE JUMP t Curseur TEMPO y Touche PATTERN/LENGTH/CLEAR SEQ. u Touche TEMPO RESET et indicateur TEMPO RESET z Touches de sélection des barres v Pads performance A Touches 16 pas w Touche NUDGE Face avant 1 Prises PHONES 2 Commande LEVEL... -
Page 19: Raccordements
Raccordements Éteignez cet appareil et débranchez le cordon d’alimentation de la ! Lorsque vous utilisez un câble LAN pour la connexion, veillez à prise électrique avant de raccorder des appareils ou de changer les utiliser soit le câble LAN fourni avec ce produit soit un câble STP branchements. -
Page 20: Exemple De Raccordements
Exemple de raccordements Lors de l’utilisation avec des appareils externes Câble audio Câble MIDI Câble LAN Câble audio Synthétiseur, etc. Système DJ compatible PRO DJ LINK Attention Associez l’entrée du canal de câble audio à la table de mixage et au numéro de lecteur. Si le numéro de lecteur est différent, changez le réglage de [PLAYER No.] sur l’écran [UTILITY]. -
Page 21: Fonctionnement
! Appuyez sur la touche [STOP] pendant la lecture pour l’arrêter et revenir au début du rythme. Fonctionnement 2 Appuyez sur la touche [PATTERN]. L’appareil bascule en mode de sélection de rythmes et la touche Commencez chaque procédure des sections suivantes à partir [PATTERN] s’allume en blanc. -
Page 22: Création D'un Rythme
! L’écran de navigation peut également être affiché en tournant le ! Un morceau peut également être sélectionné en tournant le sélec- sélecteur rotatif pour sélectionner [BROWSE] et en appuyant sur le teur rotatif. sélecteur rotatif. ! Un morceau peut également être sélectionné en appuyant sur un pad performance. -
Page 23: Informations Supplémentaires
à un fonctionnement normal. Changement des réglages Pour plus d’informations, consultez le mode d’emploi de ce produit qui est disponible sur le site Web de Pioneer DJ. Nettoyer l’écran tactile N’utilisez pas de solvants organiques, d’acides ou d’alcalins pour nettoyer la surface de l’écran tactile. Essuyez avec un chiffon doux et sec ou un chiffon plongé... - Page 24 Mischen Sie dieses Produkt, wenn Sie es entsorgen wollen, nicht mit gewöhnlichen Haushaltsabfällen. Es gibt ein getrenntes Sammelsystem für gebrauchte elektronische Produkte, über das die richtige Behandlung, Rückgewinnung und Wiederverwertung gemäß der bestehenden Gesetzgebung gewährleistet wird. Privathaushalte in den Mitgliedsstaaten der EU, in der Schweiz und in Norwegen können ihre gebrauchten elektronischen Produkte an vorgesehenen Sammeleinrichtungen kostenfrei zurückgeben oder aber an einen Händler zurückgeben (wenn sie ein ähnliches neues Produkt kaufen).
- Page 25 Vielen Dank für den Erwerb dieses Pioneer DJ-Produkts. Lesen Sie dieses Handbuch und die Bedienungsanleitung, die auf der Pioneer DJ-Website verfügbar sind, bevor Sie das Produkt verwenden. Beide enthalten wichtige Informationen, mit der Sie vor der Verwendung des Produkts vertraut sein sollten.
-
Page 26: Vor Der Inbetriebnahme
Sie folgende Pioneer DJ-Website auf. pioneerdj.com 2 Klicken Sie auf [Support]. 3 Klicken Sie auf [FIND TUTORIALS & MANUALS]. 4 Klicken Sie auf das [DJS-1000]-Symbol in der [DJ SAMPLER]-Kategorie. 5 Klicken Sie auf der Download-Seite auf die gewünschte Sprache. -
Page 27: Bezeichnungen Der Teile
Bezeichnungen der Teile Detailliertere Informationen finden Sie in der Bedienungsanweisung dieses Produktes, die Sie auf der Pioneer DJ-Webseite einsehen können. Oberseite 1 PLAY/PAUSE f-Taste f SAMPLING-Taste 2 STOP/GATE-Taste g Touchscreen 3 REC/UNDO-Taste h BACK-Taste 4 SHIFT-Taste i HOME/UTILITY/WAKE UP-Taste und... -
Page 28: Frontplatte
s TEMPO RANGE-Taste x SCENE/SCENE JUMP-Taste t TEMPO-Schieber y PATTERN/LENGTH/CLEAR SEQ.-Taste u TEMPO RESET-Taste und TEMPO RESET-Anzeige z Balken-Auswahltasten v Auftritt-Pads A 16-Step-Tasten w NUDGE-Taste Frontplatte 1 PHONES-Buchsen 2 LEVEL-Regler... -
Page 29: Anschlüsse
Anschlüsse Schalten Sie das Gerät aus und ziehen Sie das Netzkabel aus der ! Bei Verwendung eines LAN-Kabels zum Anschluss stellen Steckdose, bevor Sie Komponenten anschließen oder Anschlüsse Sie sicher, immer das mit diesem Produkt mitgelieferte LAN- ändern. Kabel oder ein STP-Kabel (abgeschirmtes, verdrilltes Paar) zu Schließen Sie den Netzstecker an die Netzsteckdose an, nachdem Sie verwenden. -
Page 30: Anschlussbeispiel
Anschlussbeispiel Bei Verwendung mit externen Geräten Audiokabel MIDI-Kabel LAN-Kabel Audiokabel Synthesizer usw. PRO DJ LINK-kompatibles DJ-System Vorsichtshinweise Bringen Sie den Audiokabel-Kanaleingang mit dem Mixer und der Player-Nummer in Übereinstimmung. Wenn die Player-Nummer anders ist, ändern Sie die [PLAYER No.]-Einstellung im Bildschirm [UTILITY]. = Für Anweisungen zum Ändern der Einstellungen auf dem [UTILITY]-Bildschirm siehe Bedienungsanleitung dieses Produkts. -
Page 31: Bedienung
! Wenn Sie die [STOP]-Taste während der Wiedergabe drü- cken, wird diese angehalten und zum Beginn des Patterns Bedienung zurückgekehrt. 2 Drücken Sie die [PATTERN]-Taste. Starten Sie die einzelnen Verfahren in den folgenden Abschnitten vom Das Gerät wechselt in den Pattern-Umschaltmodus und die [PATTERN]- Start-Bildschirm aus. -
Page 32: Ein Pattern Erstellen
2 Tippen Sie auf [BROWSE]. Trigger programmieren (Step-Aufnahme) Der Durchsuchen-Bildschirm wird angezeigt. Sie können auf dem Durchsuchen-Bildschirm nach Samples suchen und Samples in Tracks laden. 1 Tippen Sie auf dem Start-Bildschirm auf einen Track, ! Der Durchsuchen-Bildschirm kann auch angezeigt werden, indem um eine Step-Aufnahme durchzuführen. -
Page 33: Trennen Eines Usb-Geräts
Trennen eines USB-Geräts 1 Halten Sie die [USB STOP]-Taste gedrückt, bis die USB- Anzeige erlischt. Während die USB-Anzeige blinkt, darf weder das USB-Gerät getrennt noch dieses Gerät ausgeschaltet werden. Anderenfalls können die Verwaltungsdaten verloren gehen und das USB-Gerät kann u. U. nicht mehr gelesen werden. -
Page 34: Zusätzliche Informationen
Störungssuche ! Wenn dieses Gerät einen Fehler aufweist, überprüfen Sie die beschriebenen Probleme im Abschnitt „Fehlerbehebung“ in der Bedienungsanleitung für dieses Gerät und rufen Sie auch die Pioneer DJ-Support-Website auf und lesen Sie die [FAQ] für [DJS-1000] pioneerdj.com/support/ Einige Probleme treten aufgrund der angeschlossenen Komponenten auf. Beauftragen Sie das Servicecenter oder den Händler mit der Reparatur, falls das Problem nach der Überprüfung der angeschlossenen Komponenten nicht behoben ist. - Page 36 Se si vuole eliminare questo prodotto, non gettarlo insieme ai rifiuti domestici. Esiste un sistema di raccolta differenziata in conformità alle leggi che richiedono appositi trattamenti, recupero e riciclo. I privati cittadini dei paesi membri dell’UE, di Svizzera e Norvegia, possono restituire senza alcun costo i loro prodotti elettronici usati ad appositi servizi di raccolta o a un rivenditore (se si desidera acquistarne uno simile).
- Page 37 Grazie per aver acquistato questo prodotto Pioneer DJ. Prima di utilizzare questo prodotto, leggere questo manuale e le Istruzioni per l’uso disponibili sul sito Pioneer DJ. I due documenti includono informazioni importanti che devono venire comprese prima di usare questo prodotto.
-
Page 38: Istruzioni Per L'uso
Pioneer DJ indicato di seguito. pioneerdj.com 2 Fare clic su [Support]. 3 Fare clic su [FIND TUTORIALS & MANUALS]. 4 Fare clic sull’icona [DJS-1000] nella categoria [DJ SAMPLER]. 5 Nella pagina di download, fare clic sulla lingua desiderata. -
Page 39: Nome Delle Varie Parti
Nome delle varie parti Per ulteriori dettagli, vedere le Istruzioni per l’uso di questo prodotto, disponibili sul sito web Pioneer DJ. Pannello superiore 1 Pulsante PLAY/PAUSE f f Pulsante SAMPLING 2 Pulsante STOP/GATE g Display a sfioramento 3 Pulsante REC/UNDO... -
Page 40: Pannello Anteriore
s Pulsante TEMPO RANGE x Pulsante SCENE/SCENE JUMP t Cursore TEMPO y Pulsante PATTERN/LENGTH/CLEAR SEQ. u Pulsante TEMPO RESET ed indicatore TEMPO RESET z Tasti di selezione delle misure v Performance pad A 16 tasti di incremento w Pulsante NUDGE Pannello anteriore 1 Terminali PHONES 2 Controllo LEVEL... -
Page 41: Collegamento Ai Terminali Di Ingresso/Uscita
Collegamenti Spegnere questa unità e scollegare il cavo di alimentazione dalla presa ! Se si usa un cavo LAN per i collegamenti, non mancare di fare uso di corrente prima di collegare i componenti o modificare i collegamenti. del cavo LAN accluso al prodotto o un cavo STP (shielded twisted Collegare il cavo di alimentazione alla presa di corrente dopo che tutti i pair). -
Page 42: Esempio Di Collegamenti
Esempio di collegamenti Quando si utilizzano dispositivi esterni Cavo audio Cavo MIDI Cavo LAN Cavo audio Sintetizzatore, ecc. Sistema DJ compatibile con PRO DJ LINK Attenzione Far corrispondere l’ingresso del canale del cavo audio al mixer e al numero del lettore. Se il numero del lettore è... -
Page 43: Riproduzione Di Un Progetto Demo
! Se si preme il pulsante [STOP] durante la riproduzione, la ripro- duzione viene arrestata e torna all’inizio del pattern. Impiego 2 Premere il pulsante [PATTERN]. L’unità passa in modalità di commutazione dei pattern e il pulsante Avviare tutte le procedure nelle sezioni che seguono dalla schermata [PATTERN] si accende in bianco. -
Page 44: Creazione Di Un Pattern
! È inoltre possibile visualizzare la schermata di ricerca girando la ! È inoltre possibile selezionare i brani girando la manopola selettrice. ! È inoltre possibile selezionare i brani toccando i performance pad. manopola selettrice per selezionare [BROWSE] e quindi premendo la manopola selettrice. -
Page 45: Informazioni Aggiuntive
Modifica delle impostazioni Per ulteriori informazioni, vedere le Istruzioni per l’uso di questo prodotto, disponibili sul sito web Pioneer DJ. Pulizia del display a sfioramento Non utilizzare solventi organici, acidi o alcali per la pulizia della superficie del display a sfioramento. Pulire con un panno morbido e asciutto o con un panno imbevuto di detergente neutro e strizzato adeguatamente. - Page 46 Deponeer dit product niet bij het gewone huishoudelijk afval wanneer u het wilt verwijderen. Er bestaat een speciaal wettelijk voorgeschreven verzamelsysteem voor de juiste behandeling, het opnieuw bruikbaar maken en de recycling van gebruikte elektronische producten. In de lidstaten van de EU, Zwitserland en Noorwegen kunnen particulieren hun gebruikte elektronische producten gratis bij de daarvoor bestemde verzamelplaatsen of een verkooppunt (indien u aldaar een gelijkwaardig nieuw product koopt) inleveren.
- Page 47 Hartelijk dank voor uw aankoop van dit Pioneer DJ-product. Lees deze handleiding en de bedieningshandleiding die beschikbaar is op de website van Pioneer DJ voordat u het product gebruikt. Beide bevatten belangrijke informatie die u moet begrijpen om het product juist te gebruiken.
-
Page 48: Alvorens Te Beginnen
1 Open op de computer een webbrowser en ga naar de Pioneer DJ-website hieronder. pioneerdj.com 2 Klik op [Support]. 3 Klik op [FIND TUTORIALS & MANUALS]. 4 Klik op het pictogram [DJS-1000] in de categorie [DJ SAMPLER]. 5 Klik op de downloadpagina op de gewenste taal. Accessoires ! Stroomsnoer... -
Page 49: Benaming Van De Onderdelen
Benaming van de onderdelen Raadpleeg voor meer bijzonderheden de handleiding van dit product, beschikbaar op de Pioneer DJ-website. Bovenpaneel 1 PLAY/PAUSE f knop f SAMPLING-toets 2 STOP/GATE-toets g Aanraakscherm 3 REC/UNDO-toets h BACK-toets 4 SHIFT-knop i HOME/UTILITY/WAKE UP-toets en STANDBY-aanduiding... -
Page 50: Voorpaneel
s TEMPO RANGE-toets x SCENE/SCENE JUMP-toets t TEMPO schuifregelaar y PATTERN/LENGTH/CLEAR SEQ.-toets u TEMPO RESET-toets en TEMPO RESET-indicator z Maatselectietoetsen v Performance-pads A 16-stappentoetsen w NUDGE-knop Voorpaneel 1 PHONES-aansluitingen 2 LEVEL instelling... -
Page 51: Aansluiten Van De In-/Uitgangsaansluitingen
Aansluitingen Zet dit toestel uit en haal het stroomsnoer uit het stopcontact voordat u ! Bij gebruik van een LAN-kabel voor de verbinding moet u de LAN- componenten aansluit of aansluitingen wijzigt. kabel die wordt meegeleverd met dit product gebruiken of een STP Steek de stekker pas in het stopcontact nadat alle aansluitingen zijn (Shielded Twisted Pair) kabel. -
Page 52: Aansluitvoorbeeld
Aansluitvoorbeeld Gebruik met externe apparaten Audiokabel MIDI-kabel LAN-kabel Audiokabel Synthesizer, enz. Met PRO DJ LINK compatibel DJ-systeem Waarschuwingen Laat de kanaalingang van de audiokabel overeenstemmen met het mengpaneel en het spelernummer. Als het spelernummer anders is, moet u de instelling voor [PLAYER No.] veranderen op het [UTILITY]-scherm. = Zie de handleiding van dit product voor instructies aangaande het veranderen van de instellingen op het scherm [UTILITY]. -
Page 53: Een Demoproject Afspelen
2 Druk op de toets [PATTERN]. Het toestel gaat over naar de patroonoverschakelmodus en de Bediening [PATTERN]-toets licht wit op. De 16 staptoetsen branden in de momen- teel geselecteerde scènekleuren tijdens de patroonoverschakelmodus. ! Aan elke scène kunnen 16 patronen worden toegewezen. Elke Start elke procedure in de volgende secties vanaf het beginscherm. -
Page 54: Een Patroon Maken
2 Druk op de 16-stappentoetsen om triggers in te voeren. De staptoetsen die overeenkomen met de geprogrammeerde sequentie lichten op in de kleur van het muziekstuk. Een project opslaan Een project kan worden opgeslagen op een USB-apparaat. Sluit om een project op te slaan een USB-apparaat aan op het toestel. -
Page 55: Aanvullende Informatie
Instellingen aanpassen Raadpleeg voor meer informatie de handleiding van dit product, beschikbaar op de Pioneer DJ-website. Het aanraakscherm reinigen Gebruik geen organische oplosmiddelen, zuren of alkalihoudende stoffen om het oppervlak van het aanraakscherm te reinigen. Veeg het schoon met een droge zachte doek of een doek die is ondergedompeld in een neutraal reinigingsmiddel en goed is uitgewrongen. - Page 56 Si desea deshacerse de este producto, no lo mezcle con los residuos generales de su hogar. De conformidad con la legislación vigente, existe un sistema de recogida distinto para los productos electrónicos que requieren un procedimiento adecuado de tratamiento, recuperación y reciclado. Las viviendas privadas en los estados miembros de la UE, en Suiza y Noruega pueden devolver gratuitamente sus productos electrónicos usados en las instalaciones de recolección previstas o bien en las instalaciones de minoristas (si adquieren un producto similar nuevo).
- Page 57 Gracias por haber comprado este producto de Pioneer DJ. Lea este manual y el Manual de instrucciones que se puede descargar del sitio de Pioneer DJ antes de utilizar el producto. Ambos manuales contienen información que debe comprender para utilizar correcta- mente el producto.
-
Page 58: Obtención Del Manual De Instrucciones
Pioneer DJ. pioneerdj.com 2 Haga clic en [Support]. 3 Haga clic en [FIND TUTORIALS & MANUALS]. 4 Haga clic en el icono [DJS-1000] de la categoría [DJ SAMPLER]. 5 Haga clic en el idioma que desee de la página de descarga. -
Page 59: Nombres De Las Partes
Nombres de las partes Para obtener más información, consulte el Manual de instrucciones de este producto en el sitio web de Pioneer DJ. Panel superior 1 Botón PLAY/PAUSE f f Botón SAMPLING 2 Botón STOP/GATE g Pantalla táctil 3 Botón REC/UNDO h Botón BACK... -
Page 60: Panel Frontal
t Barra deslizante TEMPO x Botón SCENE/SCENE JUMP u Botón TEMPO RESET e indicador TEMPO RESET y Botón PATTERN/LENGTH/CLEAR SEQ. v Pads de actuación z Teclas de selección de barra w Botón NUDGE A Teclas de 16 pasos Panel frontal 1 Terminales PHONES 2 Control LEVEL... -
Page 61: Conexión A Los Terminales De Entrada/Salida
Conexiones Apague esta unidad y desconecte el cable de alimentación de la toma de ! Cuando se usa un cable LAN para la conexión, asegúrese de usar corriente antes de conectar componentes o cambiar las conexiones. el cable LAN incluido con este producto o un cable STP (par retor- Conecte el cable de alimentación a una toma de corriente cuando se cido blindado). -
Page 62: Ejemplo De Conexiones
Ejemplo de conexiones Cuando se utilice con dispositivos externos Cable de audio Cable MIDI Cable LAN Cable de audio Sintetizador, etc. Sistema DJ compatible con PRO DJ LINK Avisos Empareje la entrada del canal del cable de audio con el mezclador y el número de reproductor. Si el número del reproductor es diferente, cambie el ajuste [PLAYER No.] en la pantalla [UTILITY]. -
Page 63: Operación
! Al pulsar el botón [STOP] durante la reproducción, esta se detiene y vuelve al principio del patrón. Operación 2 Pulse el botón [PATTERN]. La unidad entra en el modo de cambio de patrón y el botón [PATTERN] Inicie cada procedimiento de las siguientes secciones desde la pan- se ilumina de color blanco. -
Page 64: Creación De Un Patrón
2 Pulse las teclas de 16 pasos para introducir disparadores. Las teclas de pasos correspondientes a la secuencia programada se iluminan en el color de la pista. Guardado de un proyecto Se puede guardar un proyecto en un dispositivo USB. Cuando desee guardar un proyecto, conecte un dispositivo USB a la unidad. -
Page 65: Información Adicional
Cambio de los ajustes Para obtener más información, consulte el Manual de instrucciones de este producto en el sitio web de Pioneer DJ. Limpieza de la pantalla táctil No utilice disolventes, ácidos o álcalis orgánicos para limpiar la superficie de la pantalla táctil. - Page 66 Se quiser eliminar este produto, não o misture com resíduos domésticos gerais. Existe um sistema de recolha separado para produtos eletrónicos usados de acordo com a legislação que requer tratamento, recuperação e reciclagem adequados. Os consumidores dos Estados-membros da UE, da Suíça e da Noruega podem entregar equipamentos eletrónicos fora de uso em determinadas instalações de recolha ou a um retalhista (se adquirirem um equipamento novo similar).
- Page 67 Obrigado por adquirir este produto da Pioneer DJ. Antes de utilizar o produto, leia este guia de início rápido e o Manual de instruções disponível no site da Pioneer DJ. Ambos contêm informações importantes que deve compreender bem para poder utilizar correta- mente o produto.
-
Page 68: Antes De Começar
1 Inicie um browser web num computador e aceda ao site da Pioneer DJ indicado abaixo. pioneerdj.com 2 Clique em [Support]. 3 Clique em [FIND TUTORIALS & MANUALS]. 4 Clique no ícone [DJS-1000] na categoria [DJ SAMPLER]. 5 Clique no idioma desejado na página de transferência. Acessórios ! Cabo de alimentação... -
Page 69: Nome Das Peças
Nome das peças Para obter informações mais detalhadas, consulte o Manual de instruções deste produto disponível no site Web da Pioneer DJ. Painel superior 1 Botão PLAY/PAUSE f f Botão SAMPLING 2 Botão STOP/GATE g Ecrã tátil 3 Botão REC/UNDO h Botão BACK... -
Page 70: Painel Frontal
t Deslizador TEMPO x Botão SCENE/SCENE JUMP u Botão TEMPO RESET e indicador TEMPO RESET y Botão PATTERN/LENGTH/CLEAR SEQ. v Painel tátil de atuações z Teclas de seleção de barras w Botão NUDGE A Teclas de 16-passos Painel frontal 1 Terminais PHONES 2 Controlo LEVEL... -
Page 71: Ligar Aos Terminais De Entrada/Saída
Ligações Antes de ligar componentes ou alterar as ligações, desligue a unidade e ! Quando utilizar um cabo LAN para efetuar a ligação, certifique-se retire a ficha do cabo de alimentação da tomada de corrente. de que utiliza o cabo LAN incluído com este produto ou um cabo Uma vez concluídas todas as ligações, ligue o cabo de alimentação a STP (par trançado blindado). -
Page 72: Exemplo De Ligações
Exemplo de ligações Quando utilizar com dispositivos externos Cabo de áudio Cabo MIDI Cabo LAN Cabo de áudio Sintetizador , etc. Sistema de DJ compatível com PRO DJ LINK Cuidados Faça corresponder a entrada do canal do cabo de áudio ao misturador e ao número do leitor. Se o número do leitor for diferente, altere a definição [PLAYER No.] no ecrã... -
Page 73: Reproduzir Um Projeto De Demonstração
2 Prima o botão [PATTERN]. A unidade entra no modo de alternância dos padrões e o botão Funcionamento [PATTERN] acende-se a branco. As teclas de 16 passos permanecem acesas com as cores da cena que está selecionada durante o modo de alternância dos padrões. -
Page 74: Criar Um Padrão
2 Prima as teclas de 16-passos para introduzir acionadores. As teclas dos passos correspondentes à sequência programada acen- dem à cor da faixa. Gravar um projeto É possível gravar um projeto num dispositivo USB. Ligue um dispositivo USB à unidade quando pretender gravar um projeto. 1 Prima o botão [PROJECT]. - Page 75 ! Se existir algo de errado com esta unidade, verifique os problemas descritos na secção “Resolução de problemas” do Manual de instruções da unidade e aceda também ao site de suporte da Pioneer DJ para consultar as [FAQ] do modelo [DJS-1000] pioneerdj.com/support/...
- Page 76 Е а а а а а . С а а а а а а а а а а а а Чac а а - а ЕС, Ш а Н а а а а а В а а , а а а...
- Page 77 Содержание Как следует читать данное руководство Благодарим вас за покупку данного изделия Pioneer DJ. Перед эксплуатацией данного аппарата прочтите это руководство и Инструкции по эксплуатации, которые можно найти на сайте Pioneer DJ. В них содержится важная информация, необходимая для правильной эксплуатации аппарата.
-
Page 78: До Начала
1 Запустите веб-браузер на компьютере и зайдите на следующий сайт Pioneer DJ. pioneerdj.com 2 Нажмите [Support]. 3 Нажмите [FIND TUTORIALS & MANUALS]. 4 Нажмите значок [DJS-1000] в категории [DJ SAMPLER]. 5 Выберите нужный язык на странице загрузки. Принадлежности ! Силовой кабель... -
Page 79: Названия Частей
Названия частей Для получения подробных сведений см. инструкцию по эксплуатации этого устройства, доступную на сайте Pioneer DJ. Верхняя панель 1 Кнопка PLAY/PAUSE f f Кнопка SAMPLING 2 Кнопка STOP/GATE g Сенсорный дисплей 3 Кнопка REC/UNDO h Кнопка BACK 4 Кнопка SHIFT i Кнопка... -
Page 80: Фронтальная Панель
s Кнопка TEMPO RANGE x Кнопка SCENE/SCENE JUMP t Ползунок TEMPO y Кнопка PATTERN/LENGTH/CLEAR SEQ. u Кнопка TEMPO RESET и индикатор TEMPO RESET z Клавиши выбора шкалы v Площадки для исполнения A Клавиши 16-шагового секвенсора w Кнопка NUDGE Фронтальная панель 1 Терминалы... -
Page 81: Подключение Ко Входным/Выходным Терминалам
Подключения Перед подключением компонентов и изменением подключения ! Если для подключения используется LAN кабель, то следует выключите данный аппарат и отключите силовой кабель от использовать поставляемый с данным изделием LAN кабель розетки. или STP (экранированная витая пара) кабель. По завершении всех подключений между устройствами включите ! Не... -
Page 82: Примеры Подключений
Примеры подключений При использовании внешних устройств А а Ка MIDI А а LAN а С а а PRO DJ LINK Предостережения Сопоставьте канал подключенного к микшеру аудиокабеля с номером проигрывателя. Если номер проигрывателя отличается, переключите настройку [PLAYER No.] на экране [UTILITY]. = Инструкции... -
Page 83: Воспроизведение Демо-Проекта
2 Нажмите кнопку [PATTERN]. Управление Аппарат перейдет в режим переключения шаблона, а кнопка [PATTERN] будет подсвечена белым. В режиме переключения шаблонов клавиши 16-шагового секвенсора будут подсвечиваться цветами текущей выбранной сцены. Запустите каждую процедуру в следующих разделах на главном ! Одна сцена может содержать 16 шаблонов. Для каждой экране. -
Page 84: Создание Шаблона
2 Нажимайте клавиши 16-шагового секвенсора, чтобы ввести триггеры. Клавиши шаблонов, соответствующие запрограммированной последовательности, будут подсвечиваться цветом дорожки. Сохранение проекта Проект можно сохранить на USB-устройство. Подключите USB- носитель к устройству перед сохранением проекта. 1 Нажмите кнопку [PROJECT]. Отобразится экран ПРОЕКТА. С помощью экрана ПРОЕКТА можно выполнять... -
Page 85: Дополнительная Информация
! Если аппарат не работает должным образом, ознакомьтесь со сведениями, указанными в разделе «Возможные неисправности и спо- собы их устранения» в инструкциях по эксплуатации данного устройства. Также можно посетить сайт поддержки Pioneer DJ и выпол- нить поиск по ключевому слову [DJS-1000] в разделе [FAQ] pioneerdj.com/support/... - Page 87 П а К а Па Д а а а а а а а Р а А а П а а Д а ( а . .): 5 D3-7-10-6b_B1_Ru Да а а а. С Да а а P1 - Г Г 2011 2012 2013...
- Page 88 © 2017 Pioneer DJ Corporation. All rights reserved. © 2017 Pioneer DJ Corporation. Tous droits de reproduction et de traduction réservés. PIONEER ELECTRONICS (THAILAND) CO., LTD. 17th Fl., KPN Tower, 719 Rama 9 Road, Bangkapi, Huaykwang, Bangkok 10310 6F, Yokohama i-Mark Place, 4-4-5 Minatomirai, Nishi-ku, Yokohama, Kanagawa 220-0012 JAPAN TEL: +66-2-717-0777 PIONEER TECHNOLOGY (MALAYSIA) SDN.
Need help?
Do you have a question about the DJS-1000 and is the answer not in the manual?
Questions and answers