Advertisement
Quick Links
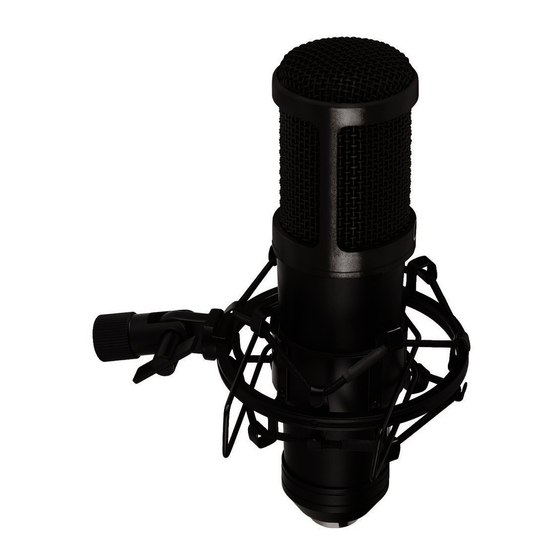
ECM-140
Best.-Nr. 23.4350
D
A
CH
Großmembran-
Elektret-Mikrofon
Bitte lesen Sie diese Anleitung vor dem Betrieb
gründlich durch und heben Sie sie für ein späteres
Nachlesen auf.
1 Einsatzmöglichkeiten
Das Mikrofon ECM-140 mit extrem dünner, goldbe-
schichteter 25,4-mm-Membran (1") ist für profes-
sionelle Studio- und Live-Einsätze konzipiert und
eignet sich sowohl für die Schallabnahme von
Instrumenten als auch für Ge sangs- und Sprach -
anwendungen. Zum Betrieb benötigt das Mikrofon
eine Phantomspeisung von 48 V .
Zum Lieferumfang gehören ein Koffer, ein vibrati-
onsdämpfender Halter (Spinne) und ein Windschutz.
2 Wichtige Hinweise für den Gebrauch
Das Mikrofon entspricht allen relevanten Richtlinien
der EU und ist deshalb mit
gekennzeichnet.
G
Setzen Sie das Mikrofon nur im Innenbereich ein.
Schützen Sie es vor Feuchtigkeit und Hitze
(zulässiger Einsatztemperaturbereich 0 – 40 °C).
G
Verwenden Sie für die Reinigung nur ein trockenes,
weiches Tuch, niemals Chemikalien oder Wasser.
G
Wird das Mikrofon zweckentfremdet, falsch ange-
schlos sen oder nicht fachgerecht repariert, kann
kei ne Haftung für daraus resultierende Sach-
oder Personenschäden und keine Garantie für
das Mikrofon übernommen werden.
Large Diaphragm Electret
GB
Microphone
Please read these operating instructions carefully
prior to operation and keep them for later reference.
1 Applications
The microphone ECM-140 with extra thin, gold-coat -
ed 25.4 mm (1") diaphragm is designed for profes-
sional studio and live applications and is both suit-
able for the sound pick-up of musical instruments
and for vocal sound and speech applications. For
the operation the microphone requires a phantom
power of 48 V .
The microphone is supplied with a case, a vibra-
tion-dampening support (spider), and a windshield.
2 Important Notes
The microphone corresponds to all relevant direc-
tives of the EU and is therefore marked with
G
The microphone is only suitable for indoor use.
Protect it against humidity and heat (admissible
ambient temperature range 0 – 40 °C).
G
For cleaning only use a dry, soft cloth, by no
means chemicals or water.
G
No guarantee claims for the microphone and no
liability for any resulting personal damage or
material damage will be accepted if the micro-
phone is for other purposes than originally intend -
ed, if it is not correctly connected, or not repaired
in an expert way.
Œ
Richtcharakteristik bei 1 kHz
Polar pattern at 1 kHz
Soll das Mikrofon endgültig aus dem Be -
trieb genommen werden, übergeben Sie
es zur umweltfreundlichen Entsorgung
einem örtlichen Recyclingbetrieb.
3 Inbetriebnahme
1) Die Spinne auf ein Stativ mit 15,9-mm-Gewinde
(
5
/
") oder, mit Gewindeadapter, auf ein Stativ mit
8
9,5-mm-Gewinde (
Drahtbügel an der Halterung zusammendrücken
und das Mikrofon einsetzen.
2) Zum Ausrichten des Mikrofons die Feststell-
schraube an der Halterung lösen, das Mikrofon
so positionieren, dass die Seite mit dem Symbol
in Richtung der Schallquelle zeigt (die Mikro-
fonachse steht senkrecht zur Hauptschallrich-
tung) und die Schraube wieder festdrehen.
3) Das Mikrofon über ein Kabel mit XLR-Stecker
(z. B. ein Kabel der MEC-Serie von „img Stage
Line") an einen Mikrofoneingang des verwende-
ten Audiogeräts (z. B. Mischpult) anschließen.
Der Mikrofon eingang muss eine 48-V-Phantom-
speisung aufweisen. Stellt das Audiogerät keine
Phantomspeisung bereit, das Mikrofon über ein
Phantomspeisungsgerät (z. B. EMA-3 von „img
Stage Line") an das Audiogerät anschließen.
4) Bei Bedarf den Windschutz aufstecken. Der
Windschutz oder ein als Zubehör erhältlicher
Poppschutz (z. B. WS-100 von „img Stage Line")
verhindert bei Sprach- oder Gesangsanwendun-
gen nicht nur die Überbetonung von Explosivlau-
If the microphone is to be put out of oper -
ation definitively, it must be disposed of in
a local recycling plant.
3 Setting into Operation
1) Screw the spider onto a stand with 15.9 mm (
thread or, with thread adapter, onto a stand with
9.5 mm (
3
/
") thread. Press the two wire brackets
8
at the support together and insert the micro-
phone.
2) To align the microphone, release the setscrew at
the support, position the microphone so that the
side with the symbol
sound source (the microphone axis is vertically to
the main sound direction) and retighten the screw.
3) Connect the microphone via a cable with XLR
plug (e. g. a cable of the MEC series from "img
.
Stage Line") to a microphone input of the audio
unit used (e. g. mixer). The microphone input
must have a 48 V phantom power supply. If the
audio unit does not provide any phantom power,
connect the microphone via a phantom power
supply unit (e. g. EMA-3 from "img Stage Line") to
the audio unit.
4) If required, place the windshield. The windshield
or a pop protection available as an accessory
(e. g. WS-100 from "img Stage Line") does not
only prevent the overemphasis of pop noise in
case of vocal sound or speech applications but
[dB]
-20
-30
-40
-50
20
®
MONACOR INTERNATIONAL GmbH & Co. KG • Zum Falsch 36 • 28307 Bremen • Germany
©
Copyright
by MONACOR INTERNATIONAL. All rights reserved.
ten, sondern schützt das Mikrofon auch vor der
Feuchtigkeit des Atems.
5) Zur Unterdrückung tiefer Frequenzen (z. B. Tritt-
schall), das Hochpassfilter einschalten: Den Fil-
terschalter in die Position
6) Bei sehr hohen Schalldrücken (z. B. bei naher
Abnahme von Schlagzeug oder Blechbläsern)
kann zum Schutz gegen Übersteuerung nachfol-
gender Geräte eine 10-dB-Dämpfung einge-
3
/
") schrauben. Die beiden
8
schaltet werden: Den Dämpfungsschalter in die
Position „-10 dB" stellen.
4 Technische Daten
System: . . . . . . . . . . . . . Druckgradientenempfänger,
Hochpassfilter: . . . . . . . . 150 Hz, 6 dB / Oktave
Dämpfungsschalter: . . . . -10 dB
Empfindlichkeit: . . . . . . . 15 mV/ Pa bei 1 kHz
Impedanz: . . . . . . . . . . . 200 Ω
Max. Schalldruck: . . . . . . 130 dB bei 0,5 % Klirrfaktor
Signal-Rausch-Abstand: 80 dB (A-Filter)
Stromversorgung: . . . . . . Phantomspeisung 48 ±4 V
Anschluss: . . . . . . . . . . . XLR, symmetrisch
Kontaktbelegung: . . . . 1 = Schirm / Phantomspeisung -
Abmessungen, Gewicht: ∅ 50 mm × 195 mm, 470 g
Änderungen vorbehalten.
also protects the microphone against the hu -
midity of the breath.
5) To suppress low frequencies (e. g. impact
sound), switch on the high pass filter: Set the fil-
ter switch to position
6) With very high sound pressures (e. g. close pick-
up of drums or brass) a 10 dB attenuation can be
5
/
")
switched on as a protection against overload of
8
subsequent units: Set the attenuation switch to
position "-10 dB".
4 Specifications
System: . . . . . . . . . . . . . pressure gradient microphone,
is directed towards the
High-pass filter: . . . . . . . 150 Hz, 6 dB / octave
Attenuation switch: . . . . . -10 dB
Sensitivity: . . . . . . . . . . . 15 mV/ Pa at 1 kHz
Impedance: . . . . . . . . . . 200 Ω
Max. sound pressure: . . . 130 dB at 0.5 % THD
S / N ratio: . . . . . . . . . . . . 80 dB (A filter)
Power supply: . . . . . . . . . phantom power 48 ±4 V
Connection: . . . . . . . . . . XLR, balanced
contact configuration: . 1 = screen / phantom power -
Dimensions: . . . . . . . . . . ∅ 50 mm × 195 mm
Weight: . . . . . . . . . . . . . . 470 g
Subject to technical modification.
50
100
200
500
1k
stellen.
Nierencharakteristik
2 = Signal + / Phantomspeisung +
3 = Signal -/ Phantomspeisung +
.
cardioid
2 = signal + / phantom power +
3 = signal -/ phantom power +
Frequenzgang
Frequency response
2k
5k
10k
20k [Hz]
A-0614.99.03.08.2012
Advertisement

Related Manuals for IMG STAGELINE ECM-140


Summary of Contents for IMG STAGELINE ECM-140
- Page 1 10 dB attenuation can be 1) Screw the spider onto a stand with 15.9 mm ( ″) The microphone ECM-140 with extra thin, gold-coat - switched on as a protection against overload of ed 25.4 mm (1″) diaphragm is designed for profes-...
- Page 2 6) Nelle pressioni sonore molte alte (p. es. in caso 3 Messa in funzione di vicinanza di percussioni o ottoni), per evitare il Il microfono ECM-140 con la sua membrana di 1) Avvitare lo spider su uno stativo con filettatura di sovrapilotaggio degli apparecchi a valle, si può...
- Page 3 3 Puesta en funcionamiento Ponga el interruptor del filtro en posición El micrófono ECM-140 con membrana extremada- 1) Atornille el spider en un pie con rosca de mente fina recubierta de oro de 25,4 mm (1″) ha...