
Related Manuals for AETA ScoopFone HD-R

Summary of Contents for AETA ScoopFone HD-R
- Page 1 ScoopFone Getting started www.aeta-audio.com 55 000 082-F © 2015 Specifications are subject to change without notice...
-
Page 2: Front Panel & Controls
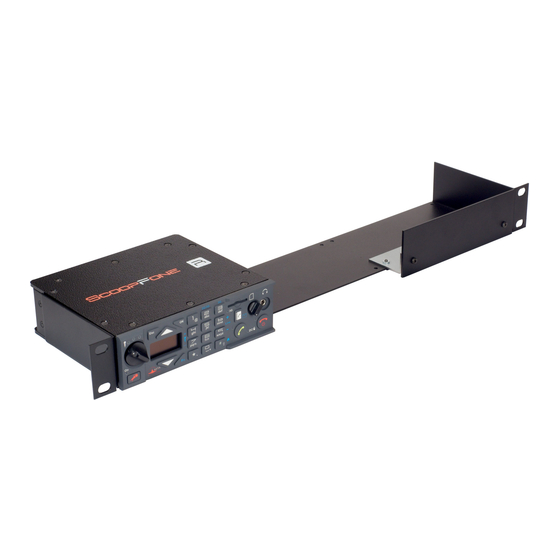
Front panel & controls 10 12 13 14 15 16 17 18 19 OLED Screen Level control: This potentiometer Navigation keys: Use the key to controls the microphone level. access the configuration menu. Use Mute indicator: The LED turns red Down keys to navigate when the microphone input is... - Page 3 Microphone gain: When 16. Call key: Use the Green phone enabled, use key to increase and to initiate a call. to decrease gain of the 17. Power indicator: The LED turns red microphone. when the battery is charging from Network auto: When is enabled, an external power supply and green use this key to select the automatic...
-
Page 4: Oled Screen
For more detailed information on each step, do not hesitate to consult the full user manual on our web site: www.aeta-audio.com The easy-to-use ScoopFone is Network level indicator: 5 levels. designed for the needs of journalists. - Page 5 SIM card SETTING IT UP To establish communication, you Powering should have a SIM card from a Before switching on the ScoopFone, telecom operator. ScoopFone you need to have an external DC power connected on the DC jack. supports standard SIM size, use a card adaptor to support micro SIM External power supply Card (Contact your dealer for more...
-
Page 6: Set A Call
SET A CALL Set a call Switching ScoopFone on /off Enter directly your phone number To switch ScoopFone on, press with the digital keypad. 2 seconds. To turn it off, press key 2s, a confirmation message will be displayed. Press to switch off or to cancel. - Page 7 Set a call with a memory Adjust your microphone/line level Press key and enter the number of requested memory from 1 to 9. Turn ON the mute LED indicator with the mute key Set the Level control (1), on middle position, white dot of the button in topmost position.
- Page 8 To restore the automatic network To get HD Voice selection, enable mode and press key 2. To get a HD Voice connection, some conditions are requested: How to turn on/off the buzzer - Both devices in the connection must support HD voice Enable mode and press key to...
- Page 9 MENU Line output level adjustment You can select maximum output level from -9dBu to 21dBu Microphone phantom power You can enable 48Volts phantom power 3 functions on Microphone/line button Flip-flop : change the input state between enabled and disabled Push to talk : Key should be keep pressed to enable the input Cough key : The key should be keep pressed to disable the input Echo cancel...
- Page 10 Audio Balance between Send and Receive Available settings: Rx only, Rx +1/3Tx, Rx+Tx Rx = Reception from the network Tx = Transmission to the network PIN save On or Off If a wrong pin is enter, PIN save option will switch to off.
- Page 11 Display brightness adjustment You have 3 levels of adjustment for the brightness : Low, Normal, High Menu for the contact version Function contact 1 or 2 Contact 1 : can be used to set a call with the memory 1on Pulse or state change Contact 2 : can be used to set a call with the memory 2, mute the microphone or force 3G only.
- Page 12 Rear side panel – Ethernet version Line OUT: 3 pins XLR balanced DC Power: XLR 4 for external Ethernet: RJ45 output. Level adjustment via Menu additional DC power 10 -16 V. 10/100Mbits/s Can also be used for connecting an AC/DC adaptor Mic/Line IN: balanced analog USB A: USB1.1 Main Antenna: SMA...
- Page 13 Rear side panel – Contact version GPIO: SubD 9pins with 2 relais, 2 contacts and power. SUBD9 GPIO : Remark Contact 1 Ex. Pin 2 : +5v / (isolated) Pin6 : Ground Contact 2 Ground Ex : Pin7 : +5v Relais 1 Dry loop Relais 2...
- Page 14 Web interface – Version ScoopFone Ethernet...
- Page 15 Import You can import a phonebook in your ScoopFone via a USB stick You should put a "book-scoopfone.txt" file in the root of the USB drive and plug it into the ScoopFone once started. The file must have the following format: Memory number: phone number 1:0141361268 2:0141361279...
- Page 16 Gain power 0/16/32/48dB Le vel on d isplay HP F Volume Limiter 50Hz Mu te Mi c/Line P4 8v Send Send Input Line Output Vo lume 3. 5mm Receive Volum e www.aeta-audio.com...
Need help?
Do you have a question about the ScoopFone HD-R and is the answer not in the manual?
Questions and answers