Table of Contents
Advertisement
Quick Links
This document will explain what's in the kit, step-by-step instructions for assembly, and some
tips and tricks to improve Signal R2's performance! For more details and resources, you can
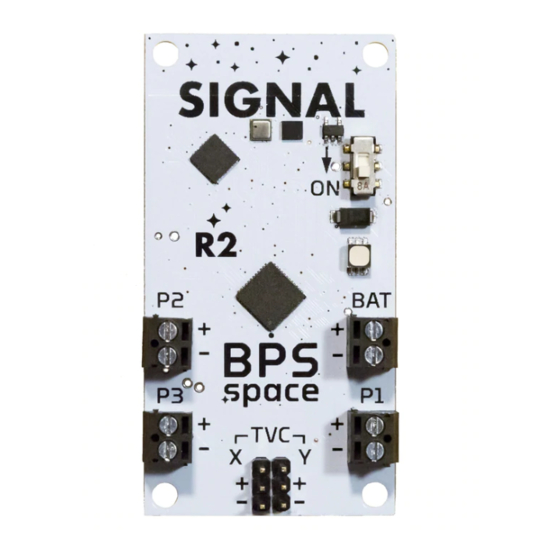
1. Signal R2 Parts
1. 29mm motor mount
2. TVC servos
3. TVC extension
cables
4. BPS stickers!
5. Signal R2 flight
computer
Copyright © 2019 Barnard Propulsion Systems, LLC
Signal R2 User Manual
Use with Signal R2, running SignalSoft
1.5.6, with R2 hardware.
visit
h ttp://bps.space/build-signal-r2
6. 9v battery
connector
7. Flight computer
mounting brackets
8. TVC inner gimbal
9. TVC outer gimbal
10. M3.5 long screws
11. M3.5 short screws
12. M2 screws
13. Linkage stoppers
14. 1.5mm hex wrench
15. TVC pushrods
Version 1.8, Jan 1, 2019
w ww.bps.space
Advertisement
Table of Contents

Subscribe to Our Youtube Channel
Related Manuals for BPS Signal R2

Summary of Contents for BPS Signal R2
- Page 1 Use with Signal R2, running SignalSoft 1.5.6, with R2 hardware. This document will explain what’s in the kit, step-by-step instructions for assembly, and some tips and tricks to improve Signal R2’s performance! For more details and resources, you can visit h ttp://bps.space/build-signal-r2 1.
-
Page 2: Pre-Assembly Notes
2. Use 4 of the M3.5 long screws to secure the flight computer in place, they should go all the way through the center beam of the mounting bracket. Copyright © 2019 Barnard Propulsion Systems, LLC Version 1.8, Jan 1, 2019 w ww.bps.space... - Page 3 4. Flight computer power To power Signal R2, you’ll need a power source of at least 7v connected to the “Bat” power terminals; 9v batteries or 11.1v Lithium Polymer batteries are ideal. 1. Attach the correct + and - leads of the battery connector to the Bat terminal block. Be careful to not reverse the polarity of the computer’s power.
- Page 4 3. Using your iPhone or Android device, go to the app store and download the “Signal - BPS.space” app. This application will talk with the Signal computer over Bluetooth! 4. With the flight computer turned on and beeping, open the Signal app and tap on “Signal R2”...
- Page 5 4. Grab one of the included servos. Count 3 holes from the attachment point of the servo horn, and insert the bent end of pushrod. Copyright © 2019 Barnard Propulsion Systems, LLC Version 1.8, Jan 1, 2019 w ww.bps.space...
- Page 6 Make sure it’s very tight, we don’t want this coming loose! Copyright © 2019 Barnard Propulsion Systems, LLC Version 1.8, Jan 1, 2019 w ww.bps.space...
- Page 7 4. Count 3 holes from the attachment point of the servo horn, and insert the other side as shown here. The servo and inner gimbal should now be attached. Copyright © 2019 Barnard Propulsion Systems, LLC Version 1.8, Jan 1, 2019 w ww.bps.space...
- Page 8 X on both ends, and the other Y. It’s worth being thorough on this, accidental reversal of the leads will result in an in-flight abort. Copyright © 2019 Barnard Propulsion Systems, LLC Version 1.8, Jan 1, 2019 w ww.bps.space...
- Page 9 2. Turn on the Signal flight computer, let it boot up into the green pad-idle mode again 3. Open up the Signal app on your iPhone or Android device, and go to System Preferences Copyright © 2019 Barnard Propulsion Systems, LLC Version 1.8, Jan 1, 2019 w ww.bps.space...
- Page 10 7. Using the drill/cut guides Signal R2 comes with drill and cut guides for the vectoring mount and flight computer. These guides will be wrapped around the airframe of your rocket to ensure you place the holes and cutouts in the correct place.
-
Page 11: Assembly Notes
● You cannot paint the flight computer - doing so will cover up the state indication LED, and may damage some of the sensors or screw terminals. Copyright © 2019 Barnard Propulsion Systems, LLC Version 1.8, Jan 1, 2019 w ww.bps.space... - Page 12 2. After startup the computer will load into “pad-idle” mode. 3. Simulate a launch by lifting your rocket straight up quickly! Keep the rocket very close to upright, simulating a successfully stabilized flight. Copyright © 2019 Barnard Propulsion Systems, LLC Version 1.8, Jan 1, 2019 w ww.bps.space...
- Page 13 Ideally 1-2 feet of tubing should be sticking out. 3. Lay the rocket down sideways, turn Signal R2 on, and open up the Signal app on your iPhone or Android device Copyright ©...
-
Page 14: Flight Tips
12. Flight tips With your tuned PID values loaded into Signal R2, you’re ready to fly! Here are a few tips to help the first flight work well. ● Because thrust vectoring keeps the rocket stable, you do not need to launch from a rail or rod. - Page 15 You’ve flown your rocket, and you got it back! Now it’s time to look at the data to see how things went. 1. Remove the Micro SD card from Signal R2 and plug it into your desktop or laptop computer 2.
-
Page 16: Troubleshooting
Troubleshooting If you experience an error or anomaly when using the Signal R2 kit, you can likely diagnose it with this table of problems and solutions. If you experience a problem not listed here, or none of the solutions work, please contact BPS at support@bps.space. - Page 17 Repeat the above steps for the individual servo. ● If everything is wired correctly, you may have a faulty or damaged servo. Please contact BPS One of the TVC servos seems to move slowly when ● You may have a faulty or damaged servo, see used in the mount.
-
Page 18: User Requirements
User Requirements The following constitute the guidelines that you agree to follow when using the Signal R2 kit. I f you do not follow these, you void any guarantees or warranties for Signal R2, and neither Joe Barnard nor BPS.space have any liability.
Need help?
Do you have a question about the Signal R2 and is the answer not in the manual?
Questions and answers