Table of Contents
Advertisement
Quick Links
Operating instructions
DIAMONDcross HG (hang gliding)
Type
DIAMONDcross 125 HG (non steerable)
DIAMONDcross 160 HG (non steerable)
DIAMONDcross 220 HG (non steerable)
Norm: Nfl II 91/09 and LTF 35/03
Pagodenburgstr. 8 | D - 81247 München | Tel.: +49 (0)89 811 65 28 | Fax: +49 (0)89 814 41 07
Mail: office@finsterwalder-charly.de | Web: http://www.finsterwalder-charly.de
Rescue systems
Finsterwalder GmbH - Charly Produkte
Certification
EP 184.2017
EP 185.2017
EP 186.2017
Effective from: Production year 2018
Last update: Nov. 2018
Revision 0
Advertisement
Table of Contents

Related Manuals for CHARLY DIAMONDcross HG Series


Summary of Contents for CHARLY DIAMONDcross HG Series
- Page 1 Norm: Nfl II 91/09 and LTF 35/03 Last update: Nov. 2018 Finsterwalder GmbH - Charly Produkte Pagodenburgstr. 8 | D - 81247 München | Tel.: +49 (0)89 811 65 28 | Fax: +49 (0)89 814 41 07 Mail: office@finsterwalder-charly.de | Web: http://www.finsterwalder-charly.de...
- Page 3 If you have any questions related to the use of this rescue system, please contact CHARLY PRODUKTE directly. If you need professional packing or repair service, please contact your local dealer or CHARLY PRODUKTE. For more information about this and other CHARLY products, please visit www.finsterwalder-charly.de.
-
Page 4: Table Of Contents
Table of contents 1. Overall illustration ....................5 2. Safety instructions ....................6 3. Technical data ......................6 4. Intended use ......................7 5. Operating limits .......................7 6. Required documents ....................7 7. Mode of operation ....................7 8. Specific characteristics of the DIAMONDcross HG rescue system ....8 8.1 Reserve parachute ......................8 8.2 Inner container .......................9 8.3 Constructive characteristics ..................12... -
Page 5: Overall Illustration
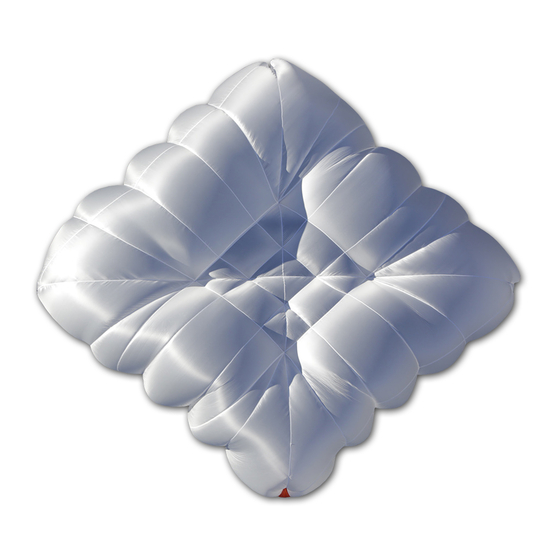
1. Overall illustration Front tip Main lines Rotor (optional) Hybrid riser Stabilo Canopy Upper center lines Bottom center lines... -
Page 6: Safety Instructions
2. Safety instructions This reserve parachute must not be used for skydiving! The Charly DIAMONDcross HG is certified according to the german and european standards Nfl II 91/09 und LTF 35/03. The use of this rescue system is at your own risk. -
Page 7: Intended Use
4. Intended use Manually deployed emergency parachute for single seat and tandem hang gliders. 5. Operating limits • Maximum operating speed: 115 km/h (32 m/s) • Packing interval: 12 months; subsequently, re-packing is required and must be documented in the packing and inspection record. •... -
Page 8: Specific Characteristics Of The Diamondcross Hg Rescue System
and the risk of the lines becoming tangled with the glider, the pilot or another object or person (e.g. in the case of a crash with another pilot) is minimised. Moreover, the inner container must gain enough speed after release to provide for a fast opening of the emergency parachute. -
Page 9: Inner Container
The DIAMONDcross HG features a special hybrid riser, to attach the reserve parachute without an additional belt to the main attachment pont of the hang glider. This hybrid riser has a high strength dyneema core that is covered with a heat- and scratch resistant aramid (kevlar) shield. - Page 10 However, it must be noted that problems associated with deployment are also significantly influenced by harness design. No dangerous gaps on the surface of the closed container The container of the DIAMONDcross has been designed in such a way that the line bundles cannot get outside the closed container.
- Page 11 DC inner container and to let the release handle be attached to it by an authorised specialist if necessary. Should sewing be required, you can contact CHARLY for assistance. We are offering this extra service as the interfaces of the different components are not standardized in paragliding. A careful...
-
Page 12: Constructive Characteristics
WARNING (according EN certification rules) Use of this parachute with any alternative inner container: the speed of opening and opening shock test has been completed using the inner container supplied. Use of any other inner container may produce different results (including failure) 8.3 Constructive characteristics Diagonal suspension and flight direction The diagonal „diamond-configuration”... -
Page 13: Flight Behaviour
Optional installation of the Charly Rotor We recommend the optional installation of the Charly Rotor Art No. HFa160. The rotor can be installed without additional sewing between the riser and the main lines. For installation contact CHARLY PRODUKTE. 8.4 Flight behaviour... -
Page 14: Maintenance, Cleaning
Therefore, never wait too long to deploy your rescue system in a problematic situation during flight. 9. Maintenance, Cleaning The DIAMONDcross rescue sytem by CHARLY has been designed for heavy-duty use and to withstand extreme conditions. Accordingly, we have selected only... -
Page 15: Storage
especially durable high strength quality materials. However, durability strongly depends on the care and maintenance by the pilot. Soiled canopies and containers can be cleaned using clear tap water. Attention: Acid marks or mould spots might affect the strength of the parachute. Rescue parachutes that are soiled in that way must be sent to the manufacturer for a check-over and possibly a repair. -
Page 16: What To Do When Damage Is Detected
12. What to do when damage is detected When damage is detected during inspection, the rescue system must be sent in to CHARLY PRODUKTE for repair. This also applies to damages whose effects on airworhiness cannot be unambiguously determined. In either case, the manufacturer must be involved in the repair process! 13. -
Page 17: Checkup And Packing Preparations
We recommend to regularly check the rescue system for signs of wear and to let CHARLY or an authorised service centre repair it if necessary before the next use. 14. Checkup and packing preparations Before packing, hang up the canopy so that it does not touch the ground for at least 6 hours in a well-ventilated room without direct UV exposure. -
Page 18: Packing
Packing the DIAMONDcross is described in detail starting on page 22. Make sure to read the most recent valid version of the instructions. It is available for download in multiple languages on Finsterwalder & Charly’s website. 16. Installation on the harness Volume and shape of the outer container should thereby be similar to the inner container. -
Page 19: Compatibility Test
• When placing the rescue system inside the harness container, it is absolutely necessary to make sure the connection between release handle and safety splint is shorter than the connection between release handle and inner container. Install the release handle at the intended position in such a way that the •... -
Page 20: Transport
19. Transport Take care that the rescue system is not exposed to extreme heat during transport (e.g., in the boot of a car in the summer). Also, it should always be handled with care (keep it clean, do not put any sharp or heavy items onto it, etc.). When packing it into the paraglider pack sack, be careful not to damage the rescue system with buckles or other items and to not accidentally open the release handle. -
Page 21: Environmentally Responsible Disposal
23. Environmentally responsible disposal Please ensure environmentally sound disposal at the end of the operating period. If you return the product to CHARLY PRODUKTE, we will be glad to provide for proper disposal. 24. Environment and nature-friendly behaviour Finally, please enjoy our amazing sport in such a way that nature and environment... -
Page 22: Packing Instruction
All measures must be confirmed in the packing- and check confirmation. If you have any doubts, check our packing video at our website finsterwalder-charly.de or contact the manufacturer or an authorized service center. Required material: Packing instruction (installation, packing service), always the latest revision! - Page 23 Connect parachute to main carabiner > Route riser and connect with velcro along the main connection to the harness. > Check main lines > Check lines, begin at the side of the harness and continue in the direction of the canopy. >...
- Page 24 2.1. > Continue and separate the centerlines according to the picture. > 2.2. > Continue to the canopy and check that all centerlines are between the two front and two rear fork lines. CAUTION: If the center lines are not between, there is a line over and the canopy is inside out! >...
- Page 25 Presort canopy > Pull back the material of the canopy around the contour of the parachute, so that the main-, center-, and brake- lines are pre tensioned. This makes folding of the canopy easier. > 3.1. > Presorted canopy after line check with red tip to the bottom. >...
- Page 26 Position canopy for packing > Bundle the lines with a packing rope and fold the right side of the canopy over the left side, so that the red marking of the front tip, that shows the flight direction, faces you. >...
- Page 27 Fold the canopy > Start with panel 01. The number is located on the panels close to the line attachment points. Always apply tension with the right hand on the already folded panels, when you take the next one! > 6.1.
- Page 28 6.2. > On the side tips, the stabilo triangles are located. No special fold is required for this part. Continue until the rear gap appears (Panel 8 – DC 125, Panel 10 – DC 160, Panel 12 – DC220). > 6.3.
- Page 29 6.4. > Align the center- lines in the middle of the canopy. 5 lines - DC 125, 8 lines - DC 160, 9 lines - DC220. Pull slightly, to tension all center lines and move the material of the canopy in the center up as far as you can reach inside for better folding in the next steps.
- Page 30 > Fold back half of the panels to the other side and remove the marking. > > Pull up the rear tip approx. 30 cm and fold it to the left side (see picture in the next step 6.8). >...
- Page 31 > > > Fold panels two times at approx.1/3 of depth in direction of the center (no S-folding!!). You may use packing clamps or weights. >...
- Page 32 6.10 > Fold the rear tip, that was on the left side over the right side and wind up the left hand panels to the inside in the same way. “Left” (top in the picture) and “Right” (down in the picture) always in flight direction! >...
- Page 33 6.12 > When you throw your DIAMONDcross, the rear tip catches air first with this packing method. It provides you with immediate opening without time lag, but it is still smooth without high shock load to the material! > Disconnect the rope from the packing loop >...
- Page 34 Put canopy into the container > Wind-up approx. 10 - 15 cm of the top of the canopy and put it into the bottom of the inside container. > > Continue with vertical small S-folds until the canopy is inside the container.
- Page 35 Close the container > Take the rubber loop and both leaves of the container and close it with the bundle of lines. > Remove packing rope > Caution: If the packing rope is not removed, the parachute cannot open. This can cause malfunction, injuries or death! >...
- Page 36 Bundle the lines > Position the lines according the picture and bundle the lines with three loops on each side of the bundle. Split line bundle and prepare lines and bundles to close the inside container. > Close the container >...
- Page 37 Prepare container for installation in the harness > Twist container 180 degrees and move the container position to the harness. Install handle and bundle the riser according to the picture. > 14. Close outside container > Close the outside container according to the manual of the harness manufacturer.
- Page 38 The original DIAMONDcross ® container gives you the highest safety level of the system in different cases of emergency!! For further information, and how to modify your container with the handle of the harness, contact Finsterwalder GmbH or your Charly dealer. >...
- Page 40 Finsterwalder GmbH - Charly Produkte Pagodenburgstr. 8 | D - 81247 München | Phone: +49 (0)89 811 65 28 | Fax: +49 (0)89 814 41 07 Mail: office@finsterwalder-charly.de | Web: http://www.finsterwalder-charly.de...
Need help?
Do you have a question about the DIAMONDcross HG Series and is the answer not in the manual?
Questions and answers