
Related Manuals for Kaliber Gaming KeyMander 2 3Play

Summary of Contents for Kaliber Gaming KeyMander 2 3Play
- Page 1 KeyMander™ 2 3Play Keyboard/Mouse Sharing Switch for PC & Game Consoles User Manual www.kalibergaming.com www.iogear.com...
- Page 2 PS/Xbox game controller with your KeyMander 2 3Play. Chapter 4, Using the K2 App, explains how to use the KeyMander 2 App with your KeyMander 2 3Play, as well as how to create and edit game profiles. Chapter 5, Firmware Upgrade, explains how to download the firmware upgrade utility and install updates on the KeyMander 2 3Play.
- Page 3 * Features may have been added to the KeyMander 2 3Play since this manual was published. Please visit our website to download the most up-to-date...
-
Page 4: Table Of Contents
Table of Contents Table of Contents ................ 4 Chapter 1 ..................8 Introduction ................8 Overview .....................8 Features .......................9 Requirements ....................10 Game Console / Controller ..............10 PC / Keyboard and Mouse ..............10 Audio Support ..................10 Operating Systems ................11 Components ....................11 GES1337 Front View................11 GES1337 Top View ................12 GE1337P2 Side View ................13... - Page 5 Chapter 1. Introduction Controller to Keyboard Button Layout ..........33 Controller Crossover Function ..............35 Reset Function ...................35 Chapter 4 ................... 36 Using the K2 App ............... 36 Overview ....................36 Installing the K2 App ................36 Opening the K2 App ................37 Signing Up an Account ................37 Connecting the K2 App .................40 Device Tab ....................43 Device Settings ..................44...
- Page 6 GES1337 KeyMander 2 3Play User Manual Uploading a Profile ................73 Customizing Controls for a Profile ............74 Sensitivity ....................75 General Mode ..................76 General Mode Advanced Settings ............77 Aim Mode (Aim-Down-Sight) ..............89 Walk Mode ....................91 Weapon Mode ..................92 Mapping ....................93 Turbo ...................... 100 Macro .....................
- Page 7 Chapter 1. Introduction Appendix ................. 116 Mouse Performance ............... 116 Understanding Mouse Performance ............116 Sensitivity Settings ................116 Maximum Turn Speed (In-Game) ............117 Turn Speed Settings (K2 App) ............119 Deadzone Settings (K2 App and In-Game) ......... 119 Resolution (Mouse Hardware/Software and K2 App)......
-
Page 8: Chapter 1
Strategy (RTS) games, then use the hotkey to instantly switch keyboard and mouse focus to your PC. The KeyMander 2 3Play has an easy to use app that allows you to customize all game controller buttons for use on a keyboard and mouse. -
Page 9: Features
Hot Swap between the PS3/PS4/Xbox One/Xbox 360/Nintendo Switch controller and keyboard/mouse instantly Supports Controller Crossover Function - interchanges different factory-supplied controllers between game consoles Note: The KeyMander 2 3Play does not support use with PS1, PS2, or the original Xbox consoles. -
Page 10: Requirements
GES1337 KeyMander 2 3Play User Manual Requirements Game Console / Controller 1 or more PS3, PS4, Xbox 360, Xbox One, or Nintendo Switch Console 1 Wired Game Controller Controller Requirements for KeyMander 2 3Play Original Xbox One wireless controller connected via included micro USB... -
Page 11: Operating Systems
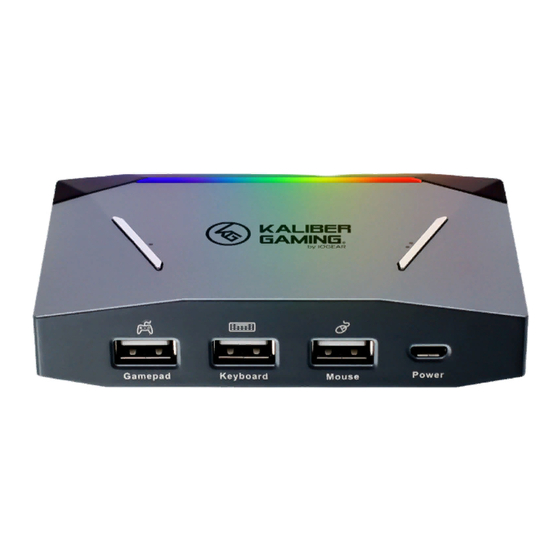
Plug a USB mouse into this port. This micro USB port provides optional power to the unit. KeyMander 2 3Play will function without additional power, however some RGB keyboards such as those with built-in USB hubs, etc. may require additional power. -
Page 12: Ges1337 Top View
GES1337 Top View Component Description Press the button to pair up your mobile device with the KeyMander 2 3Play app. This button is also used in conjunction with the Mode Button to enter the Firmware Bluetooth Pairing Upgrade Mode, and hardware reset. -
Page 13: Ge1337P2 Side View
Chapter 1. Introduction GE1337P2 Side View Component Description The USB Type-A Connection Port 1 (PC or Console) is USB Type-A used to connect the GES1337 to a PC or game console. Connection Port 1 This port also provides power to the unit when connected (PC or Console) to a PC or game console. -
Page 14: Chapter 2
PC Setup To connect the KeyMander 2 3Play to PC, follow the steps below. 1. Download and install KeyMander 2 App and create a user account to manage your game profiles. For more information, see Using the K2 App. - Page 15 3Play can provide, so an external USB power supply (minimum 2 amps) is required. 8. Turn on the PC, wait for it to boot and recognize the KeyMander 2 3Play is connected. The KeyMander 2 3Play’s LED will be glowing white.
- Page 16 GES1337 KeyMander 2 3Play User Manual your mobile device (Image 1). Next, select GES1337P under DEVICES (Image 2). When the Device Tab shows the current profile and device settings it is ready to configure the port connections (Image 3). Image 1...
-
Page 17: Xbox One / Xbox 360 Setup
Image 7 Image 8 Xbox One / Xbox 360 Setup To connect the KeyMander 2 3Play to Xbox One/Xbox 360, follow the steps below. 14. Download and install KeyMander 2 App and create a user account to manage your game profiles. For more information, see Using the K2 App. - Page 18 USB to Port 3, connect the USB end as explained in Step 5. 21. Connect the KeyMander 2 3Play to a 5V/2A DC power supply if necessary. If your KeyMander 2 LED is flashing red or you receive a low voltage notification on the K2 App, you need to connect an additional 5V/2A USB power supply (not included).
-
Page 19: On The Device Tab Of The K2 App Press The Port Config Button (Image 4)
Chapter 2. Setup (Image 2). When the Device Tab shows the current profile and device settings it is ready to configure the port connections (Image 3). Image 1 Image 3 Image 2 24. On the Device tab of the K2 App press the Port Config button (Image 4). Select Port 1, 2 or 3 (Image 5) and choose your device from the selection wheel (Image 6). -
Page 20: Image 4
GES1337 KeyMander 2 3Play User Manual Image 4 Image 5 Image 6 25. After completing the Port Configuration, press the Xbox icon on the Device tab to switch operating modes to the Xbox. 26. The default Mouse DPI setting in the K2 App is 4000 and you need to set the mouse to match or choose an alternate setting. - Page 21 Chapter 2. Setup Image 7 Image 8 27. Open the Game Center tab on the K2 App and use the search function to find your game (Image 9). Select the Xbox One version by tapping on the game’s cover art image. The required in-game settings are shown above the download button (Image 10).
-
Page 22: Ps4 / Ps3 Setup
PS4 / PS3 Setup To connect the KeyMander 2 3Play to PS4/PS3, follow the steps below. 1. Download and install KeyMander 2 App and create a user account to manage your game profiles. For more information, see Using the K2 App. - Page 23 USB cable (not supplied). After connecting the micro USB to Port 3, connect the USB end as explained in Step 5. 8. Connect the KeyMander 2 3Play to a 5V/2A DC power supply if necessary. If your KeyMander 2 LED is flashing red or you receive a low voltage notification on the K2 App, you need to connect an additional 5V/2A USB power supply (not included).
- Page 24 GES1337 KeyMander 2 3Play User Manual Image 1 Image Image 2 11. On the Device tab of the K2 App press the Port Config button (Image 4). Select Port 1, 2 or 3 (Image 5) and choose your device from the selection wheel (Image 6).
- Page 25 Chapter 2. Setup 12. After completing the Port Configuration, press the PS4 or PS3 icon on the Device tab to switch operating modes to the PS4 or PS3. 13. The default Mouse DPI setting in the K2 App is 4000 and you need to set the mouse to match or choose an alternate setting.
- Page 26 GES1337 KeyMander 2 3Play User Manual Image 9 Image 10 Image 15. Once you have the profile loaded, open the settings menu inside the game and make the changes shown on the profile in Game Center (Image 10). NOTE: if using the default PS4 or PS3 profile you need to change the game’s aim and look settings to maximum, then adjust mouse sensitivity...
-
Page 27: Nintendo Switch Setup
Chapter 2. Setup Nintendo Switch Setup To connect the KeyMander 2 3Play to a Nintendo Switch, follow the steps below. 1. Download and install KeyMander 2 App and create a user account to manage your game profiles. For more information, see Using the K2 App. - Page 28 Nintendo Switch or it will not function with the KeyMander 2 3Play 10. Press the Bluetooth Pairing Button to put KeyMander 2 3Play into pairing mode, then press the Connect button on the Device tab of the K2 App on your mobile device (Image 1).
- Page 29 Chapter 2. Setup Image 4 Image 5 Image 12. After completing the Port Configuration, press the Nintendo Switch icon on the Device tab to switch operating modes to the Nintendo Switch. 13. The default Mouse DPI setting in the K2 App is 4000 and you need to set the mouse to match or choose an alternate setting.
- Page 30 GES1337 KeyMander 2 3Play User Manual Image 7 Image 8 14. Open the Game Center tab on the K2 App and use the search function to find your game (Image 9). Select the Nintendo Switch version by tapping on the game’s cover art image. The required in-game settings are shown above the download button (Image 10).
- Page 31 Chapter 2. Setup Image 9 Image 10 Image 15. Once you have the profile loaded, open the settings menu inside the game and make the changes shown on the profile in Game Center (Image 10). NOTE: if using the default Nintendo Switch profile you need to change the game’s aim and look settings to maximum, then adjust mouse sensitivity and key bindings as desired.
- Page 32 GES1337 KeyMander 2 3Play User Manual 17. After changing the Auto-Sleep setting, scroll down the System Settings menu and select Controllers and Sensors. Change the Pro Controller Wired Communication mode to On as shown in the following image:...
-
Page 33: Chapter 3
Chapter 3 Basic Operation Overview This chapter explains how to use a keyboard and mouse for gameplay and how to configure basic modes from the keyboard and controller. For information on mapping, profiles and advanced settings, see Using the K2 App. - Page 34 Hotkey Function Description Brings the KeyMander 2 3Play focus to the USB [Alt] + [F1] Port 1 Mode Typ-A Connection Port 1 (PC or Console). Brings the KeyMander 2 3Play focus to the USB...
-
Page 35: Controller Crossover Function
Chapter 3. Basic Operation Controller Crossover Function The KeyMander 2 3Play supports controller crossover function to interchange factory-supplied controllers between game systems. You can share original Xbox One, PS4 or Nintendo Switch controllers between all three game systems. To connect and use a controller from a different console system, follow the steps below. -
Page 36: Chapter 4
Chapter 4 Using the K2 App Overview The K2 App allows you to configure the keyboard and mouse settings for game console use. This chapter explains how to use the app in four sections: Installing & Opening Signing Up ... -
Page 37: Opening The K2 App
Chapter 4. Using the K2 App Opening the K2 App To connect the KeyMander 2 3Play with your mobile devices: 1. Connect the KeyMander 2 3Play to a game console. 2. Open the K2 app. A welcome page appears, slide the screen and click Start Playing. - Page 38 GES1337 KeyMander 2 3Play User Manual 2. Fill in the required fields, check the I agree to the Term of Service, and click Next. 3. Follow the instructions to verify your email.
- Page 39 Chapter 4. Using the K2 App 4. Click Start Playing when the email verification is complete. 5. The K2 app opens as shown.
-
Page 40: Connecting The K2 App
GES1337 KeyMander 2 3Play User Manual Connecting the K2 App 1. To connect the K2 App with your mobile device. Tab Device. 2. Tab Connect from the device page. - Page 41 Chapter 4. Using the K2 App 3. Press the Bluetooth Pair Pushbutton and tap on the device name. Wait for the device to connect. 4. Do not operate the K2 App while syncing.
- Page 42 Library to add the profile or tap Ignore, start playing to continue. 6. Now your mobile device is connected. Tab Disconnect to disconnect your mobile device from the K2 App. Closing the K2 App or powering off the KeyMander 2 3Play will disconnect it from the K2 App.
-
Page 43: Device Tab
Chapter 4. Using the K2 App Device Tab This section allows you to quickly enable or disable microphone, turbo mode, macro mode, and gamepad vibration. Adjust the aim/look and mouse sensitivity for your game play, and also to perform a firmware upgrade, or reset the device. -
Page 44: Device Settings
This allows you to match the K2 App sensitivity to the Mouse DPI programmed DPI setting of the mouse for proper operation. Disconnect To disconnect your mobile device from the KeyMander 2 3Play, tap Disconnect Device. Device Device Settings to view the current app and firmware version, perform a firmware... - Page 45 Chapter 4. Using the K2 App Name Description App Version Shows the current app version. Firmware Shows the current firmware version. Version Firmware To update the firmware through your mobile device, tap Firmware Updates. See Firmware Upgrade. Updates To reset the device, tap Reset Device. For proper steps, see Reset Device Reset Device.
-
Page 46: Firmware Upgrade
GES1337 KeyMander 2 3Play User Manual Firmware Upgrade To perform a firmware upgrade, follow the steps below. 1. Tab Update beside from the Device section. If your firmware version is up to date, it will not show. Note: The Firmware Updates will only work when there is a newer ver- sion firmware available for upgrade, or your firmware version is earlier than the most recent one. - Page 47 Chapter 4. Using the K2 App 2. Click Update.
- Page 48 GES1337 KeyMander 2 3Play User Manual 3. A warning message appears, click Update again. 4. Now the KeyMander 2 is upgrading. The unit will reboot and reconnect itself after the firmware upgrade is complete.
-
Page 49: Reset Device
Chapter 4. Using the K2 App Reset Device To perform a reset using the K2 app, go to the Device tab and tap the settings icon in the upper right hand corner of the screen. On the Device Settings screen tap Reset Device and a warning message appears. Tap Reset Now to perform the factory reset. -
Page 50: Port Configuration
GES1337 KeyMander 2 3Play User Manual Port Configuration On the Device tab of the K2 App press the Port Config button (Image 1). Select Port 1, 2 or 3 (Image 2) and choose your device from the selection wheel (Image 3). Select the devices connected to the other ports and press Done to exit. -
Page 51: Changing Game Profile
Chapter 4. Using the K2 App Changing Game Profile to search for a game profile in your library and tap upload and replace your current game profile. -
Page 52: Editing Game Profile
GES1337 KeyMander 2 3Play User Manual Editing Game Profile Tab Edit to edit your current game profile. For more information, see... - Page 53 Chapter 4. Using the K2 App Customizing Controls for a Profile.
-
Page 54: Game Center Tab
GES1337 KeyMander 2 3Play User Manual Game Center Tab The Game Center tab allows you to browse and download available games for a selected game console. - Page 55 Chapter 4. Using the K2 App Name Description to search the available game you wish to download by entering the game name. to view a list of available games for the selected game console between Xbox 360 / Xbox One / PS4 / PS3 / Nintendo Switch.
-
Page 56: Library Tab
GES1337 KeyMander 2 3Play User Manual Library Tab A profile is a keyboard/mouse configuration that is created and saved for a particular game console. You must sync a profile before start playing. Default profiles are created in advanced, you can modify or delete them, or create your own. -
Page 57: Account
Chapter 4. Using the K2 App Allows you to view and modify your account information such as username and password. Backing up, and Account restoring your profiles and updates to prevent system crash. For more information, see Account. Tab to create a game profile. For more information, see + Add Game Profile Downloading a Profile from Game Center. - Page 58 GES1337 KeyMander 2 3Play User Manual Name Description Tab to sign out from the K2 App. You are required to sign in Sign Out again to access all the features. Tab to modify the username that is going to be displayed on Username the forum post.
-
Page 59: Changing Username
Chapter 4. Using the K2 App Change Tab to modify the login password for the K2 App. To modify Password the password, see Changing Password. Last Update Shows when the last update took place. Backup My Tap to backup your profiles in the K2 App. See Backing Up Profiles and Restoring Game Profiles. -
Page 60: Changing Password
GES1337 KeyMander 2 3Play User Manual Changing Password To change the password, tap Change Password from the account page. Enter the password twice and tap Reset. -
Page 61: Backing Up And Restoring Game Profiles
Chapter 4. Using the K2 App Backing Up and Restoring Game Profiles The K2 App has built-in access to cloud based storage for all your game profiles, and allows you to backup and restore your profiles as needed. To Backup your game profiles: 1. - Page 62 GES1337 KeyMander 2 3Play User Manual 3. Press the Backup My Profiles icon. Note: The Backup function takes a “snapshot” of all profiles on your de- vice and backs up those profiles, while also deleting anything from your previous backup that is not currently shown in your device li- brary.
- Page 63 Chapter 4. Using the K2 App To Restore your game profiles: 1. Press the Library tab at the bottom of the K2 App screen. 2. Press your account icon in the upper left hand corner of the app screen.
-
Page 64: Downloading A Profile From Game Center
GES1337 KeyMander 2 3Play User Manual 4. Press the Restore My Last Update icon. Note: The Restore function adds any profiles missing from your device since your last Backup, and overwrites any current profiles on your device with the version from your last Backup. If you added new profiles since your last Restore, they will be unaffected. - Page 65 Chapter 4. Using the K2 App Image 1 Image 2 Image 3 2. Select the profile you want by tapping on the game’s cover art image. The required in-game settings are shown above the download button (Image 4). You will need to enter them into the game settings menu before beginning game play.
- Page 66 GES1337 KeyMander 2 3Play User Manual Image 4 3. Press the download button to save the profile into your library. 4. Open the Library tab and scroll to the profile you downloaded, then press the up arrow to load the profile (Image 5). If there is no profile available for your game, select the default profile for your console (Image 6).
-
Page 67: Adding A Game Profile
Chapter 4. Using the K2 App Adding a Game Profile If there is no profile available for your game in Game Center you can create your own profile or enter a sharing code. To create a game profile: 1. Tap Add Game Profile (Image 1) and select Create New (Image 2). If Enter Sharing Code is selected, you can enter the sharing code to add a game profile. - Page 68 GES1337 KeyMander 2 3Play User Manual 2. Enter a profile name (Image 4) and select a game console type (Image 5). Image 3 Image 4 3. If you want to add a profile image, press the image edit button (Image 5) then accept permission to access your photos (Image 6).
- Page 69 4. Select a photo and press Save (Image 7). Image 7 To add a profile using a sharing code: 1. Tap Add Game Profile and select Entering Sharing Code.
-
Page 70: Editing, Deleting And Sharing A Profile
GES1337 KeyMander 2 3Play User Manual 2. Enter the sharing code. Editing, Deleting and Sharing a Profile To edit, delete, or share a profile, simply swipe left on the profile. - Page 71 Chapter 4. Using the K2 App Editing a Profile You can edit a profile’s functions only from the Device tab (Image 1) but you can edit a profile’s name, format or image from the Library tab. To edit a profile’s functions, see Customizing Controls for a Profile. To edit a profile’s name, format, or image from the Library tab, slide the selected profile to the left and tap Edit Info (Image 2).
- Page 72 GES1337 KeyMander 2 3Play User Manual Deleting a Profile To delete a selected profile, slide the selected profile to the left and tap Delete (Image 1). A warning message appears (Image 2), click Delete. Image 1 Image 2...
- Page 73 Chapter 4. Using the K2 App Sharing a Profile To share a particular profile to another mobile device, slide the selected profile to the left and tap Share. Image 1 Image 2 Note: The Share Code is available for 48 hours.
-
Page 74: Uploading & Customizing Controls For A Profile
GES1337 KeyMander 2 3Play User Manual Uploading & Customizing Controls for a Profile This section explains how to configure the keyboard/mouse settings for a selected profile. It is required to upload a profile before you can modify and settings and controls. -
Page 75: Customizing Controls For A Profile
Chapter 4. Using the K2 App Customizing Controls for a Profile To customize the profile settings, tap Edit on the Device Tab. There are three fields that you can customize, Sensitivity, Mapping, and Macro. Each field is explained in the following pages. -
Page 76: Sensitivity
GES1337 KeyMander 2 3Play User Manual Sensitivity The sensitivity page accesses configuration for most mouse sensitivity settings through the General Mode, Aim (Aim-Down-Sight) Mode, Walk Mode, and Weapon Mode tabs. From the configuration page, tap Sensitivity. General Mode: the normal view the character has when looking or moving around in the game. -
Page 77: General Mode
Chapter 4. Using the K2 App General Mode These settings configure how the mouse movements respond when not aiming-down-sight (ADS). To access to the General Mode, tap on General. Name Details Sets the sensitivity for mouse movement. A higher number feels more responsive, while a lower number feels more controlled. -
Page 78: General Mode Advanced Settings
GES1337 KeyMander 2 3Play User Manual General Mode Advanced Settings Name Details Adjusts the amount of movement input required before the Edit Deadzone Value game registers an actual movement in-game. Toggles to reverse the up/down movements of the mouse, so... - Page 79 Depending upon the amount of Deadzone built into the game, this may case a delay in mouse response or decreased mouse performance when playing games with KeyMander 2 3Play. Properly adjusting the Deadzone removes any delay to the mouse and delivers significantly sharper and smoother movements for much more accurate results, especially when aiming-down-sight in FPS games.
- Page 80 GES1337 KeyMander 2 3Play User Manual Setting the Deadzone Use the K2 App to adjust the Deadzone settings for the mouse so that the aim/look view begins moving slowly on its own in the direction of the adjustment – up, right, or diagonally up. You will need to make a change then observe the effect of the change until the player in the game starts to move slowly in the direction of the adjustment.
- Page 81 Chapter 4. Using the K2 App 2. Select the Zone Type. If you do not know the zone type, select Auto. Note: If Auto is selected, you can also adjust the XY (diagonal) value. 3. To adjust the X, Y, and XY values, tap on them to display the adjustment bars.
- Page 82 GES1337 KeyMander 2 3Play User Manual 4. Adjust the dots by increasing or decreasing the X, Y, and XY values, the dots re-adjust accordingly. While watching the game until the player in the game starts to move slowly in the direction of the adjustment.
- Page 83 Chapter 4. Using the K2 App Turn Speed The Turn Speed adjusts the amount of acceleration that the KeyMander 2 3Play adds when moving your mouse. A setting of 0 on the slider is equal to zero acceleration added by KeyMander 2. Settings of 1-50 add progressively greater amounts of aim acceleration to compensate for games with a slow Look mechanic.
- Page 84 A setting of Level 7 is equal to maximum vertical correction applied by the KeyMander 2 3Play, and higher settings add decreasing amounts of correction down to level 1 where zero correction is applied.
- Page 85 Chapter 4. Using the K2 App Curve Setting The Curve Setting is for adjusting the relationship of Mouse Velocity (physical mouse speed) to Aim Velocity (on-screen speed). Scroll down the General Advanced page, and tap Edit Curve Shape. The Edit Curve Shape page appears. Curve settings are used to fine tune how physical mouse movements respond on-screen (in the game).
- Page 86 GES1337 KeyMander 2 3Play User Manual Function Description Discard Tap Discard to remove the adjusted curve. Save Tap Save to save the adjusted curve. Click a curve type to use a predefined curve for mouse movements. You can change the shape of a curve type at Curve Type the points provided.
- Page 87 Chapter 4. Using the K2 App Curve The Curve is the relationship of Mouse Velocity (physical mouse speed) to Aim Velocity (on-screen speed). When the physical mouse and on-screen speed are the same, the curve looks like this: Mouse Velocity increases from left to right. Aim Velocity increases from bottom to top.
- Page 88 GES1337 KeyMander 2 3Play User Manual Adjusting the Curve Adjusting the curve allows you to fine tune turn acceleration, deceleration, high and low speeds with limits, and boost velocity. Use the graph points to adjust the curve to suit your needs. Use the examples below to understand...
- Page 89 Chapter 4. Using the K2 App (A) Normal Aim Speed / (B) Increasing Thrust for Turning (A) Normal Aim Speed / (B) Low Turn Speed (A) Decrease Aim Speed / (B) Normal Turn Speed...
-
Page 90: Aim Mode (Aim-Down-Sight)
GES1337 KeyMander 2 3Play User Manual Aim Mode (Aim-Down-Sight) To access to the aim mode (Aim-Down-Sight), tap on Aim. The Aim Mode (Aim-Down-Sight) page appears. Name Details Uncheck this box to configure the ADS Mode settings. Same as General Checking this box sets the ADS Mode to use the same settings as the Aim Look Mode. - Page 91 Chapter 4. Using the K2 App ADS Delay time Sets the delay for switching between General and ADS view. Allows you to configure advanced settings such as Invert Advanced Settings Vertical Mouse Movement, Turn Speed, Mouse Traction Control, Curve, Edit Curve Shape, and Edit Deadzone. Aim Mode Advanced Settings Use these settings to set how the mouse movements respond when the character has zoomed in, such as through a scope.
-
Page 92: Walk Mode
GES1337 KeyMander 2 3Play User Manual Walk Mode To access to the Walk Mode, tap the Walk tab. Use these settings to enable walk mode during game play. Name Details Tap to configure a controller button that is used to launch the Launch Key walk mode. -
Page 93: Weapon Mode
Chapter 4. Using the K2 App Weapon Mode To access to the Weapon Mode, tap on Weapon. Use these settings to enable weapon mode during game play. Name Details Tap the configure a controller button that is used to launch Active Swap the active swap. -
Page 94: Mapping
GES1337 KeyMander 2 3Play User Manual Mapping The Mapping page is for mapping the controller buttons to the keyboard and mouse. From the configuration page, tap Mapping. There are five mapping fields, Actions, L&R, D-Pad, Other, Left Analog Stick, and Right Analog Stick. - Page 95 Chapter 4. Using the K2 App Action L&R...
- Page 96 GES1337 KeyMander 2 3Play User Manual D-Pad Other...
- Page 97 Chapter 4. Using the K2 App Left Analog Stick Right Analog Stick...
- Page 98 GES1337 KeyMander 2 3Play User Manual Configuring Key Mappings Each controller button can be mapped to a keyboard, mouse or joystick. For default button mappings, see Controller to Keyboard Button Layout. To map a controller button, follow the steps below.
- Page 99 Chapter 4. Using the K2 App Keyboard: Press a key on the keyboard to map a controller button to it. Mouse: Click a mouse button to map the controller button to it. Joystick: Press a button to map the controller button to it. 3.
- Page 100 GES1337 KeyMander 2 3Play User Manual Quick Pairing Quick paring allows you to map a controller button in two steps. Simply press the controller button, and then press a key on a keyboard, mouse, or joystick. For default button mappings, see Controller to Keyboard Button Layout.
-
Page 101: Turbo
Chapter 4. Using the K2 App Keyboard: Press a key on the keyboard to map the controller button to a key. Mouse: Click a mouse button to map the controller button to. Joystick: Press a button to map the controller button to. 3. - Page 102 GES1337 KeyMander 2 3Play User Manual To set turbo on a button, follow the steps below. 1. From the mapping page, tap on the button you wish to set turbo. 2. From the configuration page, tap to enable Turbo Mode.
- Page 103 Chapter 4. Using the K2 App 3. Tap Speed to set the button timing from 0.1~1 second. 4. Tap Save when finished. Note: Turbo settings only work on the keyboard and mouse. Turbo settings will not work from the game controller.
-
Page 104: Macro
GES1337 KeyMander 2 3Play User Manual Macro Macros activate multiple controller buttons into a single key or mouse click. For example you can set “X+O” or “R3+L3+R2” to execute by pressing the [Y] key on the keyboard. You can create up to 8 custom macros and each macro can have up to 8 controller buttons. - Page 105 Chapter 4. Using the K2 App 2. The Recording Marco page opens. You may now start to program your Macro by pressing the buttons on the controller. 3. Tap Stop Recording when you have finished entering the macro. You are directed to a page to set launch key and macro label.
- Page 106 GES1337 KeyMander 2 3Play User Manual 4. Tap Launch Key to map a button on the keyboard, mouse or joystick that will be used to execute the macro. 5. Tap Macro Label to set a name for the macro to be listed in the Marco...
- Page 107 Chapter 4. Using the K2 App 6. Click Save. The macro appears in the Macro page. 7. Enable Macro Mode by pressing [F11] from the keyboard connected to the GES1337 KeyMander 2. 8. Press the Macro Key set in step 4 to run the macro.
-
Page 108: Chapter 5
IOGEAR website. The Windows-based Firmware Upgrade Utility (FWUpgrade.exe) provides a smooth automated process for upgrading the KeyMander 2 3Play’s firmware when needed. Check the web site regularly to find the latest firmware packages and information relating to them. - Page 109 Chapter 5. Firmware Upgrade 4. Double click the firmware upgrade (*.exe) file, or right click and select Open. This will start the Firmware Upgrade Utility, and a window appears. Read the License Agreement, select I Agree, and then click Next. 5.
- Page 110 GES1337 KeyMander 2 3Play User Manual 6. Click Next to perform the upgrade. If you enabled Check Firmware Version, the Utility compares the device's firmware level with that of the upgrade files. If the device's version is higher than the upgrade version, it brings up a dialog box...
-
Page 111: Upgrade Succeeded
Chapter 5. Firmware Upgrade Upgrade Succeeded After the upgrade has completed, a screen appears to inform you that the procedure was successful: Click Finish to close the Firmware Upgrade Utility. Upgrade Failed If the upgrade failed to complete successfully the Upgrade Failed screen appears: Click Cancel to close the Firmware Upgrade Utility. -
Page 112: Firmware Upgrade Recovery
To perform a firmware upgrade recovery, do the following: 1. Unplug the KeyMander 2 3Play from the computer. 2. Plug the KeyMander 2 3Play into to the computer. 3. Press the Bluetooth Pairing Button and the Mode Button together for 10 seconds. -
Page 113: Chapter 6
If you are using a PS4, fully charge the controller and reconnect to KeyMander 2 3Play. If you are using an Xbox One, see Loss of USB Connection to Controller. -
Page 114: Xbox One
1. Disconnect the controller from KeyMander 2 3Play. 2. Disconnect KeyMander 2 3Play from the Xbox One console. 3. Disconnect the external power cable from KeyMander 2 3Play (if attached). 4. Press and hold Xbox power button on console for 10 seconds until the console shuts down. -
Page 115: Nintendo Switch
Note: Controller should light up by itself indicating it is in USB mode. 8. Reconnect KeyMander 2 3Play cable to the rear USB port on Xbox One console. 9. Reconnect external power cable to KeyMander 2 3Play power port (if needed). -
Page 116: Led Indicator Behavior
GES1337 KeyMander 2 3Play User Manual LED Indicator Behavior Indication Status Color Lights Blue The KeyMander 2 3Play is configured with a PS3/PS4 profile. Solid Lights The KeyMander 2 3Play is configured with an Xbox 360/Xbox Green Solid One profile. -
Page 117: Appendix
The KeyMander 2 3Play is designed to provide as close to a PC gaming experience as possible on a game console, however there are a couple significant differences between playing on PC and using a keyboard and mouse with your console. -
Page 118: Maximum Turn Speed (In-Game)
Maximum Turn Speed (In-Game) The biggest difference between playing on a PC versus playing on a console with KeyMander 2 3Play is the turn speed limitation built into console games. Because console games are built for joysticks, every game has a maximum turn speed equal to having the analog thumb stick pushed all the way to the farthest position. - Page 119 Appendix speed limit that the Destiny franchise which can feel like the mouse is slow to respond if you do not adjust your settings and style of play a bit. The turn speed limit can even vary within a game depending on factors such as weapon choice, whether or not you’re in a vehicle, location in the game (especially in campaign modes), etc.
-
Page 120: Turn Speed Settings (K2 App)
GES1337 KeyMander 2 3Play User Manual Turn Speed Settings (K2 App) One way to overcome the turn speed limitations built into some games is through the use of the K2 App’s Turn Speed setting, which progressively adds acceleration to boost your aim/look speed the faster you move. Slower... - Page 121 KeyMander 2 3Play. After setting up your mouse, make sure to set the mouse resolution in the K2 App to match your mouse setting.
-
Page 122: Technical Support
GES1337 KeyMander 2 3Play User Manual Technical Support International For online technical support – including troubleshooting, documentation, and software updates: http://eservice.IOGEAR.com For telephone support, See Telephone Support below. North America Email Support support@IOGEAR.com Online Troubleshooting Technical Documentation http://www.IOGEAR.com/support... -
Page 123: Safety Instructions
Appendix Safety Instructions General This product is for indoor use only. Read all of these instructions. Save them for future reference. Follow all warnings and instructions marked on the device. Do not place the device on any unstable surface (cart, stand, table, etc.). If the device falls, serious damage will result. - Page 124 GES1337 KeyMander 2 3Play User Manual Liquid has been spilled into the device. The device has been exposed to rain or water. The device has been dropped, or the cabinet has been damaged. The device exhibits a distinct change in performance, indicating a need for service.
-
Page 125: Specifications
Appendix Specifications Function KeyMander 2 3Play Connectors Side 2 x 1m USB2.0 Full Speed Type A Male (Black) Downstream 1 x Micro USB Type B Female Port Front 3 x USB2.0 Full Speed Type A Device Inputs Female Ports External Power... -
Page 126: Limited Warranty
GES1337 KeyMander 2 3Play User Manual Limited Warranty IOGEAR warrants this product against defects in material and workmanship for a Warranty Period of two [2] years (warranty period may vary in certain regions/countries) commencing on the date of original purchase. Cables and accessories are not covered by the Standard Warranty. - Page 127 Appendix LIABILITY IS LIMITED TO THE PURCHASE PRICE YOU PAID FOR THIS PRODUCT PLUS ANY INTEREST ALLOWED BY LAW IF AN APPLICABLE LAW REQUIRES THE PAYMENT OF INTEREST. IOGEAR SHALL NOT BE LIABLE FOR PROPERTY DAMAGE, PERSONAL INJURY, LOSS OF USE, INTERRUPTION OF BUSINESS, LOST PROFITS, LOST DATA OR OTHER CONSEQUENTIAL, PUNITIVE OR SPECIAL DAMAGES, HOWEVER CAUSED AND HOWEVER ALLEGED, WITH THE EXCEPTION OF THOSE DAMAGES...
Need help?
Do you have a question about the KeyMander 2 3Play and is the answer not in the manual?
Questions and answers