Table of Contents
Advertisement
Available languages
Available languages
Quick Links
Advertisement
Chapters
Table of Contents

Related Manuals for Duramaxx 10029779

Summary of Contents for Duramaxx 10029779
- Page 1 Wildkamera 10029779...
-
Page 2: Table Of Contents
Gebrauch entstehen, übernehmen wir keine Haftung. Inhaltsverzeichnis Technische Daten 2 Geräteübersicht 4 Menü-Übersicht 6 Schnellstartanleitung 6 Detaillierte Einstellungen 8 MicroSD-Karte und Batterielebensdauer 17 Technische Daten Artikelnummer 10029779 Aufnahme Video-Format .avi Video-Auflösung 720P (1280*720) D1 (640*480) CIF (320*240) Video-Bildfrequenz 15 / 30 FPS, einstellbar Standbild-Format .jpg... - Page 3 Allgemein Bildsensor 1.3 Mega Pixel, Farbe, CMOS Linse F=3.0; FOV=49°; Auto IR-Cut-Entfernung Infrarot-Blitz 8 Meter Infrarot-CUT-Filter Weißabgleich Automatisch Tag/Nacht-Modus Farbe während des Tages, S/W während der Nacht Minimales Licht 0 Lux (IR an) PIR-Winkel 100° PIR-Empfindlichkeit Hoch/Normal/Niedrig (3 Stufen) Audioaufnahme Stromversorgung DC 6V 2A Batterietyp...
-
Page 4: Geräteübersicht
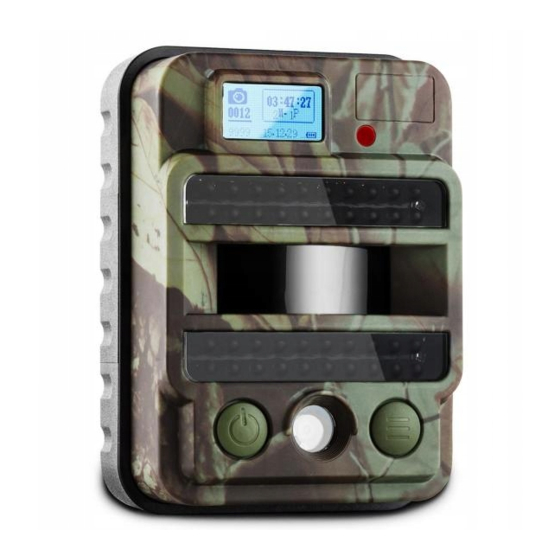
Geräteübersicht LCD-Bildschirm 20 IR-LCDs 20 IR-LCDs POWER-Taste/ Navigations-Taste Lichtsensor Tag/Nacht Kontrollleuchte PIR-Sensor MENU-Taste/ OK-Taste 10 Schraubenschlitz 11 USB-Port / DC in 12 MicroSD Steckplatz 13 Batteriefach... - Page 5 Displayanzeigen Foto-Modus Foto-Symbol 0001: Nummer des aufgenommenen Fotos oder Videoclips Stunde:Minute:Sekunde Fotoauflösung und Multishot-Anzahl Video-Modus Video-Symbol 9998: Anzahl der möglichen Restbilder in Abhängigkeit von Speicherkarte Auflösung und Bildfrequenz Batteriestand Jahr.Monat.Tag Foto- und Video Modus Hinweis: Die Kamera unterstützt 3 verschiedene Betriebsmodi: Foto, Video, Foto und Vi- deo.
-
Page 6: Menü-Übersicht
Menü-Übersicht Schnellstartanleitung Gerät einschalten: Öffnen Sie die Rückseite und legen Sie eine MicroSD-Karte und die Batterien ein. Drücken Sie auf die POWER-Taste und halten Sie sie 3 Sekun- den lang gedrückt. Nachdem die Kontrollleuchte 5 mal geblinkt hat befindet sich das Gerät im PIR Auto-Modus. - Page 7 Manuelle Foto-/Videoaufnahme: Drücken Sie auf die POWER-Taste um Fotos, Videos oder Fotos und Videos aufzunehmen, je nachdem wie das Gerät eingestellt ist. Drücken Sie erneut auf die POWER-Taste , um die Videoaufzeichnung zu beenden. Einstellungsmenü öffnen: Drücken Sie im Test-Modus auf die MENU/OK-Taste um das Einstellungs-Menü...
-
Page 8: Detaillierte Einstellungen
Erste Navigationsebene: Drücken Sie auf die MENU/OK-Taste, die Kamera befindet sich im Foto-Modus. Foto, Video oder Drücken Sie auf die MENU/OK-Taste, die Foto und Video Kamera befindet sich im Video-Modus. auswählen Drücken Sie auf die MENU/OK-Taste, Manuelle die Kamera befindet sich im Foto und Video- Aufnahme Modus. - Page 9 Kamera-Einstellungen Löschen Zurück zur vorherigen Seite Falls das gewünschte Symbol nicht auf dem Bildschirm angezeigt wird, drücken Sie wieder- holt auf die POWER-Taste, bis das Symbol erscheint. Drücken Sie die MENU-Taste, um die Konfigurationsseite aufzuru- fen und wählen Sie dann OK. Drücken Sie erneut auf die MENU- Taste, um die Konfigurationsseite zu verlassen.
- Page 10 Drücken Sie auf die MENU-Taste und wählen Sie diese Funktion. Ne- ben dem Foto und Video-Symbol wird „OK“ angezeigt. Aufnehmen: Zuerst wird das Foto, dann das Video aufgenommen. Halten Sie die Foto und Video MENU-Taste 3 Sekunden lang gedrückt, um in den Test-Modus zurück- zukehren.
- Page 11 Video-Einstellungen (Standard) Video-Größe Video-Länge Bildfrequenz 30 FPS Frequenz 50 Hz Audioaufnahme Falls das gewünschte Symbol nicht auf dem Bildschirm angezeigt wird, drücken Sie wieder- holt auf die POWER-Taste, bis das Symbol erscheint. Drücken Sie auf die MENU-Taste, um die Konfigurationsseite auf- zurufen.
- Page 12 Kamera-Einstellungen (Standard) Timer Zeitraffer Verzögerung Stempel SD-Zyklus-Aufnahme Kamera-Töne PIR-Empfindlichkeit Hoch Zeit / Datum GPRS Passwortschutz Auf Werkseinstellung Nein zurücksetzen Falls das gewünschte Symbol nicht auf dem Bildschirm angezeigt wird, drücken Sie wieder- holt auf die POWER-Taste, bis das Symbol erscheint.
- Page 13 Drücken Sie auf die MENU-Taste, um die Konfigurationsseite auf- zurufen. Drücken Sie auf die POWER-Taste und wählen Sie „ON“. Drücken sie erneut auf die MENU-Taste, um die Einstellung zu bestätigen. Drücken Sie auf die POWER-Taste und geben Sie die gewünschte Zeit ein.
- Page 14 Drücken Sie auf die MENU-Taste, um die Konfigurationsseite aufzu- rufen. Drücken Sie auf die POWER-Taste und wählen Sie „ON“ oder „OFF“. Drücken Sie erneut auf die MENU-Taste um die Einstellung zu bestätigen. Wie funktioniert der Stempel? Stempel Die Kamera nimmt Fotos/Videos auf der Grundlage des voreingestell- ten Zeitintervall auf, allerdings nur bei Bewegung.
- Page 15 Drücken Sie auf die MENU-Taste, um die Konfigurationsseite auf- zurufen. Drücken Sie auf die POWER-Taste und um eine Zahl einzugeben. Drücken Sie erneut auf die MENU-Taste, um zur nächsten Zahl zu springen. Nachdem Sie alle Zahlen eingegeben haben, drücken Sie erneut auf die MENU-Taste, um die Eingabe zu bestätigen.
- Page 16 Software Upgrade Kopieren Sie die folgenden 3 Software-Dateien auf die SD-Karte. Wichtig: Benutzen Sie eine SD-Karte mit mindestens 1-2 GB Platz für das Upgrade. Stecken Sie die SD-Karte in die Kamera. Setzen Sie die Batterien ein oder verwenden Sie den USB-Anschluss. Halten Sie die POWER-Taste gedrückt, bis Sie einen Piepton hören.
-
Page 17: Microsd-Karte Und Batterielebensdauer
MicroSD-Karte und Batterielebensdauer Die Auswahl der richtigen MicroSD-Karte Zur Benutzung des Beräts benötigen Sie eine MicroSD-Karte. Wenn Sie die Kamera ein- schalten und sich keine Karte im Steckplatz befindet, zeigt der Bildschirm „No SD Card“ an. Der Steckplatz unterstützt MicroSD-Karten bis 32 GB. Bevor Sie die Karte einstecken, müs- sen Sie die Kamera ausschalten. - Page 18 Hinweise zur Entsorgung Befi ndet sich die linke Abbildung (durchgestrichene Mülltonne auf Rädern) auf dem Produkt, gilt die Europäische Richtlinie 2002/96/EG. Diese Pro- dukte dürfen nicht mit dem normalen Hausmüll entsorgt werden. Infor- mieren Sie sich über die örtlichen Regelungen zur getrennten Sammlung elektrischer und elektronischer Gerätschaften.
-
Page 19: Technical Data
Technical Data 19 Product Description 21 Menu Overview 23 Quick Start Guide 23 Detail Setups 25 MicroSD Card and Battery Life 34 Technical Data Item number 10029779 Recording Video Format .avi Video Resolution 720P (1280*720) D1 (640*480) CIF (320*240) Video Frame Rate... - Page 20 General Image Sensor 1.3 Mega Pixels Color CMOS Lens F=3.0; FOV=49°; Auto IR-Cut-Remove Effective IR Flash 8 meters Infrared Cut Filter White Balance Automatic Day/Night Mode Color during day / B&W at night Minimum Illumination 0 Lux (IR on) Effective PIR Angle 100°...
-
Page 21: Product Description
Product Description LCD-Screen 20 IR-LCDs 20 IR-LCDs POWER button/ Navigation button Light sensor day/night Indicator light PIR Sensor MENU button/ OK button 10 Screw slot 11 USB Port / DC in 12 Micro SD Card Slot 13 Battery slot... - Page 22 Camera Screen Display Photo Mode Interface Photographing 0001: recorded file number of photos & video clips hour/min/sec Photo Resolution Multi Shot Number Video Mode Interface Video Recording 9998: estimated available file number based on left memory space in memory card Video FPS and Video Resolution Battery Left Volume...
-
Page 23: Menu Overview
Camera Menu List Quick Start Guide Power On Camera: Open back cover to insert MicroSD Card and batteries. Press and hold Power/Navigation button for 3 sec; camera will enter PIR Auto Working mode after indicator flashes 5 times; 3. Press Menu/OK button once to wake up camera LCD screen to enter TEST Mode. - Page 24 Manual Photo and Video Recording: Test Mode Main Interface, press Power/Navi- gation button again to shoot photos, videos, or photo + video based on camera settings; stop video recording by pressing again Power/Navigation button Enter Menu for Setup: Test Mode Main Interface, press Menu/OK button to en- ter settings menu;...
-
Page 25: Detail Setups
First Navigation Menu press Menu/OK button; camera is in camera mode. Set Camera, or Video, or press Menu/OK button; camera is in Camera + Video video mode. Manual press Menu/OK button; camera is in Recording Cam+Video mode. After configuration above, press and hold button for 3 seconds to return back to TEST Mode main interface;... - Page 26 Settings Delete Back to Previous Page If wanted setting icon is not showing on camera LCD screen, press POWER button repea- tedly until it appears. Press MENU button to enter configuration page, press POWER button to choose ON; press MENU button again to enter configu- ration page;...
- Page 27 Press MENU button to enter Photo + Video mode; icon „OK“ appears at right bottom of interface. Start Recording; Photo(s) First, then Recording Video: Photo and Video Press and hold MENU button for 3 seconds to return back to TEST Mode main interface;...
- Page 28 Video Settings(Default Settings) Video Size Video Length Video Frame 30 FPS Frequency 50 Hz Audio Recording If wanted setting icon is not showing on camera LCD screen, press POWER button repea- tedly until it appears. Press MENU button to enter configuration page, press POWER button to choose desired Video Size, press MENU button to confirm setting: 750 P, VGA, CIF: 1280*720 / 640*480 / 320*240.
- Page 29 Kamera-Einstellungen (Standard) Timer Time Lapse Delay Stamp SD Cycle Recording Camera Sound PIR Sensitivity High Time/Date GPRS Switch Camera Password Reset If wanted setting icon is not showing on camera LCD screen, press POWER button repea- tedly until it appears.
- Page 30 Press MENU button to enter configuration page, press POWER to choose ON; press MENU button again to set timer; Press POWER button to choose wanted number, press MENU but- ton to confirm and move to next number; Press MENU button again after Start time and End Time is set to Exit.
- Page 31 Press MENU button to enter configuration page, press POWER button to choose ON/OFF; press MENU button to confirm setting. How does this work? Stamp Left battery volume, Moon phase, Temperature, Date/Time, and pre- set Camera ID will be displayed on every photo. Press MENU button to enter configuration page, press POWER button to choose ON/OFF;...
- Page 32 Press MENU button to enter configuration page; Press POWER to choose, press MENU button to confirm wanted number and move to next number; Press MENU button again to Exit after all numbers are selected. How does this work? Time/Date Date/Time; Date: “month/date/year”; Time: “hour/minute” Note: Plz adjust Time/Date when you turn on camera to ensure ca- mera to function well as expected.
- Page 33 Software Upgrade Copy the upgrade software files (3 files) into MicroSD Card; Note: Suggest to use 1 or 2 GB SD card to do the upgrade. Insert MicroSD Card into camera; Insert batteries or plug in USB power cable; Press and hold Power/Navigation button, camera speaker emits one Beep Sound; Release button when you see red indicator led flashes;...
-
Page 34: Microsd Card And Battery Life
MicroSD Card and Battery Life MicroSD Card Selection A memory card is required to operate the camera. When the camera is „ON“ and no memo- ry card is inserted, screen displays „No SD Card“. Micro SD Card slot of camera supports up 32 GB memory card. - Page 35 Hints on Disposal According to the European waste regulation 2002/96/EG this symbol on the product or on its packaging indicates that this product may not be treated as household waste. Instead it should be taken to the appropriate collection point for the recycling of electrical and electronic equipment. By ensuring this product is disposed of correctly, you will help prevent poten- tial negative consequences for the environment and human health, which could otherwise be caused by inappropriate waste handling of this pro-...
- Page 36 Descripción del aparato 38 Descripción del menú 40 Manual de inicio rápido 40 Configuración detallada 42 Tarjeta MicroSD y duración de la batería 51 Datos técnicos Número de artículo 10029779 Grabación Formato de vídeo .avi Resolución de vídeo 720P (1280*720) D1 (640*480) CIF (320*240) Tasa de frames en vídeo...
- Page 37 General Sensor de imagen 1.3 mega píxeles, color, CMOS Lente F=3.0; FOV=49°; Auto IR-Cortar - Eliminar Flash infrarrojo 8 metros Filtro CUT infrarrojo Sí Balance de blancos Automático Modo día/noche: Color durante el día, blanco y negro durante la noche Luz mínima 0 Lux (IR on) Ángulo PIR...
- Page 38 Descripción del aparato Monitor LCD 20 LCD IR 20 LCD IR Botón POWER Botón de navegación Sensor de iluminación día / noche Indicador luminoso Sensor PIR Botón Menú/ Botón OK 10 Ranuras para los tornillos 11 Puerto USB / DC in 12 Ranura para tarjeta MicroSD 13 Compartimento para...
- Page 39 Indicadores del display Modo foto Símbolo de foto 0001: número de imágenes o videoclips registrados Hora:minuto:segundos Resolución de la imagen y número de disparo múltiple Modo vídeo Símbolo vídeo 9998: número de las imágenes restantes que se pueden capturar dependiendo de la tarjeta de memoria Resolución y frecuencia de imagen Estado de las pilas...
- Page 40 Descripción del menú Manual de inicio rápido Encender aparato: abra la parte trasera e introduzca una tarjeta MicroSD y las pilas. Pulse el botón POWER y manténgalo pulsado tres segundos. Cuando el in- dicador luminoso haya parpadeado cinco veces, el aparato se encontrará en el modo automático PIR.
- Page 41 Foto manual / grabación de vídeo: Pulse el botón POWER para capturar fotos, vídeos o fotos y vídeos dependiendo de la configuración del aparato. Pulse de nuevo el botón POWER , para finalizar la grabación de vídeo. Abrir menú de configuración: Pulse el botón MENU/OK , durante el modo prue- ba para acceder al menú...
- Page 42 Primer menú de navegación: Pulse el botón MENU/OK, la cámara estará en modo foto. Seleccionar foto, vídeo o foto y Pulse el botón MENU/OK, la cámara vídeo estará en modo vídeo. Grabación Pulse el botón MENU/OK, la cámara manual estará en modo foto y vídeo. Mantenga pulsado el botón MENU/OK en el modo deseado durante tres segundos para regresar al modo de prueba.
- Page 43 Configuración de la cámara Eliminar Regresar a la página anterior Si no aparece el símbolo deseado en pantalla, pulse varias veces el botón POWER hasta que el símbolo aparezca. 1. Pulse el botón MENU para acceder a la sección de configuración y pulse OK a continuación.
- Page 44 Pulse el botón MENU y seleccione esta función. Junto con el símbolo del vídeo y la foto aparecerá “OK”. Grabación: En primer lugar se capturará la imagen y a continuación el vídeo. Man- Foto y vídeo tenga pulsado el botón MENU durante tres segundos para regresar al modo prueba.
- Page 45 Configuración de vídeo (estándar) Tamaño de vídeo Longitud de vídeo Frames de vídeo 30 FPS Frecuencia 50 Hz Grabación de audio Si no aparece el símbolo deseado en pantalla, pulse varias veces el botón POWER hasta que el símbolo aparezca. Pulse el botón MENU para acceder a la página de ajustes.
- Page 46 Configuración de la cámara (estándar) Timer Intervalo de tiempo Retardo Marca Grabación en bucle en SD Sonido de cámara Sensibilidad PIR Alta Fecha/Hora GPRS Contraseña de seguridad Restablecer los valores de fábrica Si no aparece el símbolo deseado en pantalla, pulse varias veces el botón POWER hasta que el símbolo aparezca.
- Page 47 Pulse el botón MENU para acceder a la página de ajustes. Pulse el botón POWER y seleccione “ON”. Pulse de nuevo el botón MENU para confirmar la selección. Pulse el botón POWER e introduzca el tiempo deseado. Pulse el botón MENU para cambiar al siguiente número. Cuando haya introducido un tiempo de inicio y de fin, pulse de nuevo el botón MENU para confirmar los cambios.
- Page 48 Pulse el botón MENU para acceder a la página de ajustes. Pulse el botón POWER y escoja entre grabación de audio „ON“ o „OFF”. Pulse de nuevo el botón MENU para confirmar la configuración. ¿Cómo funciona la marca? Marca La cámara registra fotos y vídeos basándose en el intervalo de tiem- po predeterminado y solamente cuando se produce un movimiento delante de la misma.
- Page 49 Pulse el botón MENU para acceder a la página de ajustes. Pulse el botón POWER para introducir una cifra. Pulse el botón MENU para cambiar al siguiente número. Cuando haya introducido un tiempo de inicio y de fin, pulse de nuevo el botón MENU para confirmar los cambios.
- Page 50 Actualización de software Copie los siguientes tres archivos de software en la tarjeta SD. IMPORTANTE: utilice una tarjeta SD con el menos 1-2 GB de espacio libre para la actualización. Introduzca la tarjeta SD en la cámara. Introduzca las pilas o utilice una conexión USB. Mantenga pulsado el botón POWER hasta que escuche un pitido.
- Page 51 Tarjeta MicroSD y duración de la batería La selección de una tarjeta micro SD apropiada Para utilizar el aparato, necesitará una tarjeta MicroSD. Si enciende la cámara y no ha co- locado ninguna tarjeta en la ranura correspondiente, el monitor mostrará “No SD Card”. La ranura es compatible con tarjetas MicroSD de hasta 32 GB.
- Page 52 Indicaciones para la retirada del aparato Si el aparato lleva adherida la ilustración de la izquierda (el contenedor de basura tachado) entonces rige la normativa europea, directiva 2002/96/ CE. Este producto no debe arrojarse a un contenedor de basura común. Infórmese sobre las leyes territoriales que regulan la recogida separada de aparatos eléctricos y electrónicos.
-
Page 53: Fiche Technique
Aperçu de l’appareil 55 Aperçu du menu 57 Prise en main rapide 57 Paramètres avancés 59 Carte microSD et durée de vie des piles 68 Fiche technique Numéro d’article 10029779 Enregistrement Format vidéo .avi Résolution vidéo 720P (1280*720) D1 (640*480) CIF (320*240) Fréquence d’image vidéo... - Page 54 Général Capteur photo 1.3 mega pixel, couleur, CMOS Objectif F=3.0 ; FOV=49° ; Distance CUT infrarouge auto. Flash infrarouge 8 mètres Filtre CUT infrarouge Balance des blancs Automatique Mode jour/nuit Couleur de jour, N/B de nuit Éclairage minimal 0 Lux (IR activé) Angle PIR 100°...
-
Page 55: Aperçu De L'appareil
Aperçu de l’appareil 1 Écran LCD 2 20 LED IR 3 20 LED IR 4 Touche POWER / touche de navigation 5 Capteur de lumière diurne/nocturne 6 Témoin lumineux 8 Capteur PIR 9 Touche MENU / touche OK 10 Trou pour vis 11 Port USB / DC in 12 Fente microSD 13 Compartiment des... - Page 56 Affichages Mode photo Symbole photo 0001 : nombre de photos ou clips vidéo enregistrés Heure : minute : seconde Résolution photo et nombre de photos en rafale Mode vidéo Symbole vidéo 9998 : nombre des images restantes en fonction de la carte mémoire Résolution et fréquence d’images État des piles...
-
Page 57: Aperçu Du Menu
Aperçu du menu Prise en main rapide Mettre l’appareil en marche : ouvrir l’arrière de l’appareil et insérer une carte mi- croSD ainsi que les piles. Appuyer sur la touche POWER et rester appuyer dessus pendant 3 secondes. Le témoin lumineux clignote pendant 5 secondes et l’appareil bascule en mode PIR auto. - Page 58 Enregistrement photo/vidéo manuel : appuyer sur la touche POWER pour enregistrer des photos, des vidéos ou des photos et des vidéos en même temps, en fonction des réglages de l’appareil. Appuyer de nouveau sur la touche POWER pour terminer l’enregistrement vidéo. Ouvrir le menu des paramètres : en mode test, appuyer sur la touche MENU/OK pour ouvrir le menu des paramètres.
- Page 59 Premier niveau de navigation Appuyer sur la touche MENU/OK ; la caméra se trouve en mode photo. Sélectionner photo, vidéo ou Appuyer sur la touche MENU/OK ; la photo et vidéo caméra se trouve en mode vidéo. Enregistrement Appuyer sur la touche MENU/OK ; la manuel caméra se trouve en mode photo et vidéo.
- Page 60 Paramètres de la caméra Supprimer Retour à la page précédente Falls das gewünschte Symbol nicht auf dem Bildschirm angezeigt wird, drücken Sie wieder- holt auf die POWER-Taste, bis das Symbol erscheint. Appuyer sur la touche MENU pour accéder à la page de configu- ration puis sélectionner OK.
-
Page 61: Paramètres Avancés
Appuyer sur la touche MENU et sélectionner cette fonction. L’indication « OK » s’affiche à côté du symbole photo et vidéo. Enregistrer : L’appareil prend d’abord la photo, puis démarre l’enregistrement vi- Photo et vidéo déo. Rester appuyer sur la touche MENU pendant 3 secondes pour revenir au mode test. - Page 62 Paramètres vidéo (réglages par défaut) Taille de la vidéo Durée de la vidéo Fréquence d’images 30 FPS Fréquence 50 Hz Enregistrement audio ACTIVÉ Si le symbole souhaité ne s’affiche pas à l’écran, appuyer de manière répétée sur la touche POWER jusqu’à ce que le symbole s’affiche. Appuyer sur la touche MENU pour ouvrir la page de configuration.
- Page 63 Paramètres de la caméra (réglages par défaut) Minuteur DÉSACTIVÉ Prises de vue à intervalles DÉSACTIVÉ Retardateur DÉSACTIVÉ Tampon numérique ACTIVÉ Enregistrement en boucle SD DÉSACTIVÉ Sons de la caméra ACTIVÉ Sensibilité PIR Élevée Heure/date GPRS DÉSACTIVÉ Protection par mot de passe DÉSACTIVÉ...
- Page 64 Appuyer sur la touche MENU pour ouvrir la page de configuration. Appuyer sur la touche POWER et sélectionner « ON ». Appuyer de nouveau sur la touche MENU pour confirmer le réglage. Appuyer sur la touche POWER et entrer l’heure souhaitée. Ap- puyer de nouveau sur la touche MENU pour passer au nombre suivant.
- Page 65 Appuyer sur la touche MENU pour ouvrir la page de configuration. Appuyer sur la touche POWER et sélectionner « ON » ou « OFF ». Appuyer de nouveau sur la touche MENU pour confirmer le réglage. Comment fonctionne le tampon ? Tampon numérique Chaque photo est marquée d’un tampon numérique sur lequel figure...
- Page 66 Appuyer sur la touche MENU pour ouvrir la page de configuration. Appuyer sur la touche POWER et entrer le chiffre souhaité. Ap- puyer de nouveau sur la touche MENU pour passer au chiffre suivant. Après avoir saisi tous les chiffres, appuyer de nouveau sur la touche MENU pour confirmer la saisie.
- Page 67 Mise à jour du logiciel Copier les 3 fichiers de logiciel suivants sur la carte SD. Important : utiliser une carte SD avec au moins 1-2 GB d’espace libre pour la mise à jour. Introduire la carte SD dans la caméra. Introduire les piles ou utiliser un câble USB.
-
Page 68: Carte Microsd Et Durée De Vie Des Piles
Carte microSD et durée de vie des piles Sélection de la carte microSD appropriée Une carte microSD est nécessaire à l’utilisation de l’appareil. Au démarrage de l’appareil, si aucune carte n’est insérée, l’écran affiche « No SD Card ». La fente SD accepte les cartes microSD d’une mémoire maximale de 32 GB. - Page 69 Information sur le recyclage Vous trouverez sur le produit l’image ci-contre (une poubelle sur roues, barrée d‘une croix), ce qui indique que le produit se trouve soumis à la directive européenne 2002/96/CE. Renseignez-vous sur les disposi- tions en vigueur dans votre région concernant la collecte séparée des appareils électriques et électroniques.
- Page 70 Dati tecnici 70 Descrizione del prodotto 72 Descrizione del menu 74 Guida rapida 74 Impostazioni dettagliate 78 Scheda micro SD e durata delle pile 85 Dati tecnici Articolo numero 10029779 Registrazione Formato video .avi Risoluzione video 720P (1280*720) D1 (640*480) CIF (320*240)
- Page 71 Generale Sensore immagine 1.3 Mega Pixel, colore, CMOS Lente F=3.0; FOV=49°; Auto IR-Cut-Remove Flash a infrarossi 8 metri Filtro CUT a infrarossi Bilanciamento bianco Automatico Modalità giorno/notte A colori di giorno, bianco/nero di notte Illuminazione minima 0 Lux (IR accesi) Angolo PIR 100°...
- Page 72 Descrizione del prodotto Schermo LCD 20 IR-LCD 20 IR-LCD Tasto POWER/ tasto di navigazione Sensore luce giorno/ notte Spia di controllo Sensore PIR Tasto MENU/tasto OK 10 Inserimento vite 11 Porta USB / DC IN 12 Slot micro SD 13 Vano pile...
- Page 73 Spie display Modalità foto Simbolo foto 0001: numero delle foto o dei videoclip registrati Ora: minuti: secondi Risoluzione foto e numero scatto multiplo Modalità video Simbolo video 9998: numero delle immagini restanti nella scheda di memoria Risoluzione e frequenza fotogramma Livello pile Anno.mese.giorno Modalità...
- Page 74 Descrizione menu Guida rapida Accendere il dispositivo: aprire il retro e inserire una scheda micro SD e le pile. Tenere premuto il tasto POWER per 3 secondi. La spia di controllo lampeggia per 5 secondi: ora il dispositivo si trova in modalità auto PIR. Premere il tasto MENU/OK per accendere lo schermo e avviare la modalità...
- Page 75 Registrazione manuale foto/video: premere il tasto POWER per scattare foto, registrare video oppure foto e video, in base alle impostazioni del dispositivo. Premere di nuovo il tasto POWER , per uscire dalla registrazione video. Aprire il menu impostazioni: in modalità, premere il tasto MENU/OK per aprire il menu impostazioni.
- Page 76 Primo livello di navigazione: Premere il tasto MENU/OK: la fotocamera si trova in modalità Foto. Selezionare foto, video oppure Premere il tasto MENU/OK: la fotocamera foto e video si trova in modalità video. Registrazione Premere tasto MENU/OK: manuale fotocamera si trova in modalità foto e video. Dopo aver selezionato la modalità...
- Page 77 Impostazioni fotocamera Cancellare Tornare alla schermata precedente Se il simbolo desiderato non compare sullo schermo, premere ripetutamente il tasto POWER fino a quando compare il simbolo. Premere il tasto MENU per accedere alla configurazione e se- lezionare OK. Premere di nuovo il tasto MENU per uscire dalla configurazione.
- Page 78 Premere il tasto MENU e selezionare questa funzione. Accanto al sim- bolo della foto e del video appare “OK”. Registrare: Viene scattata prima la foto e poi viene registrato il video. Tenere Foto e video premuto per 3 secondi il tasto MENU per tornare alla modalità test. Ora premere il tasto POWER per avviare la registrazione.
- Page 79 Impostazioni video (standard) Grandezza video Lunghezza video Video Frame 30 FPS Frequenza 50 Hz Registrazione audio Se il simbolo desiderato non compare sullo schermo, premere ripetutamente il tasto POWER fino alla comparsa del simbolo. Premere il tasto MENU per accedere alla pagina di configurazione. Premere il tasto POWER e selezionare il formato desiderato.
- Page 80 Impostazioni fotocamera (Standard) Timer Time Lapse Ritardo allo scatto Timbro Registrazione ciclo SD Audio fotocamera Sensibilità PIR Alta Ora / data GPRS Protezione password Tornare alle impostazioni di fabbrica Se il simbolo desiderato non viene visualizzato sullo schermo, premere ripetutamente il tasto POWER fino alla comparsa del simbolo.
- Page 81 Premere il tasto MENU per accedere alla pagina della configura- zione. Premere il tasto POWER e selezionare “ON”. Premere di nuovo il tasto MENU per confermare l’impostazione. Premere il tasto POWER e inserire il tempo desiderato. Premere il tasto MENU per passare alla cifra successiva. Dopo aver inserito il tempo di inizio e di fine, premere di nuovo il tasto MENU per confermare l’impostazione.
- Page 82 Premere il tasto MENU per accedere alla pagina della configurazione. Premere il tasto POWER e selezionare “ON” oppure “OFF”. Premere di nuovo il tasto MENU per confermare l’impostazione. Come funziona il timbro? Timbro Su ogni foto compariranno la batteria residua, la fase lunare, la tem- peratura, la data/l’ora e l’ID della fotocamera.
- Page 83 Premere il tasto MENU per accedere alla pagina della configura- zione. Premere il tasto POWER per inserire un numero. Premere di nuo- vo il tasto MENU per passare alla cifra successiva. Dopo aver inserito tutte le cifre, premere di nuovo il tasto MENU per confermare la selezione.
- Page 84 Aggiornamento del software Copiare i seguenti 3 file software sulla scheda SD. Importante: per poter effettuare l’aggiornamento, è necessario utilizzare una scheda SD con almeno 1 - 2 GB di spazio libero. Inserire la scheda SD nella fotocamera. Inserire le pile oppure utilizzare un attacco USB. Tenere premuto il tasto POWER fino a quando si sente un segnale acustico.
- Page 85 Scheda micro SD e durata pile Scegliere la scheda micro SD corretta Per utilizzare il dispositivo è necessaria una scheda micro SD. Se la scheda non è stata inserita, sullo schermo compare “No SD Card”. La slot supporta micro schede SD fino a 32 GB.
- Page 86 Smaltimento Se sul prodotto è presente la fi gura a sinistra (il cassonetto dei rifi uti mo- bile sbarrato), si applica la direttiva europea 2002/96/CE. Questi prodotti non possono essere smaltiti con i rifi uti normali. Informarsi sulle dispo- sizioni vigenti in merito alla raccolta separata di dispositivi elettrici ed elettronici.
Need help?
Do you have a question about the 10029779 and is the answer not in the manual?
Questions and answers