YSI ProDSS Manual
Hide thumbs
Also See for ProDSS:
- User manual (90 pages) ,
- Use, calibration and maintenance manual (25 pages) ,
- Calibration and routine maintenance (16 pages)
Table of Contents
Advertisement
Quick Links
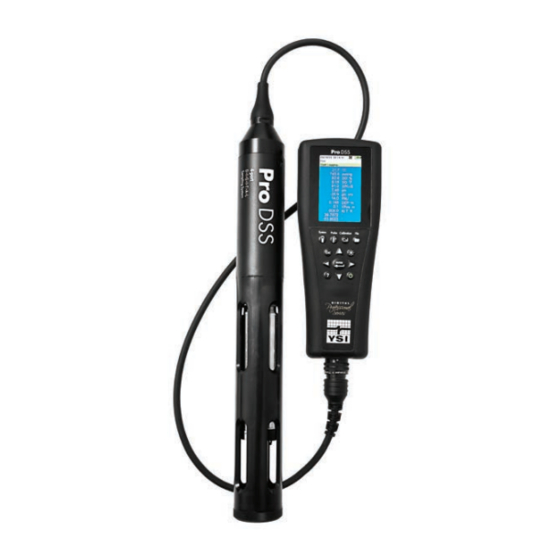
MULTIMETER: YSI-ProDSS
EQUI P M ENT NEEDED
• YSI-ProDSS multimeter
• (Sampling wand, float, tub, scoop)
• Data sheet, clipboard, pencil
Storage notes:
The battery may be damaged if kept in an
•
environment outside the range of -20 - 60°C
(-4° - 140°F).
When taking the ProDSS out into the field,
•
travel with ¼ cup of tap water in the
calibration cup.
When storing the ProDSS for longer than
•
one week, if possible, store in expired pH4
buffer solution, with the cup upright and the
probes submerged in the buffer.
NOTE 2015-16:
We purchased one instrument
in summer 2015 in the expectation of
purchasing a second and making it our
standard field water-quality testing equipment
in summer 2016. Meanwhile, we are
experimenting with settings and field
instructions, and recording values side-by-side
with our current equipment.
INITIAL INSTRUMENT PREPARATION:
1. CABLE CONNECTI ON
Inspect the cable connection between the
handheld meter and the cable. If cable is not
connected to the meter,
connectors are clean and dry before
connecting!
If connecters are clean and dry,
align the keys on the cable assembly connector
with the slots on the instrument connector.
Push together firmly, and
then twist the outer ring
clockwise until it locks
into place. The metal pin
should "snap" into place
and be visible through
small hole in the outer
ring (see image).
2. SENSOR S AND GUAR D CHECK
If any of the individual sensors are not
connected, refer to "Settings and
Troubleshooting" section for sensor installation.
m ake sure the
Do not
remove
this ring!
If there is an empty "slot" with no sensor
a port plug or sensor m ust be
installed,
installed or the bulk head w ill be
dam aged!
1. Remove calibration cup by backing off a bit
on the retaining nut in a counterclockwise
direction (see diagram). DO NOT REMOVE
THE RETAINING NUT; JUST LOOSEN IT!
(For a 4-second video, see
https://youtu.be/Z6b7YF1ONo0.)
2. Slide the cup off and set it aside on its pack,
slightly angled to hold the water inside.
3. Firmly hold the bulkhead with one hand and
turn the sensor guard counter-clockwise
until completely unthreaded. Set aside the
sensor guard in a clean dry place. Use
caution once the sensors are exposed!
4. Conduct a quick visual inspection of the
sensors; clean any debris on the sensor tips
with a lint-free cloth and rinse with water
Carefully "test" the connection of each
sensor by grasping the sensor near the
bulkhead between your thumb and finger,
and try to turn the sensor to determine if it
is loose. If the sensor moves or twists at
all (sensors should firmly be in place),
Simply
loosen
the
ring to
slide
the
entire
cup off.
.
Advertisement
Table of Contents
Troubleshooting

Related Manuals for YSI ProDSS


Summary of Contents for YSI ProDSS
- Page 1 The battery may be damaged if kept in an • environment outside the range of -20 - 60°C ring to (-4° - 140°F). slide When taking the ProDSS out into the field, • travel with ¼ cup of tap water in the entire calibration cup. cup off.
- Page 2 AC adapter. Once the charging signal appears on the screen, it can be turned off. It takes approximately 14 hours to charge the ProDSS battery with the unit turned off. For maximum battery life, if practical, don’t charge until the battery is ≤40%, and bring the battery back...
- Page 3 YSI ProDSS Select your Site Sample at mid-depth, or 8-12” below the surface if the water is deep. You may dangle System a) Select the button , then the probe or place it on clean rocks at the Logging [single]...
- Page 4 YSI ProDSS Parameters are --If turbidity values oscillate, watch them for all set to [On] several minutes and estimate the average, to (ISE=pH) the nearest whole number, considering both the Audio • extremes and most frequent numbers. If Enabled, needed, we might be able to calculate the Continuous average at the office.
- Page 5 YSI ProDSS 8. If you performed replicates, check the temperature sensor does not need to be “Water Chemistry—General” protocol to see completely dry at its base. Then: if your pairs of readings are within the a) Pour a small amount of clean water acceptable precision limits;...
- Page 6 3. Carefully align the sensor and bulkhead dry environment; do not install in the field! connectors by inserting the sensor into the The ports on the ProDSS bulkhead are port and then gently rotating the sensor universal; therefore, you can install any sensor until the connectors align.
- Page 7 1. Apply a thin coat of lubricant to the o-rings 1. Attempt to charge the unit: Using YSI on the plug port. Wipe off any excess charging equipment only, plug unit into lubricant with a lint-free cloth.
- Page 8 (see protocol problems with a ProDSS tech.) above) and return to the Run Screen. e) If a new battery pack has been ordered, refer to the YSI manual for battery removal/disposal and Cleaning the bulkhead & probes replacement.
Need help?
Do you have a question about the ProDSS and is the answer not in the manual?
Questions and answers