Table of Contents
Advertisement
Quick Links
Advertisement
Chapters
Table of Contents

Related Manuals for LIM INFINITE SOCKET TT-S

Summary of Contents for LIM INFINITE SOCKET TT-S
- Page 1 CLINICIAN INSTRUCTIONS...
-
Page 2: Table Of Contents
Contents About the Infinite Socket TT-S ™ Legend Donning the Socket Closure System Engagement Doffing the Socket Torque Specifications Troubleshooting Warranty Information Technical Appendices... -
Page 3: Tt-S
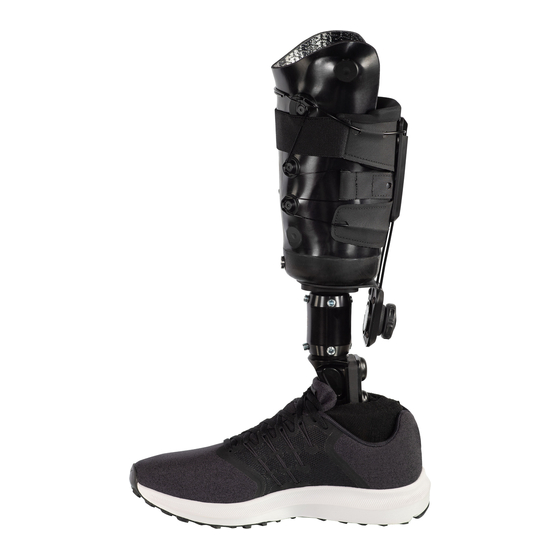
Welcome The following will guide you through basic setup of the Infinite Socket TT-S. ™ For additional support, please call 1-(833) 233-7249 or visit our Tech Tip videos on youtube.com/LIMInnovations... - Page 4 Introduction The Infinite Socket TT-S ™ is a human-inspired transtibial socket designed for daily adjustments. It optimizes knee flexion without sacrificing performance or aesthetics, providing new levels of force transitions that dynamically conform with the patient’s every stride. The Infinite socket TT-S is ™...
-
Page 5: Legend
Legend Cover Attachment Lace Housing Posterior Pad Posterior Firmwear Lace (proximal) Anterior Guide Peninsula Pressure Management Strap Posterior Firmwear Plastic Washer (distal) Suspension Mechanism Fit System ® L-Bracket optimized by Click Medical ™ Note: Tools Needed Heat Gun 2.5mm Hex Wrench 4mm Hex Wrench... -
Page 6: Donning The Socket
Donning The Socket Loosen the closure system: pull BOA dial away from the ® socket until an audible click is heard. Pull back the posterior firmwear to open. Have your patient don the socket. -
Page 7: Closure System Engagement
Closure System Engagement Engage closure system by pushing the BOA dial ® towards the limb unitil a click can be heard. Turn the dial clockwise to achieve desired fit. Photo courtesy of Click Medical™ Tip: If patient is experiencing excessive distal end contact, check the BOA ®... -
Page 8: Doffing The Socket
Doffing The Socket Before doffing, loosen closure system by pulling the BOA dial away from ® the limb. Disengage suspension mechanism. Remove limb from socket. Infinite Socket™ TT-S Posterior View... -
Page 9: Torque Specifications
Torque Specifications All screws take medium Do not over use thread strength threadlocker locker and it may (Loctite 242). damage suspension. ® 3 Nm Hand tight flush with surface 3 Nm 10 Nm... -
Page 10: Troubleshooting
Troubleshooting For specifics of how to perform adjustments, please refer to technical appendices Problem Possible Solution(s) Patient having too • Turn BOA ® dial clockwise much pressure on • Make sure alignment is correct distal tibia • Move pressure management strap laterally •... -
Page 11: Warranty Information
Warranty applies when the Infinite Socket is used as intended without unapproved modifications. The warranty can be void if the clinician does not comply with LIM virtual clinical support including but not limited to, the first product fittings. -
Page 12: Technical Appendices
Technical Appendices Aligning the L-Bracket Textile Cover Pressure Management Strap Anteror Guides Anteror Guide Angle Posterior Pad Posterior Wall Height Adjustment Heat Remolding Suspension... -
Page 13: Aligning The L-Bracket
Aligning the L-Bracket The L-Bracket slides to accommodate up to 26 mm. It may be used for foot clearance or alignment needs. To adjust: 1. Loosen 4 distal mount screws. 2. Slide desired amount. 3. Tighten 4 distal screws per torque specifications. Distal View - L-Bracket... -
Page 14: Textile Cover
Remove the cover, using a 2.5 mm wrench, unscrew from the proximal attachment points and slide away from the socket. Infinite Socket TT-S - Medial view Attachment point highlighted Tip: Cover can be machine washed on cold and left to air dry. -
Page 15: Pressure Management Strap
Pressure Management Strap The closure system provides a tapered closure system. Closure bias can be controlled with the pressure management strap. To adjust: 1. Release BOA dial to ® relieve tension in the lace. 2. Release strap from peninsula (proximal screw) and pull to adjust. - Page 16 Pressure Management Strap Lateral Adjustments Medial Adjustments When strap is moved to a When strap is moved to a more lateral position, the more medial position, the closure system provides a closure system provides a proximal bias concentrated distal bias concentrated at the at the level of the patellar.
-
Page 17: Anteror Guides
Anterior Guides The anterior guides’ position can be adjusted for line of pull control or to avoid sensitive areas. To adjust: 1. Remove guides using 2.5 mm hex wrench. 2. Remove stickers covering additional hole locations. 3. Place guide in desired location. -
Page 18: Anteror Guide Angle
Anterior Guide Angle Guides should be positioned in an orientation that evenly splits the angle of pull. Be sure the lace is not running over the screw. Loosen and turn the guides according to the diagrams. Anterior guide Correct line of pull Anterior guide Incorrect line of pull... -
Page 19: Posterior Pad
Posterior Pad The posterior pocket houses a flexible posterior pad. This pad is removable, replaceable and customizable to adjust posterior pressure. To adjust: Access the pad by removing the two most proximal anterior guides. 2. Slide the anterior elastic up and over the socket. -
Page 20: Posterior Wall Height Adjustment
Posterior Wall Height Adjustment The peninsula is adjustable in height allowing for hamstring relief and posterior force location control. To adjust: Loosen BOA dial to remove ® all tension from lace. 2. Remove screws from the peninsula and reattach at desired position. -
Page 21: Heat Remolding
Heat Remolding The socket’s interface is heat remoldable. To adjust: Remove textile cover, all firmwear abd anterior guides as needed. 2. With heat gun on low setting; heat general target area at a minimum of 2 inches away. 3. Heat for approximately 4 minutes while constantly moving the heat gun. -
Page 22: Suspension
Suspension Suction Valve Adjustments Pin Lock Adjustments 1. If you experience a lack of 1. If you experience a clicking suction, be sure the valve is sound originating from the orientated correctly. lock, employ the use of the provided washers (0.5 mm 2. - Page 23 424 9th Street, San Francisco, CA 94103 (844)888-8546 info@liminnovations.com www.LIMinnovations.com...
Need help?
Do you have a question about the INFINITE SOCKET TT-S and is the answer not in the manual?
Questions and answers