Table of Contents
Advertisement
Quick Links
Advertisement
Table of Contents

Related Manuals for AVYCON AVK-P1000

Summary of Contents for AVYCON AVK-P1000
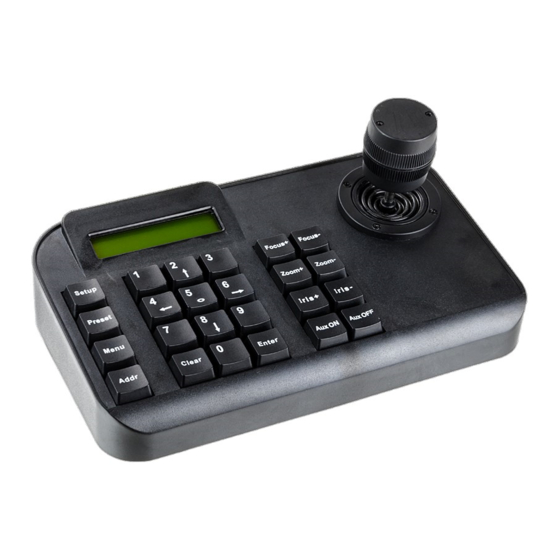
- Page 1 AVK-P1000 PTZ controller User Manual...
- Page 2 This manual might be not accurate technically or contains some minor typo errors. The contents about production description and program in this manual might be updated at any time without notice. Cautions: The LCD is fragile, no crush or long-exposed under strong light.
-
Page 3: Table Of Contents
INDEX 1 Product Introduction ..............1 1.1 Package Contents ..............1 1.2 Main Functions ................2 1.3 Specification ................3 2 Installation ..................4 2.1 Dimension ..................4 2.2 External Connection ..............5 3 Operation ................... 7 3.1 Keyboard Self-detection ............7 3.2 Joystick Operation .............. -
Page 4: Product Introduction
1 Product Introduction 1.1 Package Contents Keyboard 1 pc Power supply 4Pin Line Pressing Terminals User manual... -
Page 5: Main Functions
1.2 Main Functions The address range of PTZ or dome camera or decoder can be set from 0~255. At most, 128 devices can be connected in parallel. All input and output communication ports are lightning protection design and the anti-jamming ability is strong. The standard transmission distance is up to 1.2km. -
Page 6: Specification
1.3 Specification AVK-P1000 Keyboard Product Power Supply DC12V+10%/50HZ 500mA Operating -20℃~+55℃ Temperature Operating ≤90% Non Condensing Humidity Communication RS-485 Interface 4PIN Line Pressing Terminals 1200bps, 2400bps, 4800bps, Baud Rate 9600bps, 19200bps Communication PELCO-D, PELCO-P,SAMSUNG, Protocal YAAN, SAE Communication One point to multi-points... -
Page 7: Installation
2 Installation After open keyboard package, please keep the original packaging materials, so that when there is a problem, keyboard with original packaging materials can be sent back to the agent or the manufacturer for reparation. Non-original packaging material may lead to an unexpected transit damage, which may cause additional costs. -
Page 8: External Connection
camera. T+ is connected to RS485+ and T- to RS485-. R+ and R- are reserved. Power indicator: It shows the present power status. Light on means power connected well. COMM indicator: When keyboard connect to dome camera or PTZ, this light is on. 2.2 External Connection Please read the user manual carefully before any connection. - Page 9 The control system of controlling multiple dome cameras is as below: Notice: Before using the keyboard to control dome camera, please make sure the address, protocol, baud rate of the keyboard is set the same to the dome or PTZ camera. Otherwise, the dome or PTZ camera can’t be controlled.
-
Page 10: Operation
3 Operation 3.1 Keyboard Self-detection PELCO-D 2400 000 SYSTEM STARTUP < < < < < < Fig 3.1.1 Fig 3.1.2 After power on, the keyboard take the following actions automatically: A. Self-detecting: The first line of LCD display shows “SYSTEM STARTUP”. The second line shows “<”... - Page 11 Vector joystick outline is as below: Vector Joystick has three main functions as following: (1) Control dome camera rotation: Rocking the joystick in any direction, camera moves in appropriate direction. At the same time, the LCD displays "PTZ <<<<<". Controlling rocker of rotary speed of inclination can control the speed of the camera.
-
Page 12: Key Operation
down is to select the next menu option. Joystick left or right can change parameters of the selected menu (as described in the LCD menu operation). 3.3 Key Operation 【Focus+】: Manual focus on far object. The far objects come clear and the near objects come blurring. 【Focus-】... -
Page 13: Menu Operation On Lcd
communication address. 【0】~【9】: Number keys [0], [1], [2], [3], [4], [5], [6], [7], [8], [9]. 【Clear】: Delete key, [Clear]+number+[Enter] to delete the preset point. 【Enter】: Confirm key, to confirm the present operation. 【Aux ON】: Aux ON. 【Aux OFF】: Aux OFF. 3.4 Menu Operation on LCD Enter the menu on LCD: Press【Menu】... -
Page 14: Menu Operation Mode
3.4.1 Menu Operation Mode There are two modes of menu operation: (1) Joystick operation: Joystick up and down to flip the menu. Joystick left and right + [Enter] to set the parameters of the menu. (2) Key operation: Press [2], [8] to flip the menu. Press [4], [6]+ [Enter] to set the parameters of the menu. -
Page 15: Menu Operation
below (e.g communication address): MENU ADDRESS Menu Setting Range: PROTOCOL: PELCO-P/ PELCO-D/ SAMSUNG/ YAAN/ LANGUAGE: ENGLISH SOUND: ON/OFF ADDRESS: 000 ~ 255 BAUD RATE: 1200/2400/4800/9600/19200 BPS 3.5 Menu Operation When joystick and keys are operated at the same time, joystick operation is preferred. - Page 16 When there is nothing in the second line on LCD as Fig 3.5.1, number keys [2], [8], [4], [6] can be used as up, down, left and right keys to control PTZ or dome camera left and right rotation as the function of joystick. But the rotation speed is the fastest and no grades to select, shown as 3.5.2 (e.g key [2]).
-
Page 17: Keyboard Short Commands
finishes, it will enter baud rate setting [BAUD RATE 2400]. When go back to [ADDRESS] again, the menu interface displays [ADDRESS 000]. The present set value can’t be seen. When exit menu, the first line on LCD displays the present communication address. -
Page 18: Appendixⅰ Analysis And Solution Of Common Problem
AppendixⅠ Analysis and Solution of Common Problem Possible Issue Solution Reason Nothing on Check power cable connection LCD after and connect it well No power item is turned Make sure power is DC12V Check protocol of keyboard. Protocol is Make sure it is the same to the wrong dome or PTZ camera. -
Page 19: Copyright Statement
Copyright Statement This copyright merely belongs to the manufacturer. Without permission, please don’t plagiarize or copy the contents of this book in any form or by any means. The company follows the policy of continuous development. Therefore, the company reserves the right to modify or improve the products described in this manual without notice.
Need help?
Do you have a question about the AVK-P1000 and is the answer not in the manual?
Questions and answers