Table of Contents
Advertisement
Quick Links
Advertisement
Table of Contents

Related Manuals for X-Cite Exacte

Summary of Contents for X-Cite Exacte
- Page 1 X-Cite exacte User Guide ®...
- Page 2 X-Cite® exacte User Guide 035-00283 Rev. 3 Made in Canada Excelitas Canada Inc. 2016 All rights reserved No part of this publication may be reproduced, transmitted, transcribed, stored in a retrieval system or translated into any language in any form by any means without the prior written consent of Excelitas Canada Inc.
-
Page 3: Table Of Contents
Viewing Accumulated Lamp Hours ..............22 Closed-Loop Feedback™ (CLF) ............... 22 Calibration/Radiometry (optional) ............... 24 ® X-Cite exacte Power Reading using the XR2100 Power Meter or XR2000; ..24 ® X-Cite exacte Calibration using the XR2100 (or XR2000) & Light Guide ..25 ®... - Page 4 10.2 Power Up Failure ..................37 10.3 Lamp Strike Failure ..................37 10.4 Low Light Intensity ..................38 10.5 Shutter Failure....................38 10.6 LED Display Failure ..................38 10.7 Cooling Fan Failure ..................38 11. Care and Maintenance ..................39 11.1 General ......................
-
Page 5: X-Cite Exacte Message Reference
1. X-Cite exacte Message Reference ® Display Definition Description Message Displays the iris setting, which gives relative intensity as Intensity Setting (%) percentage of the lamp’s maximum output Displays the power setting, which gives absolute XX.XX Power Setting (watts) intensity in terms of watts... -
Page 6: Introduction
® The X-Cite exacte is a high quality product manufactured in accordance with ISO 9001, CE marked and certified to UL, China RoHS and CSA standards. We suggest that you read this manual to discover all its features, and how to use them. -
Page 7: Safety
CAUTION - Risk of danger: consult accompanying documents WARNING -Eye damage may result from directly viewing ultraviolet light – protective eye shielding and clothing must be used at all times. Input/Output Signals Input Signal CAUTION – Hot Surface ® X-Cite exacte User Guide 035-00283 rev 3... -
Page 8: Safety Precautions
3.2 Safety Precautions ® The X-Cite exacte is equipped with two safety sensors to protect the user from accidental UV exposure. In addition, please observe the following precautions during use. This series of cautions, warnings and dangers relate to the operation and ®... - Page 9 http://www.environmental- expert.com/technology.aspx?idCategory=2054&word=mercury%20spill%20kits http://www.alibaba.com/products/spill_kit/4.html Warning ® Should this X-Cite exacte unit be used in a manner not specified by Excelitas Technologies, the protection provided by the equipment may be impaired. ® X-Cite exacte User Guide 035-00283 rev 3...
- Page 10 Prior to opening the unit and handling the lamp module, allow a minimum of 5 minutes for the lamp module to cool down completely. Caution ® Any electronic equipment connected to the X-Cite exacte must comply with the requirements of EN/IEC 60950. Cleaning: Clean the exterior of the unit with a slightly dampened cloth and simple water/ detergent solution only.
-
Page 11: Getting Started
4. Liquid Light Guide (3mm x 1.5m or 3mm x 3.0m)……………………………………………… 5. Power Cord, IEC (shielded and grounded)……………………………………………………... ® 6. Quick Start Guide, X-Cite exacte (User Guide, Software and Driver downloads: http://www.excelitas.com/Pages/Product/X-Cite-exacte.aspx)…………………………………..7. Foot Pedal Switch Assembly…………………………………………………………………….. 8. USB Cable (A-B type)…………………………………………………………………………….. -
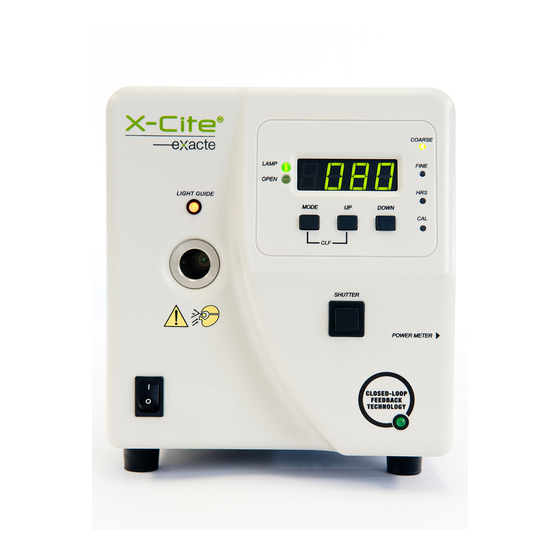
Page 12: Front Panel
LIGHT GUIDE STATUS LED CALIBRATION LIGHT GUIDE STATUS LED PORT MODE DOWN ADJUST BUTTON OWER ETER CALIBRATION PORT POWER ON SWITCH SHUTTER CLOSED LOOP ACTIVATION FEEDBACK LED BUTTON Figure 1 Front Panel ® X-Cite exacte User Guide 035-00283 rev 3... -
Page 13: Rear Panel
4.3 Rear Panel TTL INPUT FOR SHUTTER TTL OUTPUT CONNECTION FOR SHUTTER SYNC FOOT PEDAL AC RECEPTACLE INPUT AND FUSE DRAWER Figure 2 Rear Panel ® X-Cite exacte User Guide 035-00283 rev 3... -
Page 14: Installation/Set-Up
LAMP HOUSING SIDE PANEL Figure 3 Side Panel ® Tip: Clips for holding the hex tool on the X-Cite exacte are conveniently located underneath the system housing. 5.1.3 Carefully remove the lamp module from its container, holding only the ceramic component and lamp rim. - Page 15 5.1.5 Make sure the middle of the lamp is in position to fit into the spring clamp. Slide the lamp until it snaps into the spring clamp. The leading edge of the reflector (lamp rim) should fit snugly into the lamp holder recess. SPRING CLAMP ® X-Cite exacte User Guide 035-00283 rev 3...
- Page 16 CONNECTOR Figure 5 Lamp connections 5.1.7 Locate power connector with two leads and connect it to its mate located on the side of the lamp-housing wall. CENTER BAR AND LEAD WITHIN CUT ® X-Cite exacte User Guide 035-00283 rev 3...
-
Page 17: Inserting/Removing Light Guide
5.2 Inserting/Removing Light Guide ® 5.2.1 Ensure the power is not connected to the X-Cite exacte unit. 5.2.2 Ensure that the protective end caps are removed from both the input and output ends of the light guide prior to installation. - Page 18 ® Note: The X-Cite exacte is designed for use with a 3mm liquid light guide. ® Excelitas Technologies can not guarantee the performance of the X-Cite exacte if using light guides other than those supplied by Excelitas Technologies.
-
Page 19: Tips To Prevent Premature Degradation Of Light Guides
5.3 Tips to Prevent Premature Degradation of Light Guides ® 5.3.1 Liquid light guides have a typical useful life of 2-3 years in the X-Cite exacte when installed and handled properly. The formation of bubbles is one of the most common reasons for a light guide to degrade prematurely and result in a sudden reduction in illumination intensity. -
Page 20: Installing The Collimating Adapter
(i.e. during sample preparation, ® or between time lapse time points) close the iris/shutter on the X-Cite ; this reduces unnecessary UV photon load on the liquid light guide. (Using only the shutter/stop in the microscope itself protects the specimen, but energy is still passing through the light guide.) - Page 21 Figure 7 Collimating Adapter Warning! ® Turning power on to the X-Cite exacte unit without the light guide properly installed in the unit and in the microscope can increase your risk of exposure to UV light. ® X-Cite exacte User Guide...
-
Page 22: Operation
6.1.1 Ensure that the lamp and light guide have been properly installed and that the lamp housing panel is securely fastened. ® 6.1.2 Plug the X-Cite exacte unit into a properly grounded AC outlet. ® Warning! Turning power on to the X-Cite exacte unit without the light guide properly installed in the unit and in the microscope can increase your risk of exposure to UV light. -
Page 23: Quick Start: Illuminating A Specimen
® 6.2.1 When the X-Cite exacte is first powered on, the internal shutter will be in the closed position as a safety precaution and the iris will be in the 0% position. 6.2.2 To illuminate a specimen, press and release the SHUTTER button to open the shutter (OPEN LED will turn on). -
Page 24: Led Indicators
The unit is in lamp hours mode; LED display HOURS indicates accumulated lamp hours ® The X-Cite exacte has been successfully calibrated with Radiometer or Power Meter ® The X-Cite exacte is not calibrated Blinking Calibration will expire within 12 hours... -
Page 25: Output Intensity Modes
6.6 Output Intensity Modes ® 6.6.1 The X-Cite exacte can be operated in two different output modes: Relative and Absolute. Relative Mode: Intensity level is adjusted and displayed as a percentage of the lamp’s current maximum output. When operating in relative mode, intensity is displayed using three digits (“XXX”) on the display screen. -
Page 26: Viewing Accumulated Lamp Hours
® 6.8.2 To put the X-Cite exacte in Lamp Hour Mode, press the MODE button until the HRS LED on the front panel is illuminated. The LED display will show four digits with a flashing decimal point at the end (“XXXX.”). The number shown here will be the total number of hours the lamp has been in operation. - Page 27 NOTE: The intensity setting cannot be changed while CLF is engaged, however, the MODE button can be used as usual to toggle between display modes to view hours, iris position and power set point. ® X-Cite exacte User Guide 035-00283 rev 3...
-
Page 28: Calibration/Radiometry (Optional)
7. Calibration/Radiometry (optional) ® ® All X-Cite exacte units are capable of being calibrated with an X-Cite Power Meter ® XR2100 or X-Cite Radiometer XR2000 (optional accessories). Once calibrated, the lamp output can be set in absolute units (watts), for easily repeatable illumination levels. -
Page 29: X-Cite Exacte Calibration Using The Xr2100 (Or Xr2000) & Light Guide
035-00390R. 7.2.2 Attach the Stereo Connection Cable to the port on the right side of the XR2100 ® (under flap in rubber boot), and the port on the right side of the X-Cite exacte. ® 7.2.3 Press and release the X-Cite exacte CAL button on the XR2100. -
Page 30: To Clear A Calibration
CAL button on the XR2100 to perform an XP750 calibration. ® 7.3.7 The X-Cite exacte will display CAL, and the XR2100 will display a moving dash ( – ) while the calibration sequence is running ® 7.3.8 When the calibration is complete, the CAL LED on the X-Cite exacte will light ®... -
Page 31: Warnings And Alarms
8. Warnings and Alarms ® The X-Cite exacte is designed to detect certain conditions that may affect safe or proper functioning. These conditions are categorized as one of three “alarm types” according to the danger they pose to the operator, system or experiment: Critical Safety –... -
Page 32: Clearing Alarms
8.1 Clearing Alarms ® 8.1.1 The X-Cite exacte provides an audible alarm to alert the operator of various error conditions. 8.1.2 To silence the audible alarm: 1. Manually: Press the front panel MODE button 2. Remotely: a. From the Graphical User Interface (GUI), by clicking the “Alarm” icon. -
Page 33: External Control
1. Click Next. ® ® 8. The X-Cite exacte has a virtual COM port for support of the X-Cite 120PC communication protocol. Another piece of hardware will be detected, follow steps 5-7 again. -
Page 34: Graphical User Interface Panel
9.3 Graphical User Interface Panel ICON SIDE PANEL TABS OPTICAL DATA STATUS DATA CALIBRATION DATA DATA LOG POWER SNAPS SHOT STABILITY DATA DATA LOG ICONS STATUS ICONS FUNCTIONS ICONS Figure 8 GUI Control Panel ® X-Cite exacte User Guide 035-00283 rev 3... -
Page 35: Icons And Functions
Green = ON, if clicked ON intensity will freeze, click again to turn off. Lock/unlock the front panel controls on the unit ® Green = front panel of X-Cite exacte locked ® Grey = front panel of X-Cite exacte unlocked,... - Page 36 GUI control will be used and the front panel shutter button is disabled. ® 3. When icons are ALL grey, the X-Cite exacte is either disconnected or not communicating properly with the computer 4. Side Panel Tabs shown greyed-out in Figure 8 GUI Control Panel will not be ®...
-
Page 37: Logging Stability Data
9.6.1 The Control Panel will automatically log events such as alarm conditions, calibration expiry, and CLF turning off. User-defined events or information ® relating to the X-Cite set-point, or experimental conditions can also be logged in the data file. To log an event: 1. -
Page 38: Shutter Control Via Foot Pedal
2. Place the foot pedal on the floor or another conveniently located flat surface. ® 3. Power-up the X-Cite exacte as normal, and wait for the lamp to warm up. 4. Press down on the foot pedal until it clicks to open or close the shutter. 9.9 Shutter control via TTL 9.9.1 For high-speed shutter activation, TTL control can also be used. -
Page 39: Software Developer's Kit (Sdk)
Maximum output current: 500uA Typical input current: 800uA 9.10 Software Developer’s Kit (SDK) ® The command list for X-Cite exacte is available by request. To obtain the latest update, please contact Excelitas Technologies. ® X-Cite exacte User Guide 035-00283 rev 3... -
Page 40: Troubleshooting
Service to be completed by qualified repair personnel only! 10.1 Error Codes ® If the X-Cite exacte internal monitoring systems identify a problem, an error code will be generated. Definitions and recommended actions are in the following table. Code Error Description... -
Page 41: Power Up Failure
If it still does not strike, replace the lamp. The LED display indicates the “cool” message. This indicates the lamp is too hot to strike. The lamp will automatically strike when it has cooled. ® X-Cite exacte User Guide 035-00283 rev 3... -
Page 42: Low Light Intensity
Check the microscope settings, filter cubes, ND filters, manual stops, polarisers, and position of camera port beam splitters for anything that may be blocking the light ® path between the X-Cite and eyepieces/camera. It may be necessary to replace the lamp or to replace the light guide. -
Page 43: Care And Maintenance
11. Care and Maintenance ® Note: Unless otherwise specified, information in this section applies to all X-Cite lamp illuminators, regardless of which model may be depicted 11.1 General 11.1.1 This section contains installation, maintenance and troubleshooting tips to help ®... -
Page 44: Liquid Light Guides
® unit (i.e. up to the “A” line 11.2.2 Always fully insert the light guide in to the X-Cite printed on the grey ferrule); this ensures contact with a heat sink to conduct heat away from the light guide. - Page 45 11.2.7 Depending on the size and location in the light guide, a bubble may or may not be obvious. To check for bubbles: ® 11.2.8 Disconnect the LLG from the X-Cite and microscope adapter. 11.2.9 Hold one end towards a bright window or overhead room light - DO NOT use an ®...
- Page 46 11.2.12 Yes, light guides with small bubbles can sometimes recover. Disconnect the ® light guide from the X-Cite unit, and leave the light guide undisturbed on a shelf for 1-2 weeks. For this to be effective, it is important to catch the bubble when it is small.
-
Page 47: Lamps
~70% of the initial output for the remainder of the lamp life. If the lower power regions of the output spectra are being used, it may be desirable to replace lamps more frequently to maximize signal levels. ® X-Cite exacte User Guide 035-00283 rev 3... -
Page 48: Replacing The Lamp Module
2. After lamp ignition, avoid turning the lamp off until it has run for a minimum of 20 minutes ® ’s Intelli-Lamp will prevent 3. Avoid attempting to strike a hot lamp (note: the X-Cite this) 4. Avoid unnecessary movement and jarring of the lamp, especially when it is in operation or hot. -
Page 49: Air Vents & Filters
Ensuring adequate cooling ® 11.5.2 Never obstruct the air vents on the X-Cite unit. Vents are located at the rear and underside of the unit. (Note: Arrows indicate direction/location of air flow. In ®... - Page 50 This may compromise airflow through the unit. ® unit is approximately “room 11.5.4 Ensure that the air being used to ventilate the X-Cite temperature” (e.g. do not place the X-Cite ® unit on top of another heat-producing instrument).
-
Page 51: Replacing The Air Filter
11.6 Replacing the Air Filter ® 11.6.1 The external air filter is located under the front face plate of the X-Cite exacte. 11.6.2 Turn off the main POWER switch and remove the AC POWER cord from the unit. 11.6.3 Gently slide and pull out the filter. -
Page 52: Technical Specifications
Relative Humidity: 15% to 95% (non-condensing) Installation Category: Pollution Degree: Enclosure Rating: IPXO Transport and Storage Conditions Temperature: -40 to +70ºC Relative Humidity: 10% to 100% Atmospheric Pressure: 500 to 1060 hPa ® X-Cite exacte User Guide 035-00283 rev 3... -
Page 53: Lamp
2000 hours Warm Up 20 minutes (min), reference sections 3.1 Glossary of Symbols and 6.1 Powering Up/Powering Down. CAUTION: ® Use only Excelitas Technologies lamp part number 012-66000R in the X-Cite exacte unit. ® X-Cite exacte User Guide 035-00283 rev 3... -
Page 54: Light Guide
8.2" / 20.6cm Depth: 13.3" / 33.8cm Width: 7.1" / 18.0cm Weight: 10.8lbs / 4.9kg ® Note: X-Cite exacte unit dimensions only, does not include clearance at front of unit for liquid light guide. ® X-Cite exacte User Guide 035-00283 rev 3... -
Page 55: Regulatory
13. Regulatory 13.1 Product Safety and Electromagnetic Compatibility: ® The X-Cite exacte has been tested and found to comply with product safety and electromagnetic compatibility requirements. For a complete list of tests and for ® certification details, please contact your X-Cite representative or visit http://www.excelitas.com/Pages/Product/X-Cite-exacte.aspx. -
Page 56: China Rohs
If you need more information on the collection, reuse and recycling systems, please contact your local or regional waste administration. 13.2 China RoHS The symbol above indicates that this product is in compliance with China RoHS requirements. ® X-Cite exacte User Guide 035-00283 rev 3... -
Page 57: Warranty
® If the X-Cite exacte bulb fails to strike during the warranty period of 2000 hours, the bulb will be replaced under warranty, or a credit will be applied to the purchaser’s account. In the event of a claim under this guarantee, the lamp is to be sent postage and carriage paid, including a description of the fault, to the Excelitas Technologies Service Center. -
Page 58: Contact Information
Hex Key, 3mm (lamp access cover) 010-00245R (Optical ® X-Cite XR2100 Optical Power Meter (010-00242R) Power Measurement ® X-Cite XP750 Objective Plane Power Sensor (010-00241R) System) ® 035-00287 X-Cite exacte Quick Start English ® X-Cite exacte User Guide 035-00283 rev 3...
Need help?
Do you have a question about the Exacte and is the answer not in the manual?
Questions and answers