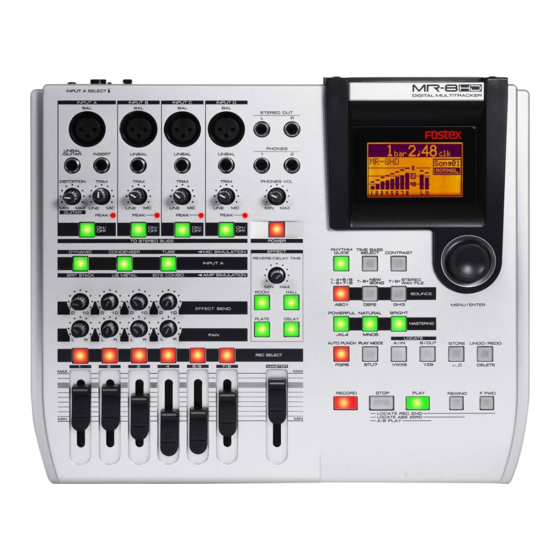
Fostex MR-8HD/CD Manual
Software update procedures
Hide thumbs
Also See for MR-8HD/CD:
- Supplementary manual (28 pages) ,
- Owner's manual (148 pages) ,
- Brochure & specs (6 pages)
Advertisement
Quick Links
SOFTWARE UPDATE PROCEDURES
1) Connect the AC power cable to the AC IN connector. The MR-
8HD/CD power switch starts fl ashing in red.
2) Press the MR-8HD/CD power switch. MR-8HD/CD starts booting
up and the power switch is lit solid in red. After a short while, the
normal display appears on the LCD.
3) Press the [MENU/ENTER] dial to enter the MENU mode.
4) Rotate the [MENU/ENTER] dial and select the "USB" menu.
5) Press the [MENU/ENTER] dial.
6) Rotate the [MENU/ENTER] dial and select the "Disk Protect"
menu.
7) Press the [MENU/ENTER] dial and set "Disk Protect" to "Off" by
rotating the [MENU/ENTER] dial. Then, press the [MENU/EN-
TER] dial. With this setting, the Disk Protect mode is turned off
indicating the condition that the software update fi le can be copied
to the MR-8HD/CD internal HDD.
8) Rotate the [MENU/ENTER] dial to select the "< < Back" menu
and press the [MENU/ENTER] dial.
9) Rotate the [MENU/ENTER] dial and select the "USB Device
Mode" menu.
10) Press the [MENU/ENTER] dial. If MR-8HD/CD is correctly put
into the USB mode, the display on the right will appear on the
LCD. Now MR-8HD/CD is ready to connect to PC or Macintosh.
11) Connect the USB cable from the MR-8HD/CD USB port to PC on
which Windows XP/2000 is running or Macintosh on which OS X
is running.
CAUTION: MR-8HD/CD can be connected to PC on which Windows XP/2000 is running or Macintosh
on which OS X is running for software update as well as audio data transfer. Of course PC/
Macintosh has to be equipped with a USB port.
AC-IN
INPUT A SEL
GTR CLEAN
MIC/LINE
GTR DIST
DIGITAL
USB
USB HOST
MIDI OUT
OUT
FOOT SW
USB port
1
USB port
Advertisement

Related Manuals for Fostex MR-8HD/CD


Summary of Contents for Fostex MR-8HD/CD
- Page 1 Windows XP/2000 is running or Macintosh on which OS X is running. CAUTION: MR-8HD/CD can be connected to PC on which Windows XP/2000 is running or Macintosh on which OS X is running for software update as well as audio data transfer. Of course PC/ Macintosh has to be equipped with a USB port.
- Page 2 12) PC or Macintosh recognizes MR-8HD/CD as an external removable disk. (a) Windows XP/2000 The example on the right indicates that MR-8HD/CD is recognized as a remov- able disk (F) in the My Computer on Windows XP PC. Unzip the software update file with “zip”...
- Page 3 After transferring the software update fi le is com- pleted, do not tun off the USB connection by pressing the MR-8HD/CD STOP key. First, you need to safely remove the MR-8HD/CD from PC side by opening the “Safety Remov- able Hardware” in the tool bar and pressing the “Stop”...
- Page 4 USB connection from the MR- 8HD/CD side. CAUTION: There is a case that it takes time for PC or Macintosh to recognize MR-8HD/CD as an external device. While the “ACC” (access) indication on the upper right of the MR-8HD/CD LCD is fl...
- Page 5 21) The selected software fi le is displayed together with the software version number. To go on, press the [MENU/ENTER] dial while holding down the [REC] key. 22) The software updating procedures begin. “File loading...”, “Flash ROM Erasing...” and “Flash ROM Writing...” will appear in order. It will take about one minute to complete the procedures.
- Page 6 The display on the right will appear on the LCD. It indicates that the programming date is October 16th, 2006 and the version number is V1.01. To get back to the normal display, press the [STOP] key. 25) Press the [STOP] key to return to the normal display mode. Then, press the [MENU/ENTER] dial to enter the MENU mode.
Need help?
Do you have a question about the MR-8HD/CD and is the answer not in the manual?
Questions and answers