Advertisement
Quick Links
ATS-12C
ATS-30C
Best.-Nr. 24.3930
Best.-Nr. 24.4320
D
A
CH
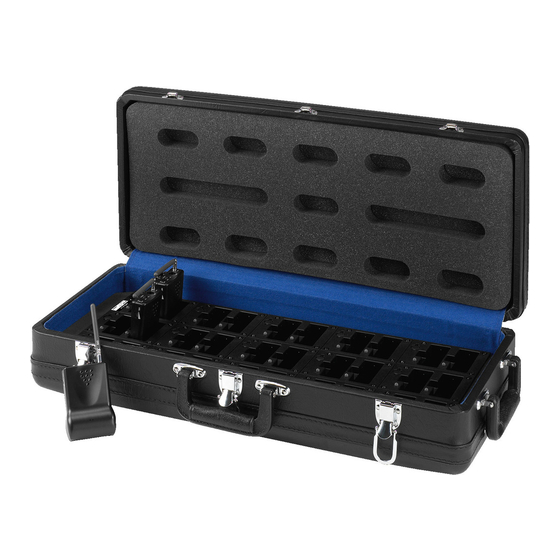
Transportkoffer mit
Ladefunktion
1
Verwendungsmöglichkeiten
In diesem Koffer lassen sich mehrere Taschensen-
der ATS-10TM, ATS-10TL und Empfänger ATS-10R
verstauen und komfortabel transportieren:
– im Koffer ATS-12C max. 12 Geräte
– im Koffer ATS-30C max. 30 Geräte
Der Koffer besitzt außerdem eine integrierte Lade-
funktion: Bei Anschluss an das Stromnetz über sein
beiliegendes Netzgerät werden die Akkus aller ein-
gesetzten Geräte gleichzeitig aufgeladen.
2
Hinweise für den sicheren Gebrauch
Der Ladekoffer und das Netzgerät entsprechen der
Richtlinie 89/336/EWG für elektromagnetische
Verträglichkeit. Das Netzgerät entspricht zusätzlich
der Niederspannungsrichtlinie 73/23/EWG.
Achtung! Das Netzgerät wird mit lebensgefähr-
licher Netzspannung versorgt. Nehmen Sie des-
halb nie selbst Eingriffe am Gerät vor. Durch un-
sachgemäßes Vorgehen besteht die Gefahr eines
elektrischen Schlages. Außerdem erlischt beim
Öffnen des Geräts jeglicher Garantieanspruch.
Beachten Sie auch unbedingt die folgenden Punkte:
Mit diesem Ladekoffer dürfen nur NiCd-Akkus
oder NiMH-Akkus aufgeladen werden. Nicht wie-
deraufladbare Batterien können beim Versuch sie
aufzuladen, auslaufen oder explodieren!
Setzen Sie zum Aufladen nur Akkus gleichen
Typs in den Sender oder Empfänger und tau-
schen Sie die Akkus immer paarweise aus.
Transport Case with Charging
GB
Facility
1
Applications
This case allows storage and convenient transport
of several ATS-10TM, ATS-10TL pocket transmit-
ters and ATS-10R receivers:
– case ATS-12C: 12 units max.
– case ATS-30C: 30 units max.
In addition, the case is equipped with an integrated
charging facility: When connected to the mains via
its supplied power supply unit, the rechargeable bat-
teries of all units inserted will be charged at the
same time.
2
Safety Notes
The charging case and the power supply unit corre-
spond to the directive for electromagnetic compati-
bility 89/336/EEC. The power supply unit also cor-
responds to the low voltage directive 73/23/EEC.
Attention! The power supply unit is supplied with
hazardous mains voltage. Leave servicing to skilled
personnel only. Inexpert handling may cause an
electric shock hazard. Furthermore, any guarantee
claim will expire if the unit has been opened.
Please observe the following items in any case:
Only use this case for charging NiCd or NiMH bat-
teries. If non-rechargeable batteries are charged,
this may result in leakage or explosion!
Only insert rechargeable batteries of the same
type into the transmitter or the receiver and
always replace the batteries in pairs.
The charging case and the power supply unit are
suitable for indoor use only. Protect the units
against dripping water and splash water, high air
humidity, and heat (admissible ambient tempera-
ture range 0 – 40 °C).
Do not place any vessel filled with liquid on the
units, e. g. a drinking glass.
®
Copyright
Der Ladekoffer und das Netzgerät sind nur zur
Verwendung im Innenbereich geeignet. Schützen
Sie die Geräte vor Tropf- und Spritzwasser, hoher
Luftfeuchtigkeit und Hitze (zulässiger Einsatz-
temperaturbereich 0 – 40 °C).
Stellen Sie keine mit Flüssigkeit gefüllten Gefäße,
z. B. Trinkgläser, auf die Geräte.
Nehmen Sie den Ladekoffer nicht in Betrieb bzw.
ziehen Sie sofort den Netzstecker des Netzgeräts
aus der Steckdose:
1. wenn sichtbare Schäden am Ladekoffer, am
Netzgerät oder an der Netzanschlussleitung
vorhanden sind,
2. wenn nach einem Sturz oder Ähnlichem der
Verdacht auf einen Defekt besteht,
3. wenn Funktionsstörungen auftreten.
Lassen Sie die Geräte in jedem Fall in einer Fach-
werkstatt reparieren.
Ziehen Sie den Netzstecker des Netzgeräts nie
am Kabel aus der Steckdose, fassen Sie immer
am Stecker an.
Verwenden Sie für die Reinigung nur ein trocke-
nes, weiches Tuch, niemals Wasser oder Chemi-
kalien.
Werden die Geräte zweckentfremdet, nicht richtig
angeschlossen oder nicht fachgerecht repariert,
kann keine Haftung für daraus resultierende
Sach- oder Personenschäden und keine Garan-
tie für die Geräte übernommen werden.
Sollen die Geräte endgültig aus dem Betrieb ge-
nommen werden, übergeben Sie sie zur umwelt-
gerechten Entsorgung einem örtlichen Recycling-
betrieb.
Do not operate the charging case or immediately
disconnect the mains plug of the power supply
unit from the socket
1. in case of visible damage to the charging case,
to the power supply unit, or to the mains cable,
2. if a defect might have occurred after the unit
was dropped or suffered a similar accident,
3. if malfunctions occur.
In any case the units must be repaired by skilled
personnel.
Never pull the mains cable for disconnecting the
mains plug of the power supply unit from the
socket, always seize the plug.
For cleaning only use a dry, soft cloth; never use
chemicals or water.
No guarantee claims for the units and no liability for
any resulting personal damage or material damage
will be accepted if the units are used for other pur-
poses than originally intended, if they are not cor-
rectly connected or not repaired in an expert way.
Important for U. K. Customers!
The wires in the mains lead of the power supply unit
are coloured in accordance with the following code:
green/yellow = earth,
blue = neutral, brown = live
As the colours of the wires in the mains lead of this
appliance may not correspond with the coloured
markings identifying the terminals in your plug,
proceed as follows:
1. The wire which is coloured green and yellow
must be connected to the terminal in the plug
which is marked with the letter E or by the earth
symbol
, or coloured green or green and
yellow.
2. The wire which is coloured blue must be con-
nected to the terminal which is marked with the
letter N or coloured black.
3. The wire which is coloured brown must be con-
nected to the terminal which is marked with the
letter L or coloured red.
Warning – This appliance must be earthed.
©
by MONACOR INTERNATIONAL GmbH & Co. KG, Bremen, Germany. All rights reserved.
3
Aufladen der Akkus
1) Den Koffer öffnen. Die Buchse für den Anschluss
des Netzgeräts befindet sich neben dem ganz lin-
ken hinteren Ladeschacht. Den Kleinspannungs-
stecker des Netzgeräts in die Buchse stecken.
2) Das Netzgerät über das mitgelieferte Netzkabel
an eine Steckdose (100 – 240 V~/50 – 60 Hz) an-
schließen. Bei Anschluss an das Stromnetz leuch-
tet die Betriebsanzeige am Netzgerät und die
LEDs der Ladeschächte leuchten kurz grün auf.
(Wird der Koffer von der Stromversorgung ge-
trennt, sollten vor einer erneuten Inbetriebnahme
15 s verstreichen, anderenfalls könnten die Lade-
anzeigen nicht richtig funktionieren.)
3) Die aufzuladenden Akkus in den Sender/Emp-
fänger einsetzen.
4) Den Sender/Empfänger so herum in einen Lade-
schacht setzen, dass sich seine Gürtelklemme in
der Aussparung neben dem Schacht befindet.
5) Während des Ladevorgangs leuchtet die LED für
den jeweiligen Ladeschacht rot.
6) Sind die Akkus voll aufgeladen, leuchtet die LED
des Ladeschachts grün. Den Sender/ Empfänger
dann aus dem Ladeschacht nehmen.
7) Wird der Koffer nicht zum Aufladen benutzt, das
Netzgerät vom Stromnetz trennen, um nicht un-
nötig Strom zu verbrauchen.
4
Technische Daten
Einsatztemperatur: . 0 – 40 °C
Stromversorgung: . . 12 V /5 A über beilieg. Netzgerät an
100 – 240 V~/ 50 – 60 Hz/50 VA
Abmessungen: . . . . ATS-12C 300 x 170 x 280 mm
ATS-30C 660 x 170 x 300 mm
Änderungen vorbehalten
If the units are to be put out of operation defini-
tively, take them to a local recycling plant for a dis-
posal which is not harmful to the environment.
3
Charging the Batteries
1) Open the case. The jack for connecting the power
supply unit can be found next to the rear charging
compartment on the left. Connect the low-voltage
plug of the power supply unit to the jack.
2) Connect the power supply unit via the supplied
mains cable to a socket (100 – 240 V~/50 – 60 Hz).
When connected to the mains, the power LED on
the power supply unit lights up and the LEDs of the
charging compartments shortly show green. (After
disconnecting the case from the power supply, wait
for 15 s before setting it into operation again, other-
wise the charging LEDs may not operate correctly.)
3) Insert the batteries to be charged into the trans-
mitter/receiver.
4) Insert the transmitter/receiver into a charging
compartment in such a way that its belt clip fits
into the recess next to the compartment.
5) During the charging process, the LED for the cor-
responding charging compartment shows red.
6) If the batteries are fully charged, the LED of the
charging compartment shows green. In this case,
remove the transmitter/receiver from the charg-
ing compartment.
7) If the case is not used for charging, disconnect
the power supply unit from the mains to prevent
unnecessary power consumption.
4
Specifications
Ambient temperature: 0 – 40 °C
Power supply: . . . . . 12 V /5 A via supplied power supply
unit connected to
100 – 240 V~/50 – 60 Hz/50 VA
Dimensions: . . . . . . ATS-12C 300 x 170 x 280 mm
ATS-30C 660 x 170 x 300 mm
Subject to technical modification.
A-0315.99.02.03.2005
Advertisement

Related Manuals for Monacor IMG STAGELINE ATS-12C


Summary of Contents for Monacor IMG STAGELINE ATS-12C
- Page 1 ATS-30C 660 x 170 x 300 mm Warning – This appliance must be earthed. units, e. g. a drinking glass. Subject to technical modification. ® Copyright © by MONACOR INTERNATIONAL GmbH & Co. KG, Bremen, Germany. All rights reserved. A-0315.99.02.03.2005...
- Page 2 1) Aprire la valigetta. La presa per il collegamento tuirle sempre a coppie. dell’alimentatore si trova vicino al vano di carica Con riserva di modifiche tecniche. ® Copyright © by MONACOR INTERNATIONAL GmbH & Co. KG, Bremen, Germany. All rights reserved. A-0315.99.02.03.2005...
- Page 3 Przy wymianie akumulatorów 1) Otworzyć obudowę. Gniazdo do podłączenia Z zastrzeżeniem do możliwych zmian. należy je wymieniać parami. wtyku zasilacza znajduje się z lewej strony ® Copyright © by MONACOR INTERNATIONAL GmbH & Co. KG, Bremen, Germany. All rights reserved. A-0315.99.02.03.2005...
Need help?
Do you have a question about the IMG STAGELINE ATS-12C and is the answer not in the manual?
Questions and answers