Advertisement
Quick Links
Advertisement

Related Manuals for knorr-baby JOGGY NOVO ACTIVE


Summary of Contents for knorr-baby JOGGY NOVO ACTIVE
- Page 1 JOGGY NOVO ACTIVE GEBRAUCHSANWEISUNG www.knorr-baby.de...
- Page 2 Vielen Dank, dass Sie sich für einen Thank you for choosing a stroller made Kinderwagen von knorr-baby entschieden by knorr-baby. Please read the instruc- haben. Lesen Sie bitte die Gebrauchs- tions carefully before use, and retain for anleitung sehr sorgfältig und bewahren future reference.
-
Page 3: Product Characteristics
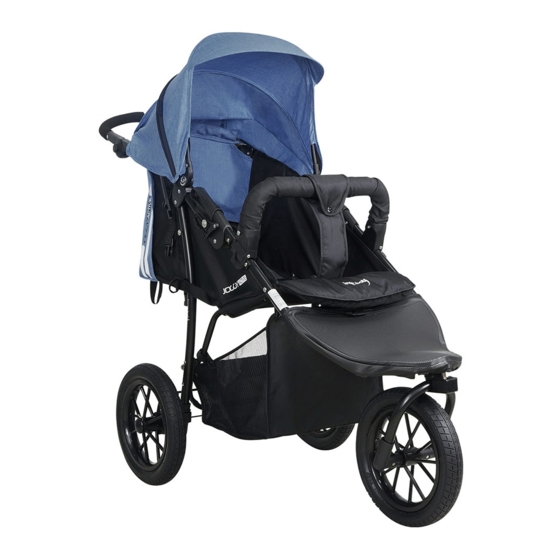
SPORTBUGGY Produktbeschreibung Product characteristics Verdeck Schiebegriff Canopy Handle Sitzeinheit Seat unit Sitzgurt Harness Schutzbügel Bumper bar Höhenverstellbare Aufbewahrungskorb Fußstütze Basket Footrest adjuster 360° Schwenkbare Hinterräder Vorderräder Rear wheel 360° rotable Front wheels www.knorr-baby.de... - Page 4 SPORTBUGGY Teileliste des Buggys Parts check list of the buggy Teileliste Parts check list 1. Gestell 1. Frame mit Schutzbügel 1x with bumper 1x 2. Vorderräder 2. Front wheels 2x 3. Hinterräder 3. Rear wheels 2x...
- Page 5 An incorrect manipulation could result in irreversible damage to the stroller and withdrawal of guarantee of the product. www.knorr-baby.de...
- Page 6 SPORTBUGGY Montage und Demontage der Räder Installation und removal of wheels Montage der Hinterräder Richten Sie die Achse jedes Rades zur Öffnung am Gestell aus und drücken Sie das Rad fest hinein bis es einrastet. Install rear wheel Align the axle of each wheel with the opening on the chassis and push firmly until it locks in position.
- Page 7 Knopf an der Rückseite des Rades nach unten. To lock the front wheels, align each wheel so they are facing backwards and then push the button aligned on the back of the wheel. www.knorr-baby.de...
- Page 8 SPORTBUGGY Nach Abschluss aller vorstehenden Installationsschritte ist die Montage nun zu Ende. Assembly is now finished after...
- Page 9 Daumen nach links, drücken Sie gleich- zeitig die Taste auf der Unterseite des Schiebegriffs. To put the stroller together, slide the button at the top of the handle to the left with your thumb, press the button of the handle at the same time. www.knorr-baby.de...
- Page 10 SPORTBUGGY Zusammenfalten des Buggys Folding of the buggy Während Sie die Knöpfe drücken, falten Sie das Gestell nach unten. While you are pressing the buttons push down the frame. Falten Sie das Gestell zusammen und versichern Sie sich, das der Sicherungs- haken eingerastet ist.
- Page 11 SPORTBUGGY Zusammenfalten des Buggys Folding of the buggy Zusammenfalten abgeschlossen Der Buggy ist nun am kompaktesten und komplett gefaltet. Folding is finished The stroller is now completely folded and in it’s most compact status. www.knorr-baby.de...
- Page 12 SPORTBUGGY Öffnen des Buggys Opening of the buggy Lösen Sie den Falthaken. Release the folding hook. Heben Sie den Griff an, bis das Gestell komplett entfaltet ist. Lift the handle until the complete deployment of the chassis. Der Rahmen ist entfaltet, wenn Sie ein Klickgeräusch hören.
- Page 13 Stoff gespannt ist. To unfold the canopy, pull it forward until it is completely unfolded and the fabric is stretched. Der Kinderwagen ist nun vollständig aufgebaut. The stroller now is fully assembled. www.knorr-baby.de...
- Page 14 SPORTBUGGY Gebrauch der Anschnallgurte Use of harness Platzieren des Kindes im Sportwagen Installation of child in the stroller Legen Sie den Schrittgurt zwischen Place the crotch strap between your die Beine und die Schultergurte über child’s legs and the shoulder straps over der Schulter Ihres Kindes.
- Page 15 Überprüfen Sie die Wirkung der Bremse jedes Mal nach deren Betätigung, indem der Sportwagen rück- und vorwärts geschoben wird. WARNING: Verify the efficiency of the brake each time after having engaged it, by pushing the stroller backward and forward. www.knorr-baby.de...
-
Page 16: Einstellen Des Verdecks
SPORTBUGGY Einstellen des Verdecks Adjust the canopy Um das Verdeck einzustellen, ziehen sie es nach vorne, bis es komplett herausgeklappt ist und der Stoff gespannt ist. To unfold the canopy, pull it forward until it is completely unfolded and the fabric is stretched. -
Page 17: Verstellung Der Fußstütze
To adjust the footrest, pull the bar forward under the footrest and place it on top. Die Fußstütze ist nun ausgeklappt und verlängert die Liegefläche für Ihr Kind. The footrest is now unfolded and extends the lying surface for your child. www.knorr-baby.de... -
Page 18: Adjustment Of The Backrest
SPORTBUGGY Verstellung der Rückenlehne Adjustment of the backrest Ziehen Sie an beiden Gurten an der Rück- seite des Sitzes, um die Rückenlehne aufzurichten. Pull the belts on both side to lift up the backrest. Drücken Sie beide Knöpfe am Verschluss und ziehen sie daran, um die Rückenlehne abzusenken. - Page 19 SPORTBUGGY Verstellung der Rückenlehne Adjustment of the backrest Höchste Einstellung der Rückenlehne. Highest adjustment of the backrest Flachste Einstellung der Rückenlehne. Lowest adjustment of the backrest. www.knorr-baby.de...
- Page 20 SPORTBUGGY UM DIE SICHERHEIT IHRES KINDES ZU GEWÄHRLEISTEN, MACHEN SIE SICH BITTE GENAU MIT DER VORLIEGENDEN ANLEITUNG BEKANNT UND BEWAHREN SIE DIESE AUF. WARNUNG! Lesen Sie bitte vor Benutzung des Kinderwagens die vorliegende Anleitung durch und bewahren Sie diese für später auf. WARNUNG! Dieser Kinderwagen ist geeignet für Kinder ab 6 Monaten und für ein Maximalgewicht von 15kg.
- Page 21 Öle order Fette, da diese Schmutz anziehen können, der dann die Bewegung hemmt. • Verwenden Sie nur Original-Ersatzteile. Es kann möglicherweise unsicher sein Teile zu verwenden, die nicht von knorr-baby GmbH geliefert wurden. • Lagern Sie das Produkt niemals zusammengelegt im nassen Zustand. Lagern Sie es niemals in einer feuchten Umgebung, da diese Schimmelbildung verursachen kann.
- Page 22 SPORTBUGGY WE DO CARE FOR YOUR CHILD’S SAFETY. THIS IS WHY YOU ARE KINDLY REQUESTED TO FAMILIARIZE YOURSELF WITH THIS INSTRUCTION MANU- AL BEFORE USE AND KEEP IT FOR FUTURE REFERENCE. WARNING! Read this instruction manual before use and keep it for future reference. Failing to observe the instructions and recommendations included herein may affect the safety of your child.
- Page 23 • Only original replacement should be used. It may be unsafe to use parts not supplied by knorr-baby GmbH. • Do not fold or store the product while wet and never store in a damp environment as this can cause mildew to form.
- Page 24 GmbH Am Schafberg 4 D-96489 Niederfüllbach Telefon/Fax: Phone +49 (0) 9565 9449-80 Fax +49 (0) 9565 9449-85 E-Mail: info@knorr-baby.de www.knorr-baby.de knorr-baby/facebook knorrbaby www.knorr-baby.de...
Need help?
Do you have a question about the JOGGY NOVO ACTIVE and is the answer not in the manual?
Questions and answers