Advertisement
Quick Links
CAUTION: READ
OPERATOR'S MANUAL
BEFORE USE
Visit www.hamiltonbeach-me
.com for our complete line of
products and Use and Care
Guides – as well as delicious
recipes and tips!
Hamilton Beach Brands, Inc.
4421 Waterfront Drive
Glen Allen, VA 23060 USA
840288900
9/17
Dicing Food Processor
آلة تقطيع األطعمة
English – Original Translation........... 2
Arabic .............................................. 25
Advertisement

Related Manuals for Hamilton Beach Professional 70825-SAU


Summary of Contents for Hamilton Beach Professional 70825-SAU
- Page 1 CAUTION: READ OPERATOR’S MANUAL BEFORE USE Dicing Food Processor آلة تقطيع األطعمة Visit www.hamiltonbeach-me .com for our complete line of products and Use and Care Guides – as well as delicious recipes and tips! Hamilton Beach Brands, Inc. 4421 Waterfront Drive Glen Allen, VA 23060 USA English –...
-
Page 2: Important Safeguards
IMPORTANT SAFEGUARDS When using electrical appliances, basic safety precautions should always be followed to reduce the risk of fire, electric shock, and/or injury to persons, including the following: ead all instructions. void contacting moving parts. his appliance is not intended for use by persons o not operate any appliance with a damaged with reduced physical, sensory, or mental supply cord or plug, or after the appliance... - Page 3 o not let cord hang over edge of table or o not attempt to defeat the lid interlock counter, or touch hot surfaces. mechanism. eep hands and utensils away from moving ake sure the blade or disc has come to a full blade and disc while processing food to stop before removing lid.
- Page 4 CAUTION! I n order to avoid a hazard ever use appliance for a longer period or with due to inadvertent resetting of the thermal cut- a larger amount of ingredients other than that out, this appliance must not be supplied through recommended by appliance manufacturer.
- Page 5 Other Consumer Safety Information This appliance is intended for household use only. The length of the cord used on this appliance was selected to reduce the hazards of becoming tangled in or tripping Electrical Shock Hazard: This appliance is w WARNING over a longer cord.
-
Page 6: Parts And Features
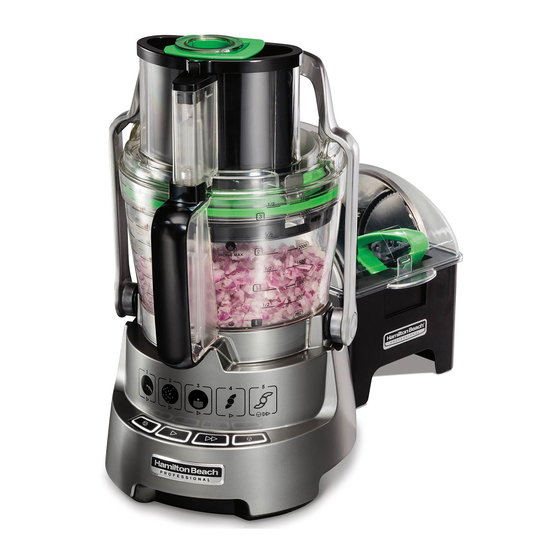
Note that the removable dicing grid will fall out of the dicing disc when turned upside down. Handle blades and discs carefully; they are very sharp. Wash all parts Model 70825-SAU except base in hot, soapy water. Rinse; then dry. Type: FP28... - Page 7 Storage Case, Parts, and Control Panel If the lights on the control panel are flashing, then the food processor is Dicing Assembly (3) not yet assembled correctly. Either the locking arm is not in place or the large food pusher is missing. When all parts are properly installed, the NOTE: The cutting disc and control panel lights will be lit continuously.
- Page 8 How to Use Dicing Assembly w WARNING Laceration Hazard. Handle blades carefully; they are very sharp. Press STOP and unplug before inserting or removing blades. Place work bowl on base with To insert the dicing assembly, lower the dicing disc onto the motor Secure four latches of the dicing handle facing forward.
- Page 9 How to Use Dicing Assembly NOTE: Dicing parts are color-coded (cont.) green to remind you to use the medium pusher when dicing and the green cleaning tool to clean out the grid. Press button. For best results use medium or small pusher. When finished, press STOP ( ) Remove lid from bowl.
- Page 10 How to Use Laceration Hazard. w WARNING Handle disc carefully; it is very sharp. Press STOP ( ) and Adjustable Slicing Disc unplug before inserting or removing blades. Place work bowl on base with handle facing forward. Adjust disc Carefully place disc onto motor shaft. Place lid on work bowl. to desired thickness by turning the adjustment post.
- Page 11 How to Use Adjustable Slicing Disc (cont.) Press button. NOTE: If the large pusher is removed, the last setting When finished, press STOP ( ) Remove lid. will be remembered. This setting will blink. To start slicing again, and unplug. Push locking arm back simply insert the large pusher.
- Page 12 How to Use Shredding Disc w WARNING Laceration Hazard. Handle disc carefully; it is very sharp. Press STOP ( ) and unplug before inserting or removing blades. Place work bowl on base with Carefully place disc onto motor shaft. Place lid on work bowl so the handle facing forward.
- Page 13 How to Use Shredding Disc (cont.) Push locking arm back to unsnap Press button. When finished, press STOP ( ) and unplug. and lower onto counter. Remove lid. Carefully remove blade from motor shaft using finger holes.
- Page 14 How to Use Chopping/Mixing Blade w WARNING Laceration Hazard. Handle blade carefully; it is very sharp. Press STOP ( ) and unplug before inserting or removing blades. Place work bowl on base with Carefully slide blade straight Place food to be chopped/mixed Place lid on work bowl so the handle facing forward.
- Page 15 How to Use Chopping/Mixing Blade (cont.) If the lights on the control panel are flashing, then the food processor is not assembled correctly. Either the locking arm is not in place or the large food pusher is missing. When all parts are properly installed, the control panel lights will be lit continuously.
-
Page 16: How To Use Dough Blade
How to Use Dough Blade Place work bowl on base with Carefully slide blade straight Place lid on work bowl so the handle facing forward. down onto the motor shaft. chute lines up with the handle. NOTE: Operate using only one blade or disc at a time. - Page 17 How to Use Dough Blade (cont.) If the lights on the control panel are flashing, then the food processor is not assembled correctly. Either the locking arm is not in place or the large food pusher is missing. When all parts are properly installed, the control panel lights will be lit continuously.
-
Page 18: Tips And Techniques
Tips and Techniques Processing Charts • For a more uniform consistency, • Do not puree or mash starchy When using attachments, do not process past the MAX LEVEL on the work bowl. start with pieces of food that vegetables like potatoes as are similar in size. -
Page 19: Care And Cleaning
Care and Cleaning Electrical Shock Hazard. w WARNING Disconnect power before cleaning. Do not immerse cord, plug, or base in water or any other liquid. Laceration Hazard. w WARNING Handle blades and discs carefully; they are very sharp. Wipe base, control panel, and NOTE: If food particles get trapped in the back of the food chute, cord with a damp cloth or place openings on sides of enclosure under running water to rinse... -
Page 20: Processing Times
Processing Times RECOMMENDED BLADE TYPE RECOMMENDED FOOD PROCESSING TIME RECOMMENDED AMOUNT Bread dough 1 1/2–2 minutes 3 cups (375 g) bread flour, 2 tablespoons (30 ml) oil, 1 cup (237 ml) water, 1 pkg (21 g) yeast Pizza dough 1 1/2–2 minutes 3 cups (360 g) all-purpose flour, 1 tsp (5 ml) sugar, 2 tablespoons (30 ml) oil, 1 cup (237 ml) water, 1 pkg (21 g) yeast, 1 tsp (5 ml) salt Chickpeas/hummus... - Page 21 Processing Times (cont.) RECOMMENDED DISC TYPE RECOMMENDED FOOD PROCESSING TIME RECOMMENDED AMOUNT Cabbage 5–10 seconds per wedge 1 wedge, approx. 100 g Carrots 5–10 seconds per carrot 2 large, approx. 140 g Hard cheese 5–10 seconds per block 1 block, approx. 140 g Potatoes 5–10 seconds per potato half 1 half, 75–80 g...
-
Page 22: Food Processing
Food Processing FOOD BLADE OR DISC PROCESS FOOD BLADE OR DISC PROCESS Nut Butters Chopping/Mixing Blade (5) Apples Adjustable Slicing Disc (1) Nuts Chopping/Mixing Blade (5) Dicing Assembly (3) Onions Adjustable Slicing Disc (1) Baby Foods Chopping/Mixing Blade (5) Chopping/Mixing Blade (5) Bread Dough Dough Blade (4) Dicing Assembly (3) -
Page 23: Troubleshooting
Troubleshooting PROBLEM PROBABLE CAUSE/SOLUTION Unit does not operate • Is the unit plugged in? Does the outlet work? on any speed or Pulse. • Is the lid latched in place? See “How to Use” sections. Place lid on work bowl, making sure to align the pour spout on the lid with the pour spout on the work bowl. - Page 24 Troubleshooting (cont.) PROBLEM PROBABLE CAUSE/SOLUTION Lid will not sit flush with the • Dicing assembly may not be properly installed. See “How to Use” section on page 8. work bowl. • Clips are not latched on dicing assembly. Remove lid. Latch the four metal clips on dicing assembly. Place lid on work bowl and move locking arm up and snapped into place.
- Page 48 Hamilton Beach Brands, Inc. • 4421 Waterfront Drive • Glen Allen, VA 23060 840288900 09/2017...
Need help?
Do you have a question about the 70825-SAU and is the answer not in the manual?
Questions and answers