Advertisement
Quick Links
Advertisement

Subscribe to Our Youtube Channel
Related Manuals for Blue Rhino Endless Summer 62000 Series


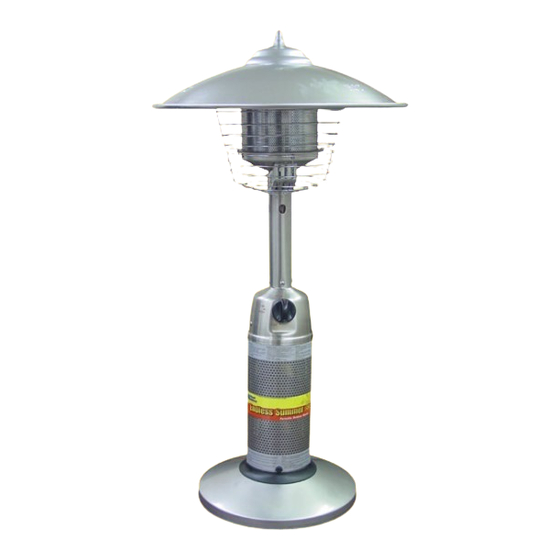
Summary of Contents for Blue Rhino Endless Summer 62000 Series
- Page 1 ® Instructions for replacing valves and cleaning Series: 62000 - 92000 LP Gas...
-
Page 2: Tools Required
1. Installation and repair should be done by a qualified service person. 2. Use only Blue Rhino Global Sourcing, LLC. factory authorized parts. The use of any part that is not factory authorized can be dangerous. This will also void your warranty. - Page 3 ® For assistance call 1.800.762.1142. Steps 1-3 1. Remove LP cylinder or extension hose from the base of the unit. 2. Remove dome and top wire guard. 3. Remove the dome by unscrewing the decorative finial and the dome cap and unscrewing (you may need the pliers here) the three nuts in the dome.
- Page 4 ® For assistance call 1.800.762.1142. Step 4 Remove the engine from the shroud (cylinder housing) by removing the 4 Phillips screws. Instructions for replacing valves and cleaning Series 62000 - 92000 LP Gas 501020...
- Page 5 ® For assistance call 1.800.762.1142. Step 5 1. Remove the top wire guard by lifting it straight up. 2. Remove the 4 screws holding the emitter screen to the emitter bottom. 3. Remove the emitter by lifting it straight up. Instructions for replacing valves and cleaning Series 62000 - 92000 LP Gas 501020...
- Page 6 ® For assistance call 1.800.762.1142. Step 6 1. Remove the 3 screws holding the bottom wire guard. 2. Slide the wire guard down. Instructions for replacing valves and cleaning Series 62000 - 92000 LP Gas 501020...
- Page 7 ® For assistance call 1.800.762.1142. Step 7 1. Remove the 2 small screws located in 2 of the four oblong holes. 2. Remove the 2 small screws on the emitter bottom. 3. Slide the burner out. Instructions for replacing valves and cleaning Series 62000 - 92000 LP Gas 501020...
- Page 8 ® For assistance call 1.800.762.1142. Step 8 Remove the ODS Cage by removing the screw. Instructions for replacing valves and cleaning Series 62000 - 92000 LP Gas 501020...
- Page 9 ® For assistance call 1.800.762.1142. Step 9 Remove the ODS Pilot by unscrewing the screw. Instructions for replacing valves and cleaning Series 62000 - 92000 LP Gas 501020...
- Page 10 ® For assistance call 1.800.762.1142. Step 10 1. Remove the 4 Phillips screws holding the post to the valve housing and slide the post up. 2. Remove the pilot supply tube using the # 10 mm and the #12 mm wrenches. Hold the pilot orifice with the #12mm wench.
- Page 11 ® For assistance call 1.800.762.1142. Step 11 1. Remove the control knob 2. Remove the two small screws behind the knob 3. Remove the two screws on either side of the valve housing. Instructions for replacing valves and cleaning Series 62000 - 92000 LP Gas 501020...
- Page 12 ® For assistance call 1.800.762.1142. Step 12 Remove the valve from the valve housing. You may need to bend the burner supply tube a little. The back of the control valve will drop down and you should be able to pull it out the rest of the way. Instructions for replacing valves and cleaning Series 62000 - 92000 LP Gas 501020...
- Page 13 ® For assistance call 1.800.762.1142. Step 13 Remove the thermal-couple tip switch block. This is the small brass block located at the back of the control valve. Note: Remove the thermal-couple wire by unscrewing the nut. You will then be able to remove the tip switch wires and the brass block.
- Page 14 ® For assistance call 1.800.762.1142. Step 14 Remove the two Phillips screws that hold the regulator supply tube to the valve. Be careful not to lose the rubber washer and remember to reinstall the washer when you put the new control valve in.
- Page 15 ® For assistance call 1.800.762.1142. Step 15 Remove the burner supply tube by removing the two small Phillips screws. Be careful not to lose the rubber washer and remember to reinstall the washer when you put the new control valve in. Instructions for replacing valves and cleaning Series 62000 - 92000 LP Gas 501020...
- Page 16 ® For assistance call 1.800.762.1142. Step 16 If you also need to replace the regulator you will need to remove the 2 screws that hold the regulator in the regulator housing. Using a 9/16” open end wrench disconnect the regulator from the regulator supply tube. You may need to hold the regulator with the pliers.
- Page 17 ® For assistance call 1.800.762.1142. Step 17 Using a non-abrasive scouring pad, clean the outside and inside of the emitter. Finish up by blowing any loose soot off the emitter with air or a can of compressed air. Instructions for replacing valves and cleaning Series 62000 - 92000 LP Gas 501020...
- Page 18 ® For assistance call 1.800.762.1142. Step 18 Clean the inside of the venturi tub, by insert a bottle brush completely into the venturi tube and twist a couple of times to loosen any debris. Instructions for replacing valves and cleaning Series 62000 - 92000 LP Gas 501020...
- Page 19 ® For assistance call 1.800.762.1142. Step 19 Use a pipe cleaner to clean all burner ports. Clean the top of the heat shield on the burner with a non-abrasive scouring pad to remove any soot or carbon build- Instructions for replacing valves and cleaning Series 62000 - 92000 LP Gas 501020...
- Page 20 ® For assistance call 1.800.762.1142. Step 20 With the venturi tube, burner ports and the heat shield cleaned, use the air or a can of compressed air to blow out any soot or carbon build-up. Instructions for replacing valves and cleaning Series 62000 - 92000 LP Gas 501020...
- Page 21 ® For assistance call 1.800.762.1142. Step 21 Follow the instruction in reverse and remember to check for leaks at all connections you have made. Instructions for replacing valves and cleaning Series 62000 - 92000 LP Gas 501020...
- Page 22 ® For assistance call 1.800.762.1142. Step 22- IMPORTANT Perform leak check. WARNING FOR YOUR SAFETY If you smell gas - 1. Shut off gas to appliance. 2. Extinguish any open flame. 3. If odor continues, immediately call your gas supplier or your fire department. 1.
- Page 23 ® For assistance call 1.800.762.1142. Burner Connections 1. Make sure the regulator valve and hose connections are securely fastened to the burner and the tank. 2. If your unit was assembled for you, visually check the connection between the burner pipe and orifice.
- Page 24 1.800.762.1142, www.bluerhino.com © 2004 Blue Rhino Global Sourcing, LLC All Rights Reserved. ® Endless Summer is a registered trademark of Blue Rhino Global Sourcing, LLC All Rights Reserved. ® Blue Rhino is a registered trademark of Ferrellgas, L.P. All Rights Reserved.
Need help?
Do you have a question about the Endless Summer 62000 Series and is the answer not in the manual?
Questions and answers