Table of Contents
Advertisement
Quick Links
Advertisement
Table of Contents

Related Manuals for thomann Cajon Construction Kit


Summary of Contents for thomann Cajon Construction Kit
- Page 1 Cajon Construction Kit cajon construction kit user manual...
- Page 2 Musikhaus Thomann Thomann GmbH Hans-Thomann-Straße 1 96138 Burgebrach Germany Telephone: +49 (0) 9546 9223-0 E-mail: info@thomann.de Internet: www.thomann.de 27.05.2019, ID: 397333 (V2)
-
Page 3: Table Of Contents
Assembly instructions......................6 3.1 Assembling the body..................... 6 3.2 Assembling the innards....................11 3.3 Mounting the striking surface.................. 16 3.4 Mounting the back panel................... 19 3.5 Mounting rubber feet....................24 3.6 Edge grinding......................... 25 Protecting the environment................... 26 Cajon Construction Kit... -
Page 4: Safety Instructions
PVC floor and after some time cause permanent dark stains. In case of doubt, do not put the rubber feet directly on the floor, but use felt-pad floor protectors or a carpet. cajon construction kit... -
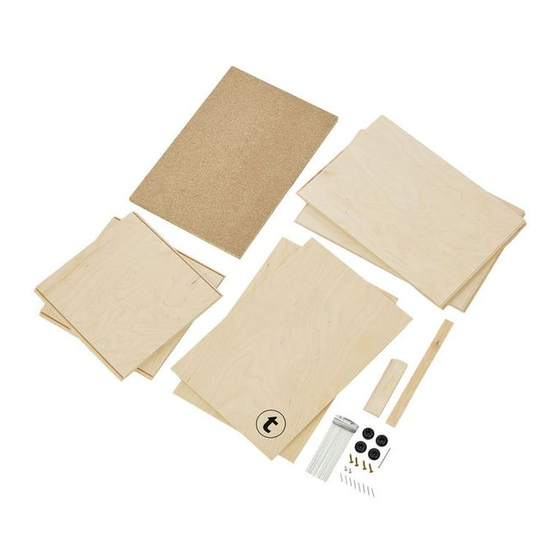
Page 5: Scope Of Delivery
Scope of delivery Scope of delivery Thank you very much for purchasing this cajon construction kit. All wooden parts, screws, nails as well as snare strip and snare carpet are included in this package. Before assembling the cajon, verify that the entire delivery is included, as listed below. -
Page 6: Assembly Instructions
Folding rule or ruler Varnish and accessories Damp cloth (to wipe away excess varnish) If you are not using the Thomann Cajon Add-On Pack to assemble the cajon, addi‐ tionally provide the following tools and materials: Wood or express glue 2 ×... - Page 7 Insert the side panels into the groove of the floor panel. When installing the side panels and gluing them with the floor panel, ensure that the edges line up precisely. You can readjust as long as the glue is not dried. Cajon Construction Kit...
- Page 8 Assembly instructions After you have glued the two side panels to the floor panel check them for flushness and glue the top plate in the same way. cajon construction kit...
- Page 9 Slide the supplied cardboard angle template centrally into the body to create a straight angle. Place the tension straps over the cajon and tighten them slightly. Make sure that the belt buckles of the tension straps are oriented outwards to avoid pressure points. Cajon Construction Kit...
- Page 10 Assembly instructions Place the cajon horizontally on the pressure plate and check the connections for flushness. Readjust them, if necessary, and tighten the tension straps. Observe the drying time indicated on the packaging of the glue used. cajon construction kit...
-
Page 11: Assembling The Innards
Use the pricking awl (big nail) to pierce three holes with regular spacing into the top of the bottom strip. Carefully apply the express glue to the underside of the bottom strip and press it flush with the front edge against the inside of the floor panel. Cajon Construction Kit... - Page 12 Assembly instructions Fix the bottom strip with three nails in the pre-punched holes. Observe the drying time indicated on the packaging of the glue used. cajon construction kit...
- Page 13 The bevelled side must point into the interior of the cajon. Make sure to mount the snare strip on the same side as the bottom strip. Cajon Construction Kit...
- Page 14 Observe the drying time indicated on the packaging of the glue used. Mounting the snare carpet The soldering of the snare carpet spirals must point into the interior of the cajon. Make sure not to bend the snare carpet spirals. cajon construction kit...
- Page 15 Use the pricking awl (big nail) to pierce two holes with each 10 mm distance from the lower edge of the snare strip. The snare carpet must be mounted centrally on the snare strip. Affix the snare carpet with two raised countersunk screws in the pre-punched holes on the snare strip. Cajon Construction Kit...
-
Page 16: Mounting The Striking Surface
You can loosen the tension straps used to secure the side walls. The straps are now needed to fix the striking surface. Place the cajon with its back on the parallel tension straps. Carefully apply the express glue along the body edges, snare and bottom strip. cajon construction kit... - Page 17 Place the striking surface flush on the edges and press it briefly. The striking surface presses the outward standing snare carpet back into the interior of the cajon. Make sure that the T-logo is at the level of the floor panel. Cajon Construction Kit...
- Page 18 Stretch the tension straps around the cajon to secure the striking surface. Make sure that the belt buckles of the tension straps are lying on the pressure plate oriented outwards to avoid pressure points. cajon construction kit...
-
Page 19: Mounting The Back Panel
The hole can be sawn with a fretsaw or jigsaw. To do so, drill a hole with a diameter of approx. 10 mm at the edge of the indicated mark and insert the saw into the hole. Cajon Construction Kit... - Page 20 Saw along the indicated mark. Use abrasive paper to smoothen the edges of the sawn hole. Use an ordinary household sponge for sanding which you wrap with abra‐ sive paper. So you have an optimal sanding surface. cajon construction kit...
- Page 21 You can loosen the tension straps used to secure the striking surface. The straps are now needed to fix the back panel. Place the cajon with its striking surface on the parallel tension straps. Carefully apply the express glue along the body edges. Cajon Construction Kit...
- Page 22 Assembly instructions Place the back panel flush on the edges and press it briefly. Make sure that the sound hole is opposite to the snare carpet (closer to the cover panel). cajon construction kit...
- Page 23 Stretch the tension straps around the cajon to secure the back panel. Make sure that the belt buckles of the tension straps are lying on the pressure plate oriented outwards to avoid pressure points. Cajon Construction Kit...
-
Page 24: Mounting Rubber Feet
If the surface is going to be coated the rubber feet should only be attached after that. Place the cajon on the cover panel and use the pricking awl to mark the position where the rubber feet should be screwed. cajon construction kit... -
Page 25: Edge Grinding
Screw the rubber feet with the four countersunk screws in the corners of the floor panel. 3.6 Edge grinding Use the sanding paper to perfectly grind the edges of the cajon so that it can be played as comfortable as possible. Cajon Construction Kit... -
Page 26: Protecting The Environment
Ensure that plastic bags, packaging, etc. are properly disposed of. Do not just dispose of these materials with your normal household waste, but make sure that they are collected for recycling. Please follow the notes and markings on the packaging. cajon construction kit... - Page 28 Musikhaus Thomann · Hans-Thomann-Straße 1 · 96138 Burgebrach · Germany · www.thomann.de...
Need help?
Do you have a question about the Cajon Construction Kit and is the answer not in the manual?
Questions and answers