Table of Contents
Advertisement
Quick Links
Advertisement
Table of Contents

Related Manuals for Ronix 7108

Summary of Contents for Ronix 7108
- Page 1 ELECTRIC COMPACT ROUTER 7108...
-
Page 3: Specification
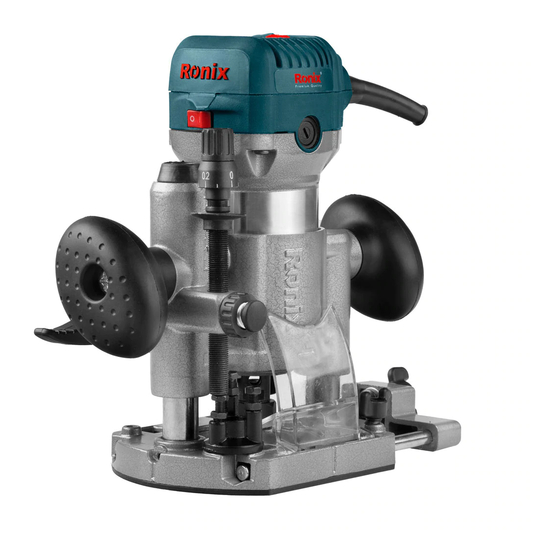
SPECIFICATION Model 7108 Power 710W Voltage 220V Frequency 50Hz No load speed 13000 – 33000RPM Collet size 6-8mm Overall length 200mm Net weight Wrench- Collet- Straight guide-Transparent Accessories guard- Guide holder PART LIST 1) Motor 2) ON/ OFF Switch 3) Speed Controller... -
Page 4: Work Area Safety
- The term “power tool” in the warnings refers to your mains-operated (corded) power tools or battery operated (Cordless) Power tools. WORK AREA SAFETY - Keep work area clean and well lit. Cluttered or dark areas invite accidents. - Don’t operate power tools in explosive atmospheres, such as in the presence of flammable liquids, gases or dust. -
Page 5: Personal Safety
PERSONAL SAFETY - Stay alert, watch what you are doing and use common sense when operating a power tool. Don’t use a power tool while you are tired or under the influence of drugs, alcohol or medication. A moment of inattention while operating power tools may result in serious personal injury. - Page 6 must be repaired. - Disconnect the plug from the power source and/or the battery pack from the power tool before making any adjustments, changing acces- sories, or storing power tools. Such preventive safety measures reduce the risk of starting the power tool accidentally. - Store idle power tools out of the reach of children and don’t allow persons unfamiliar with power tool or these instructions to operate the power tool.
- Page 7 to a stable platform. Holding the work by your hand or against the body leaves it unstable and may lead to loss of control. - Wear hearing protection during extended period of operation. - Handle the bits very carefully. Check the bit carefully for cracks or damage before operation.
-
Page 8: Functional Description
FUNCTIONAL DESCRIPTION SWITCH ACTION 1) Switch 2) OFF (O) side 3) ON ( I ) side CAUTION Before plugging in the tool, always check to see that the tool is switched off. - To start the tool, press the “ON ( I )” side of the switch. - To stop the tool, press the “OFF (O)”... - Page 9 bit diameter. Refer to the table for the relationship between the number settings on the dial and the approximate tool speed. Number Speed (RPM) 10,000 13,000 17,000 22,000 27,000 33,000 CAUTION: If the tool is operated continuously at low speeds for a long time, the motor will get overloaded, resulting in tool malfunction.
-
Page 10: Operation
Method 2: 1) Tighten 2) Loosen 3) Shaft lock CAUTION: - Do not tighten the collet nut without inserting a bit, or the collet cone will break. - Use only the wrenches provided with the tool. Insert the bit all the way into the collet cone and tighten the collet nut securely with the two wrenches or by pressing the shaft lock and using the provided wrench. - Page 11 TOOL BASE 1) Adjusting knob 2) Lock lever 3) Depth pointer 4) Stopper pole setting nut 5) Fast-feed button 6) Stopper pole 7) Stopper block 8) Adjusting bolt Place the tool on a flat surface. Loosen the lock lever and lower the tool body until the bit just touches the flat surface.
- Page 12 surface, keeping the tool base flush and advancing smoothly until the cutting is complete. When doing edge cutting, the workpiece surface should be on the left side of the bit in the feed direction. 1) Workpiece 2) Bit revolving direction 3) View from the top of the tool 4) Feed direction STRAIGHT GUIDE...
-
Page 13: Maintenance
To install the straight guide, insert the guide bars into the holes in the plunge base. Adjust the distance between the bit and the straight guide. At the desired distance, tighten the wing bolts to secure the straight guide in place. When cutting, move the tool with the straight guide flush with the side of the workpiece. -
Page 14: Replacing Carbon Brushes
REPLACING CARBON BRUSHES Remove and check the carbon brushes regularly. Replace when they wear down to the limit mark. Keep the carbon brushes clean and free to slip in the holders. 1) Screwdriver 2) Brush holder cap Both carbon brushes should be replaced at the same time. Use only identical carbon brushes. - Page 15 ATTENTION: To maintain product SAFETY and RELIABILITY, repairs, carbon brush inspection and replacement, any other maintenance or adjustment should be performed by RONIX SERVICE Authorized or RONIX SERVICE Centers, always using RONIX SERVICE replacement parts. USER MANUAL...
Need help?
Do you have a question about the 7108 and is the answer not in the manual?
Questions and answers