
Related Manuals for Dini Argeo EGT scale series

Summary of Contents for Dini Argeo EGT scale series
- Page 1 EGT-BATCH USER GUIDE SOFTWARE FOR MULTICOMPONENT DOSAGE SYSTEMS Revision 1.00 Last update 08/05/2013...
- Page 2 Page intentionally left blank.
-
Page 3: Table Of Contents
EGT-AF05 USER GUIDE Table of contents INTRODUCTION ............................7 TECHNICAL SPECIFICATIONS ........................9 INSTALLATION ............................11 Case and dimensions ........................11 Power supply ........................... 12 Start up ............................13 Turning off the instrument ......................13 INDICATOR PARTS ............................ 15 Display ............................. 16 4.1.1 Display Indicators ........................ - Page 4 EGT-AF05 USER GUIDE Function of the activities and formulas ................... 32 “Automatic dosage” type of an activities ..................33 “Manual dosage” type of an activities .................... 34 “Unloading” type of an activities ..................... 35 6.4.1 Total unloading of the silo ....................... 35 6.4.2 Split total unloading.........................
- Page 5 6.16.6 Printing of the production program report ................50 6.17 Functioning of the remote components’ dosage ................50 6.18 Example of the formula and the description of the executed cycle ..........52 6.19 Error messages ..........................55 6.20 Progressives ............................. 57 6.20.1 Additional value ........................
-
Page 7: Introduction
INTRODUCTION This manual was created to help you install and learn all about the functional possibilities of the purchased indicator. The instrument is suitable for use in various weighing environments. Not only does it have all the normal features of high-precision scales, but it also gives you the possibility to work in specific environments due to the functioning modes contained in the software implemented in the FLASH MEMORY on the internal board. - Page 8 INTRODUCTION Do not install in any area where there is a risk of explosion. The crossed-out wheeled bin on the product means that at the product end of life, it must be taken to separate collection or to the reseller when a new equivalent type of equipment is purchased.
-
Page 9: Technical Specifications
TECHNICAL SPECIFICATIONS 12 Vdc ( 8 ÷ 24 Vdc in the IO versions), with internal 100 ÷ 240 Vac (50÷60 POWER SUPPLY Hz) / 12 Vdc adapter. MAXIMUM POWER 16 VA. OPERATING TEMPERATURE From -10 to +40 °C. CONVERTER 24 bit Sigma Delta. CONVERSION SPEED 200 conv./sec with automatic selection. -
Page 11: Installation
INSTALLATION Case and dimensions The indicator has an STAINLESS STEEL case, whose external dimensions are shown in the Figure 1. It can be simply put on a table or fixed to a shelf or column available on request. NOTE: If the identification plate is supplied separately (therefore not attached to the indicator), it is advisable to attach it to the indicator, in order to be able to identify the instrument. -
Page 12: Power Supply
INSTALLATION Figure 2. Back panel Part Description RJ45 connector Fixing for shelf or column mounting Available for load cells / serial lines / inputs / outputs Power supply input Power supply The indicator is powered with 12Vdc voltage (8 ÷ 36 Vdc in the IO version), through an internal adapter which converts the 100 ÷... -
Page 13: Start Up
INSTALLATION Start up Step Description Screen Press the key until when the instrument powers on The logo ( Logo to show at the start up) and the software version appear for some instants. EGT-AF05-XX is the name of the installed software, which identifies the language. -
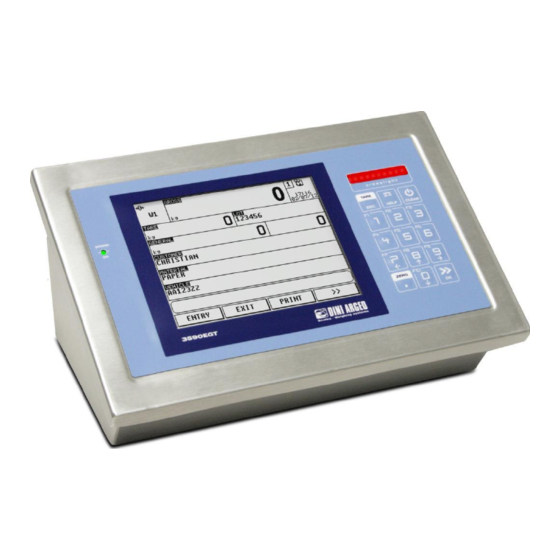
Page 15: Indicator Parts
INDICATOR PARTS Figure 3. Front panel Part Description Touch screen Cross light (3 colors) Keyboard... -
Page 16: Display
INDICATOR PARTS Display The indicator presents 2 main screens, illustrated in the below scheme: Figure 4. First main screen Figure 5. Second main screen... - Page 17 INDICATOR PARTS Element Description Display indicators Active scale Touch to switch to the next scale Time and date Touch to change the date Weight value on the active scale Touch to tare the gross weight Tare value Touch to insert a preset tare Formula dosage progress bar Target value of the working formula if indicator is in dosage Total target of the production if the production is existed and indicator is out of dosage...
-
Page 18: Display Indicators
INDICATOR PARTS 4.1.1 Display Indicators Symbol Description The weight detected by the weighing system is near the zero, included within the interval of –1/4 and +1/4 of the scale division The weight is unstable A tare value has been acquired A preset tare value has been entered Active weighing range Locked keyboard... -
Page 19: Numeric Input
INDICATOR PARTS 4.1.2 Numeric input Screen Function Allows to insert a numeric value within the range. X ~ Y: valid range for the value to insert 0…9: numbers .: decimal point +/-: positive or negative sign / * - +: arithmetic operations C: clears all the value BkSp: backspace OK: exit saving the value... - Page 20 INDICATOR PARTS Step Description Light The manual dosage does not start (cross light turned off) The manual dosage is at maximum speed (yellow light turned on) The manual dosed weight is within tolerance (green light turned The manual dosed weight is over target (red light turned on) FUNCTIONING: The function of light control is: ...
-
Page 21: Main Functioning Description
MAIN FUNCTIONING DESCRIPTION All the functions of the indicator are available from the button in the second screen. The functions are divided into the following groups: Group Description Scale functions Operations to the weight (zeroing, tare, …) Printout Print functions management Generic functions Generic operations to the indicator (lock keyboard, calculator, …) Diagnostic... -
Page 22: Tare
MAIN FUNCTIONING DESCRIPTION If the weight on the scale is included in percentage Zeroing percentage with ZERO key), it is zeroed and the 0 indicator turns on Tare 5.2.1 Semiautomatic tare Step Description Screen Press the key or touch on the weight area to tare the gross weight on the scale A message appears on the display... -
Page 23: Preset Tare
MAIN FUNCTIONING DESCRIPTION 5.2.2 Preset tare Step Description Screen Touch on the tare area Insert the preset tare value and confirm with the OK key The entered value is subtracted from the gross weight and the PT indicator turns on 5.2.3 Link a preset tare to a product It’s possible to insert the tare value of a product in the database. -
Page 24: Input Texts
MAIN FUNCTIONING DESCRIPTION Input texts Step Description Screen Touch on the button to get access to the input texts Touch on the desired text to be changed Insert the content of the text and confirm with the OK button Touch on the ESC button to go back to the main screen Databases 5.4.1 Insertion... - Page 25 MAIN FUNCTIONING DESCRIPTION Select the desired position by touching the element or by touching the NEW button to insert an element in the first empty position Touch the first field to insert the content Insert the content of the field and confirm it with the OK button Repeat the operation for the desired fields and press the ...
-
Page 26: Modification
MAIN FUNCTIONING DESCRIPTION 5.4.2 Modification Step Description Screen Touch the button to get access to the desired database Touch the element or the A..Z button to search the element to be updated Touch the desired field to be modified Insert the content of the field and confirm it with the OK button Repeat the operation for the desired fields to be updated and press the ... -
Page 27: Cancellation
MAIN FUNCTIONING DESCRIPTION 5.4.3 Cancellation Step Description Screen Touch the button to get access to the desired database Touch the element or the A..Z button to search the element to be deleted Touch the DELETE button Press the button to confirm or not the cancellation The element has been removed from the database... -
Page 28: Selection
MAIN FUNCTIONING DESCRIPTION 5.4.4 Selection Step Description Screen Touch the button in the first main screen to get access to the elements present into desired database Touch the desired element to select The description of selected element appears on the display 5.4.5 Deselection Step Description... -
Page 29: Alphanumeric Search
MAIN FUNCTIONING DESCRIPTION Press the button to confirm or not the deselection The description of previous selected element disappears on the display 5.4.6 Alphanumeric search Step Description Screen Touch the A..Z button in the database update/selection screen Insert the first characters of the element to search The table shows all the elements with the typed characters. -
Page 30: Search By Element Index
MAIN FUNCTIONING DESCRIPTION 5.4.7 Search by element index Step Description Screen Touch the INDEX button in the database update/selection screen Insert the index of the desired element and confirm Printouts The indicator has 32 print functions, each function has an associated format. When a function has been put into execution through the operation illustrated in the scheme, the associated format is sent to the print serial port. - Page 31 MAIN FUNCTIONING DESCRIPTION START MANUAL WEIGHT Start manual weight printing END MANUAL WEIGHT End manual weight printing Not used END PAUSE End pause printing END TIMER End timer printing END CYCLE End cycle printing RESET CYCLE Reset cycle printing DOSAGE ERROR Dosage error printing GENERAL TOTAL Press...
-
Page 32: Dosage
DOSAGE DOSAGE The programme has been made to manage automatic/manual multi component dosages, in loading and in unloading, with tolerance control, accumulation, and printing of the executed formulas. The input/output allows for the automatic dosage management, for the selection of the formulas and for other functions (see technical manual). -
Page 33: Automatic Dosage" Type Of An Activities
DOSAGE EXAMPLE: FORMULA: dosagE 01 AUTOMATIC MANUAL TIMER TOTAL UNLOADING DOSAGE DOSAGE Activity 1 Activity 2 Activity 3 Activity 4 In the suggested example, the instrument will execute an automatic dosage as first activity, and then a manual dosage, then a timer activity, and then, the total unloading of the silo. The execution order of the activities depends on the order in which these are entered when programming the formula: the first entered activity will be the first executed one, etc. -
Page 34: Manual Dosage" Type Of An Activities
DOSAGE remains until a weight value is reached in which the SLOW WEIGHT + FLIGHT WEIGHT is missing from the FINAL WEIGHT. 2. At this point the AUTOMATIC SLOW DOSAGE is displayed indicating the end of the fast dosage and the beginning of the slow dosage. -
Page 35: Unloading" Type Of An Activities
DOSAGE instrument passes directly to the following activity. By setting a value > than 0 but less than “99999.9”: The activity is automatically ended after the weight has reached and exceeded the set target value and the time is elapsed. The system goes into “EERROR: TIME OUT”... -
Page 36: Split Total Unloading
DOSAGE maximum speed and does not foresee the tolerance check. The display, during the unload activity, shows the “UNLOAD ALL” message. As soon as the weight reaches the TOTAL UNLOADING END a wait time starts equal to the WAIT FOR DISCHARGE END ( Once the wait time is finished the activity ends, with subsequent disabling of the fast dosage and product outputs. -
Page 37: Partial Unloading
DOSAGE activity has ended: automatically or manually (by pressing the external INPUT 1 or the START button). Each following unloading will be manually enabled by pressing the external INPUT 1 or the START button: in this way the operator, for example, can change the container with each partial unloading. - Page 38 DOSAGE therefore the instrument gives the possibility to load the silo and then to unload the desired quantity from it: To obtain a dosage of this type, one should enter an unloading activity as first activity of the formula, or a single component formula made up of a single unloading activity, with a target greater than 0 By entering an unloading activity with target equal to 0, one obtains a total unloading (see first unloading method).
-
Page 39: Net/Gross Weight Display At The End Of Unloading Activity
DOSAGE 6.4.4 NET/GROSS weight display at the end of unloading activity It is possible to decide to have at the end of the unloading activity, the visualization of the remaining weight (gross weight on the scale) or the unloaded weight (negative net weight). Normally the remaining gross weight is shown on the display, by setting the WEIGHT DISPLAY ON UNLOADING step on NET ( ) only the unloaded weight will be shown. - Page 40 DOSAGE STOPPING MODE 2) Not stoppable: It’s not possible to stop the timer before the end that has been set. It does not foresee a target weight to be reached: normally the eventual weight added is not stored; it is possible to decide to store the weight added during the timer activity by enabling the ADD TO CONSUMPTION DURING TIMER ( ), and, in this case, the dosage of the eventual material necessary for this activity must be manually stopped.
-
Page 41: Manual Weight" Type Of An Activities
DOSAGE “Manual weight” type of an activities a) Description This activity is useful when one wants to add to the dosage an amount of material having a known fixed weight, which is set when entering the activity in the database, counting it in the consumptions without having to dose it (for example, a bag of dust of 20kg, a tank of additives of 3kg...). -
Page 42: Synchronization" Type Of An Activities
DOSAGE display shows the REMOTE DOSAGE message and the weight window shows the progress bar in percentage for the remote dosage. The operator can remotely control the instrument for executing the dosage; all the dosage requirements should be in accordance with the selected formula in the REMOTE FORMULA INDEX. After the remote dosage is terminated, a wait time starts equal to the DATA READING TIME ( in order to allow the reading of the activity data;... -
Page 43: Formula Execution Modes
DOSAGE ends and it is not possible to end the cycle, once the set time has passed, the error is signalled; the operator must manually fill the stockpile silo. By pressing for an instant the external INPUT 1 or the START button, the cycle starts again in the condition in which it was in before the error took place. -
Page 44: First Free Component
DOSAGE If the total weight of the various loading activities exceeds the maximum dosable weight (MAXIMUM DOSABLE WEIGHT step ), the instrument calculates the number of consecutive repetitions which it must execute in order to reach the set total weight. By examining the previous example, if the maximum dosable weight would have been equal to 800kg, the instrument would execute 2 consecutive repetitions of the following formula: BASIC FORMULA... -
Page 45: Dosage Procedure
DOSAGE The quantity of dosed material for the first component must be within the range proposed by the instrument. If first activity of the formula selects a manual dosage: The "OK" message with the weight range indicates that the weight is within the tolerance range; otherwise "KO"... -
Page 46: Dosage Cycle Starts
DOSAGE Once the first formula is finished, the instrument: - executes the automatic tare - executes the following formula (in Production Program) These operations are repeated for all the formula. At the end, the instrument waits to receive the start of the new dosage, or, in case of various repetitions of the dosage cycle, restarts automatically with the following cycle. -
Page 47: Dosage Cycle Reset
DOSAGE If during the dosage the mains voltage is cut off, when it is restored, the instrument will turn on automatically into PAUSE; press the button to continue with the interrupted dosage. The dosage now restarts from the condition in which it was in, when it turned off. In the PAUSE condition it is possible to access the USER MENU function "Repeat dosage cycles", in which it is possible to change the number of the cycles. -
Page 48: Tolerance Check Mode
DOSAGE 6.14 Tolerance check mode When the weigh is acquired, the instrument can follow three different ways, depending on the parameter set in the tolerance range enabling step << Enabling tolerance test>> TOLERANCE TEST NO TEST PERC WEIGHT 6.14.1 Tolerance expressed as weight During entering the formula, a tolerance can be entered expressed as a weight value, which defines a fixed tolerance range independently from the Target weight: TARGET-TOL.WEIGHT... -
Page 49: No Test Tolerance Of Weight
DOSAGE 180 kg (target -10%) 200 kg 220 kg (target +10%) Weight out of Weight within Weight within Weight tolerance tolerance tolerance tolerance 6.14.3 No test tolerance of weight Once the dosage is ended, the instrument proceeds directly to the following formula or in WAIT START condition. -
Page 50: Enabling The Production Program
DOSAGE 6.16.1 Enabling the production program Through BATCH1 function Enable production which can be combinable with the desired key ( ), one is asked to enable/disable the function. The same setting is possible also in the setup environment. 6.16.2 Setting the production program Through BATCH1 function Manage production which can be combinable with the desired key ( ), one is asked firstly to input the number of formulas, from 1 to 4: press the enter key, input the number and... - Page 51 DOSAGE manual) in a 485 line through REMOTE DOSAGE and SYNCHRONIZATION activities (see the section 13.1.7 and 13.1.8). NOTE: if the multi component dosage is enabled, the function only works in the TOTAL WEIGHT mode (set in the FORMULA’S TARGET SETTING MODE step on the “Setting of the total weight” ), otherwise when the input 1 is closed and the dosage starts, the display shows “ERROR: REMOTE TARGET”...
-
Page 52: Example Of The Formula And The Description Of The Executed Cycle
DOSAGE If the SCALE is set at 255 in the “SYNCHRONIZATION” activity, when all the remote instruments dosage are terminated, the automatic dosage starts. For example 2: REMOTE REMOTE AUTOMATIC DOSAGE 1 DOSAGE 2 DOSAGE Activity 1 Activity 2 Activity 3 Activity 1 Activity 2 Activity 3... - Page 53 DOSAGE Activities Target Activity 1 50 KG Activity 2 80 KG Activity 3 20.0 S Activity 4 130 KG CONFIGURATION In order to execute the formula one should: a) Select the formula. b) Once the relays OUT1 and OUT3 are enabled, put the initial tare on the plate, which must have a weight greater than 2 kg and less than 6 kg (the instrument displays "ERROR: BEYOND MAXIMUM TARE"...
- Page 54 DOSAGE l) Keeps OUT6 enabled under the TARGET WEIGHT (80 kg), and disables it if the weight exceeds this threshold. m) Carries out the tolerance test, if enabled (<<ENABLING TOLERANCE TEST>> ), and then: - shows the message "MANUAL DOSING OK" if the weight is within tolerance: with a start command the instrument will pass to the following phase;...
-
Page 55: Error Messages
DOSAGE 6.19 Error messages Displayed error message Type of error What to do The scale weight is out of the To check the zero tolerance zero tolerance weight value weight technical before starting the dosage setup , Enlarge this value or unloaded the scale more ... - Page 56 DOSAGE The present weight is lower check selected than the selected formula formula minimum tare in the preset minimum tare value database management and on dosage start change the minimum tare value or load the scale until weight over formula minimum tare ...
-
Page 57: Progressives
DOSAGE the dosage start weight is Wait for the stabiblity of the unstable weight, then prsess button again. the dosed weight is outside Load or unload the dosed selected formula weight manually until the tolerance range dosed weight is in tolerance, then prsess the button again. -
Page 58: Lot Progressive
DOSAGE 6.20.4 Lot progressive In MENUProgressiveLot progressive, one obtains the clearing of the AUTOMATIC LOT (up to 6 digits); before carrying out the actual clearing, one is asked to confirm or cancel the operation. The AUTOMATIC LOT is a progressive number which increments of one upon the first totalisation subsequent to the clearing of the general total. - Page 59 DECLARATION OF CONFORMITY This device conforms to the essential standards and norms relative to the applicable European regulations. The Declaration of conformity is available in the web site www.diniargeo.com. WARRANTY The TWO-YEAR warranty period begins on the day the instrument is delivered. It includes spare parts and labour for repairs at no charge if the INSTRUMENTS ARE RETURNED prepaid to the DEALER’S PLACE OF BUSINESS.
Need help?
Do you have a question about the EGT scale series and is the answer not in the manual?
Questions and answers