Table of Contents
Advertisement
Quick Links
Advertisement
Table of Contents

Subscribe to Our Youtube Channel
Related Manuals for SPEC Designer Audio RPA-MG1000


Summary of Contents for SPEC Designer Audio RPA-MG1000
- Page 1 MONAURAL POWER AMPLIFIER RPA-MG1000...
- Page 2 Safety Precautions Operating Environment Operating environment temperature and humidity: +5 °C to +35 °C (+41 °F to +95 °F); less than 85 %RH (cooling vents not blocked) Do not install this unit in a poorly ventilated area, or in locations exposed to high humidity or direct sunlight (or strong artificial CAUTION: TO REDUCE THE RISK OF ELECTRIC SHOCK, DO...
-
Page 3: Table Of Contents
Contents Chapter 1 Introduction Chapter 3 Part Names Check included items ..............4 Front panel ..................9 Installing this product ............... 4 Rear panel ..................10 Regarding installation ............... 4 Chapter 4 How to Operate Chapter 2 Connections Playback steps ................12 Connections diagram ............... -
Page 4: Chapter 1 Introduction
Introduction Chapter 1 Check included items Installing this product • Power cord × 1 • Be sure to install this product on a flat, stable surface. • DC cord (MAIN) × 1 • Do not install this product in the following locations: —... -
Page 5: Chapter 2 Connections
• When a playback device is directly connected to the product, the volume of the product can be adjusted by connecting the volume controller (H-VC5) (sold separately) to the SPEC-VOL CONT terminal. Set the 3 GAIN selector switch to [SPEC-VOL]. ( page 11) • When a control amplifier is connected to the product, set the 3 GAIN selector switch to [MAX] or [-6 dB]. - Page 6 • When a playback device is directly connected to the product, the volume of the product can be adjusted by connecting the volume controller (H-VC5) (sold separately) to the SPEC-VOL CONT terminal. Set the 3 GAIN selector switch to [SPEC-VOL]. ( page 11) • When a control amplifier is connected to the product, set the 3 GAIN selector switch to [MAX] or [-6 dB].
-
Page 7: How To Connect The Speaker Cords
Connections Chapter 2 How to connect the speaker cords How to connect XLR cables The connection terminals are red for positive (+) and black for Connect the balanced output terminal on the device to the XLR negative (–). input terminal on the product. Match the orientation of the XLR plug to the XLR input terminal Twist the wire. -
Page 8: How To Connect Audio Cords
Connections Chapter 2 How to connect audio cords Caution Connect the RCA output terminal on the device to the RCA input • The power cord for this product is removable, but please refrain terminal on the product. from using power cords other than the cord included (3P plug- in socket type with electrical current capacity: 7 A). -
Page 9: Part Names
Part Names Chapter 3 Front panel 1 ON indicator Lit when the product power is turned on. Change the illumination type by setting the DIMMER switch. ( page 10) -
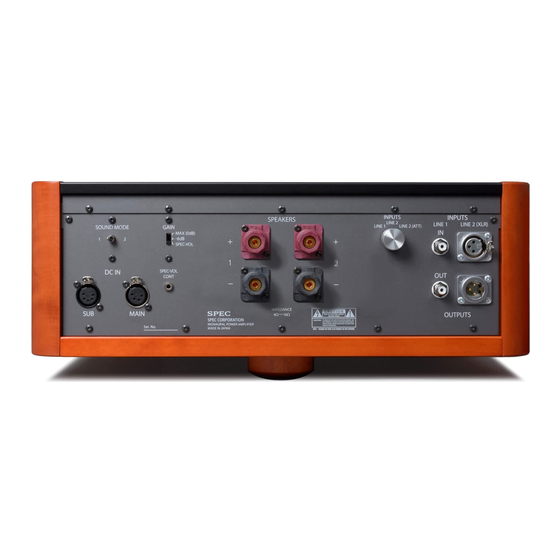
Page 10: Rear Panel
Part Names Chapter 3 Rear panel ■ Power supply 1 POWER switch 4 DIMMER switch Turns power ON and OFF. Changes the illumination type of the ON indicator on the front of the product. (For both the power supply and amplifier) 2 AC IN terminal ON : Lit in white light. - Page 11 : Switches the setting to the rated output minus 6 dB. 7 Audio input terminals ( pages 5 to 6) SPEC-VOL : Select this setting when using the volume LINE 1 : RCA-type input terminal. controller (H-VC5). LINE 2 : XLR-type input terminal (female). 4 SPEC-VOL CONT terminal 8 Audio output terminals Connect the volume controller (H-VC5).
-
Page 12: How To Operate
How to Operate Chapter 4 Playback steps Turn on the power of the playback device. Confirm that the volume of the device connected to the product is set to its lowest setting, and then turn on the power of the product. Check that the ON indicator on the body front panel is lit. -
Page 13: Chapter 5 Other
The product may not function properly due to external factors, such as static electricity. In this case, the product may once again function properly if the power cord is unplugged and then plugged in again. If this does not solve the problem, please contact SPEC CORPORATION. -
Page 14: Specifications
Other Chapter 5 Specifications ■ Amplifier Maximum output ........300 W × 2 (4 Ω, during bi-amplifier connection) Frequency response ......10 Hz - 30 kHz ±1 dB (6 Ω, 1 W) Line input terminal ......XLR input: 1 RCA unbalanced input: 1 Line output terminal ......XLR output: 1 RCA unbalanced output: 1 Speaker terminal .........2... -
Page 15: Warranty And After Sales Service
(e.g. if you have moved or the product was a gift), please If the product malfunctions in the course of normal use consult with SPEC CORPORATION. (use in accordance with the manual and safety precautions) 3. A fee will be charged for repairs in the following circumstances, during the warranty period, then we will repair the product even if it is during the warranty period. - Page 16 4th FL.NIHOMBASHI NAKAYA BUILDING,12-12 NIHOMBASHI- KOBUNA-CHO,CHUO-KU,TOKYO 103-0024,JAPAN 2019...
Need help?
Do you have a question about the Designer Audio RPA-MG1000 and is the answer not in the manual?
Questions and answers