Advertisement
Quick Links
Owner's Manual
Thank you, and congratulations on your choice of the BOSS TU-12BW Chromatic Tuner.
Before using this unit, carefully read the sections entitled: "USING THE UNIT SAFELY" and
"IMPORTANT NOTES" (supplied on a separate sheet).
These sections provide important information concerning the proper operation of the
unit. Additionally, in order to feel assured that you have gained a good grasp of every
feature provided by your new unit, this manual should be read in its entirety. The
manual should be saved and kept on hand as a convenient reference.
As shipped, the TU-12BW's batteries are not yet installed. Be sure to read the section
"Changing the Batteries," and then follow the instructions to install the batteries.
Copyright © 2008 BOSS CORPORATION
All rights reserved. No part of this publication may be reproduced in any form
without the written permission of BOSS CORPORATION.
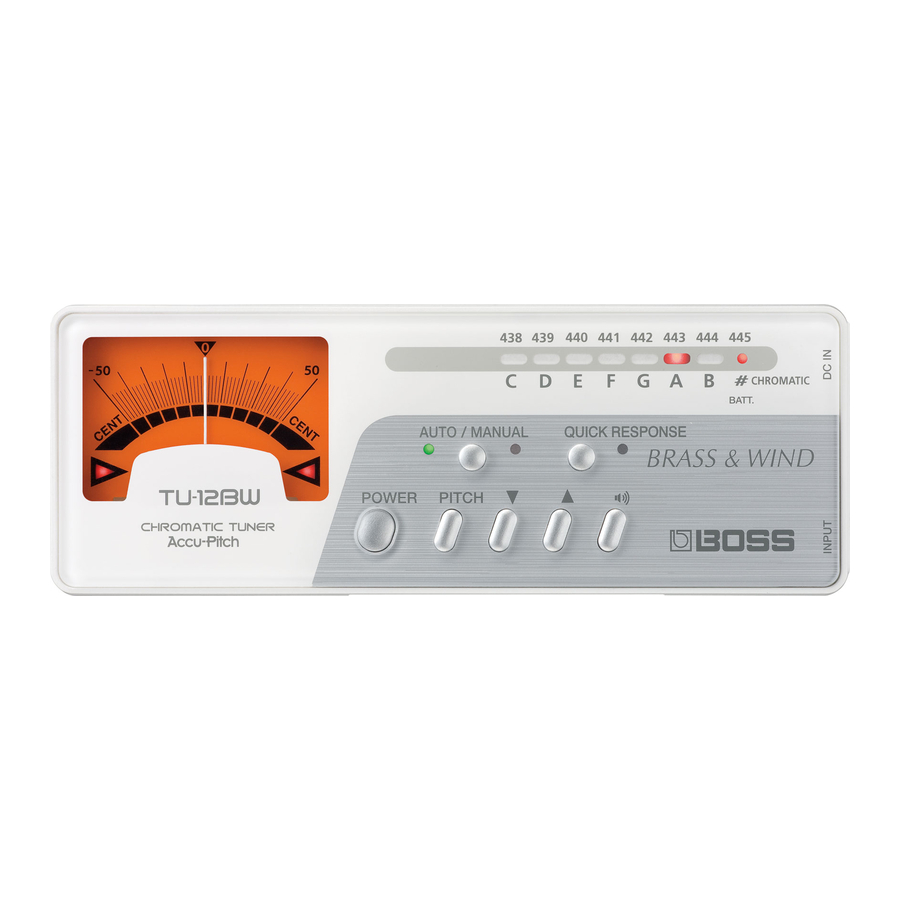
fig.01??????
AUTO/MANUAL
This changes the tuning mode.
Green Indicator: AUTO CHROMATIC mode
Red indicator: MANUAL mode
(for tuning a single specified pitch)
Needle Meter
Tuning Guide
The tuning indicator lights to show how close you
are to the target pitch.
lights: pitch is flat (low)
lights: pitch is sharp (high)
light simultaneously: in tune (± 3 cents)
Speaker
This plays the reference tone
and the Accu-Pitch sound.
Batteries Compartment
(bottom of the unit)
Insert two of the same type of AAA batteries.
Meter Adjustment Control (bottom of the unit)
Normal Tuning (AUTO CHROMATIC Mode)
1. Connect the plug of the included piezo mic to the INPUT jack and
mount the piezo mic on the instrument you want to tune.
To carry out tuning using the built-in microphone, connect nothing to the INPUT
jack and place the TU-12BW close to the instrument. If you have a digital wind
controller or an instrument with a built-in mic or pickup, plug its output into the
INPUT jack.
2. Press [POWER] to switch the power on.
3. Press [AUTO/MANUAL] to enable the "AUTO" setting (lighting the
green indicator).
In AUTO CHROMATIC Mode, the TU-12BW automatically displays a note's pitch (the
note name) as you play it on the instrument. Most of the time, AUTO is the most
convenient mode to use.
When you want to practice producing a specific pitch, you may want to
use MANUAL mode; in this mode, only the pitch that you specify is
detected and displayed.
4. Play a single note on the instrument.
While the note is sounding, the name for the note's current pitch is displayed.
The meter and Tuning Guide show how far the note is from the correct pitch.
5. Tune the instrument.
With the intended note name displayed, tune the instrument so that
on the Tuning Guide light simultaneously and the meter's needle points to 0 (the
center position).
When the Accu-Pitch feature is on, the tuner makes a beeping sound when the note
is stabilized at the correct pitch, informing you that the note is in tune.
Training for a Specific Pitch
(Tuning in MANUAL Mode)
1. Connect the plug of the included piezo mic to the INPUT jack and
mount the piezo mic on the instrument you want to tune.
To carry out tuning using the built-in microphone, connect nothing to the INPUT
jack and place the TU-12BW close to the instrument. If you have a digital wind
controller or an instrument with a built-in mic or pickup, plug its output into the
INPUT jack.
2. Press [POWER] to switch the power on.
3. Press [AUTO/MANUAL] to enable the "MANUAL" setting (lighting the
red indicator).
4. Press [ ] or [ ] to display the note name for the specific pitch you
want to practice and/or tune.
5. Play a single note on the instrument.
The meter and Tuning Guide show how far the note is from the correct pitch.
6. Tune the instrument.
With the intended note name displayed, adjust the instrument's tuning so that
both
and
on the Tuning Guide are lit and the meter's needle points to 0
(center position).
When the Accu-Pitch feature is on, the tuner makes a beeping sound when the note
is stabilized at the correct pitch, informing you that the note is in tune.
TU-12BW Settings
Changing the Reference Pitch for Tuning
1. Hold down [PITCH] and press [ ] or [ ] to choose the reference
pitch you want.
The indicator flashes. Choose the reference pitch you want by getting it to flash.
2. Release [PITCH] to set the selected reference pitch.
This setting is saved in memory when the TU-12BW is powered off.
Tuning While Listening to the Reference Tone (Sound Mode)
1. Choose the tuning mode you want to use (AUTO or MANUAL).
2. Press [
] (Sound) to play the reference tone.
3. Press [ ] or [ ] to light the indicator for the note name you'd like to
use as a reference.
The sound of the note name shown by the indicator is played.
Pressing [ ] and [ ], you can play reference tones in half-step increments
over five octaves (C2 to C7).
4. Tune the instrument to the reference tone.
When you're using Sound mode, tuning cannot be performed using the
built-in mic (the built-in mic is disabled).
5. Press [ ] (Sound) to stop playing the reference tone.
Changing the Meter Response Speed (Quick Response Feature)
The Quick Response feature increases the speed of the meter's response to the incoming
pitch. You may find this handy for some advanced music practice applications.
1. Press [QUICK RESPONSE] to turn the Quick Response feature on/off.
Quick Response is activated when the red indicator lights.
Indicators
These show the current note's name (C-B),
natural or sharp status (#), the master reference
pitch (438-445), and a warning when the
battery is low.
DC IN jack
Connect the AC adaptor
(optional BOSS PSA series) here.
INPUT jack
Connect devices such as the
included piezo mic or a digital
instrument you want to tune here.
QUICK RESPONSE
This changes the meter
response speed.
(Sound button)
Use this to turn the reference tone's
sound on and off.
(Down)/
(Up)
These change various settings.
PITCH
This changes the settings for the reference
pitch.
POWER
Switches the power on and off.
Built-in Mic
This allows you to tune an acoustic instrument
when it's not convenient to use the included
piezo mic. For the best results with the built-in
mic, move the TU-12BW as close to the instrument
as possible while tuning.
and
Calibrating the Meter's Needle
Rarely, the meter's needle may drift out of calibration, causing the needle to point
slightly off from the 0 position even when the Tuning Guide's
light simultaneously. This can occur over time as the unit is transported, or if the unit is
handled in a rough fashion. If this occurs, you can recalibrate the needle using the
following procedure.
During normal use, the meter's needle almost never drifts out of
calibration. To adjust it, be sure to use a small Phillips screwdriver (a 2.3
mm precision screwdriver).
1. Hold down [PITCH] and turn the power on.
Confirm whether or not the needle is pointing at the 0 position.
2. If the needle is not pointing to 0, carefully turn the adjustment screw
with a small, precision phillips screwdriver (2.3 mm) until the needle
points to 0.
3. After completing calibration, press [POWER] to switch off the power.
Useful Features
Preventing Battery Drain If You Forget to Switch Off the
Power (Auto Power Off Feature)
When the TU-12BW is turned on and powered by batteries, the power is turned off
automatically if approximately 30 minutes passes without any button being
pressed.
Deactivating the Auto Power Off Feature
You can temporarily deactivate the Auto Power Off feature when you power up the
TU-12BW. To do so, simultaneously hold down [ ] and [ ] while you press
[POWER] to turn on the power.
The Auto Power Off feature is always enabled when you switch on the power in the
usual way.
Using a Tone to Indicate Tuning is Completed
(Accu-Pitch Feature)
When the Accu-Pitch feature is on, a beeping sound is played when the pitch of the
instrument you're tuning stabilizes within a range of three cents above or below
the correct pitch. This sound tells you that the pitch is in tune.
Switching the Accu-Pitch Feature On and Off
1. Hold down [
] (Sound) and press [POWER] to switch on the power.
If no sound is heard from the unit as it's powered up, it means that the Accu-Pitch
feature has been deactivated. To enable the Accu-Pitch feature, perform the same
operation again; if you hear a beeping sound when the power comes on, it means
that Accu-Pitch has been enabled.
Memory Features
Once batteries are installed in the TU-12BW, the settings described below are
retained in memory even after the power is switched off.
Removing the batteries returns all settings to their factory defaults.
Setting
Tuning mode setting (AUTO or MANUAL)
Reference pitch
Note name selected in Sound mode
Accu-Pitch feature settings
Quick Response feature settings
Changing the Batteries
The BATT. indicator flashes when the batteries begin to
run down.
Replace the batteries as soon as possible.
* When turning the unit upside-down, place it on a soft cloth or
the like so as to prevent damage to the panel.
1. Open the battery compartment (located
on the bottom of the unit) by sliding the
cover toward OPEN.
2. Remove the old batteries from the battery compartment.
3. Insert two of the same type of fresh AAA batteries.
* Make sure the "+" and "-" ends of the batteries are oriented correctly.
* Do not mix fresh batteries with used ones, or mix batteries of different types. Doing so can result in
fluid leakage.
4. Slide the cover of the battery compartment back into place.
Specifications
Tuning Range E0 (20.6Hz) –
Expected battery
C8 (4,186.0Hz)
continuous use
Reference Pitch A4 (438–445Hz)
Tuning
± 1 cent
Accuracy
Power Supply Dry battery R03 (carbon)
or LR03 (alkaline); (AAA)
type x 2; DC 3 V
AC adaptor DC 9V (PSA
series; optional)
Current Draw
12 mA
* In the interest of product improvement, the specifications and/or appearance of this unit are subject to
change without prior notice.
and
Original factory settings
AUTO
440Hz
C4
ON (enabled)
OFF (disable)
Approximately 15 hours
life under
This figure will vary depending on the
actual conditions of use.
(carbon)
Dimensions
147.5 (W) x 54.0 (D) x 23.9 (H) mm
5-13/16 (W) x 2-1/8 (D) x 1 (H) inches
Weight
205 g, 8 oz (including batteries)
Accessories
Dry battery (R03 (AAA) type) x 2 (carbon),
piezo microphone, Owner's Manual, Soft
Case, Holder, Leaflet ("USING THE UNIT
SAFELY" and "IMPORTANT NOTES"), Infor-
mation
indicators
Advertisement


Need help?
Do you have a question about the Brass & Wind TU-12BW and is the answer not in the manual?
Questions and answers