Advertisement
Quick Links
1.0 Introduction
The following provides instructions for the installation
and operation of the Stone Age Mezzo™ Vent Free
Fireplace Combo, manufactured by Stone Age Manu-
facturing, Collinsville, Oklahoma.
Three generations of fireplace knowledge and experi-
ence have gone into the design and construction of the
Mezzo™ Vent Free Fireplace-Pizza Oven Combo.
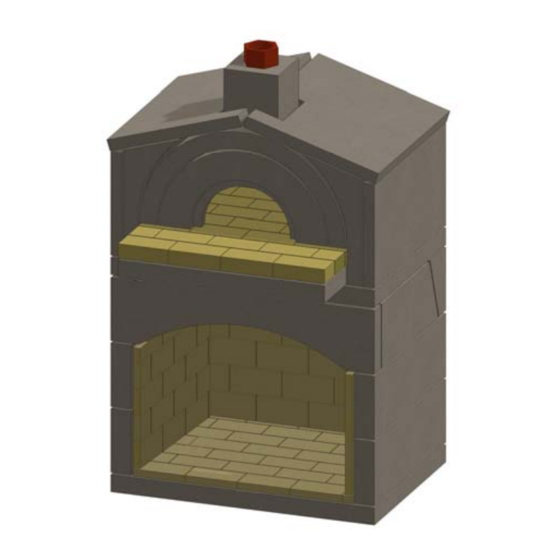
Assembly and Cutaway views of a SA-MPO-VFC
fireplace oven combo are shown in Figure 1.
SA-MPO-VFC
Front View
Figure 1. Fireplace Front and Cutaway Views
It is recommended that this fireplace be installed by a
professional installer, or by a builder in new construc-
tion. Installation by a non-qualified person may ne-
gate the warranty.
Keep these instructions for future reference.
Installation and Operation
Instructions
Mezzo™ Vent Free
Fireplace-Pizza Oven Combo
Side
Cutaway
View
1
2.0 Description
This unit is delivered as a kit with all components nec-
essary to complete the installation. Component ar-
rangements are shown in Figure 2. Components are
listed in Table 1. Some pieces are larger and shaped
differently than required for installation, and are in-
tended to be field-cut to fit. These are showing in Fig-
ure 2, with red arrows showing the shape of the piece.
Specific instructions for cutting each piece are listed in
the installation step where these pieces are to be in-
stalled.
A completed installation should include the following:
A. Fireplace items shown in Figure 2 and listed in
Table 1.
B. Vent Free Gas Log Set (sold separately)
C. Chimney Cap (sold separately) (Shown in Figure
26).
D. Stone Age Multi-Purpose Ready-Mix Cement
(sold separately).
The Mezzo™ Vent Free Fireplace-Pizza Oven Combo
is designed for outdoor use only, and should not be
installed within an enclosed structure or area.
Select a vent free gas log set that is properly sized for
this firebox. See gas log set manufacturer's guidelines
for proper sizing.
Ensure that appropriate building permits required by
local codes are obtained before installation in an exist-
ing home.
Advertisement

Related Manuals for Stone Age Mezzo SA-MPO-VFC


Summary of Contents for Stone Age Mezzo SA-MPO-VFC
- Page 1 The following provides instructions for the installation This unit is delivered as a kit with all components nec- and operation of the Stone Age Mezzo™ Vent Free essary to complete the installation. Component ar- Fireplace Combo, manufactured by Stone Age Manu- rangements are shown in Figure 2.
-
Page 2: Specifications
2.1 Specifications This fireplace and oven combo is designed for outdoor use only, and has not been tested for minimum clearanc- es to combustibles. Consult local building codes for a scratch-built wood fired oven, to determine minimum clearance to combustibles. If this unit is to be installed under a covered patio or area, the oven chimney should be converted to use a UL-103 metal chimney system. - Page 3 VOID THE WARRANTY AND MAY RESULT IN FIRE AND PERSONAL INJURY. It is most important that the Stone Age fireplace be installed according to the following instructions. It is also important that local building codes be consulted and followed. Improper installation could result in: Piers •...
- Page 4 Components broken into multiple pieces must be replaced. If this is your first Stone Age installation, it is suggest- Front ed that you first assemble the components without mortar to familiarize yourself with how the compo- nents fit together.
- Page 5 B. If installing the unit at the pad level, align and set E. Install the back plate (3). See Figure 10. the Base Plate directly on the footing, ensuring it is plumb and level. See Figure 7. Base Plate Concrete Pad Figure 10.
- Page 6 Figure 13. Back Header H. Line the firebox, using split firebrick and 1/4- inch mortar joints. Install firebrick on the floor first, with 1/4-inch of Stone Age Multi-Purpose Ready- Figure 16. Sidewall Firebrick Mix or other high temperature mortar. See Figure K.
- Page 7 L. Install the firebox top plate (1), checking for level. N. Install the oven base plate (8). Apply a bead of See Figure 18. mortar approximately 3” wide to the top plate of the firebox (1) in the areas below the edges of the oven base plate, and a create a z pattern of mortar through the middle area under the oven base plate, aligning it with the front edge of the base plate extension, and...
- Page 8 P. Install oven roof piece (9), aligning it with the R. Install the oven front wall. Use shims to tempo- rear edge of the oven floor. See Figure 22. rarily hold the wall piece in place while working mortar into the joint using a joint tool. Completely bed and fill the joint with mortar.
- Page 9 T. Install the enclosure end panels (13). End panels V. Cut out the front corners of the roof panels (15) are larger than required, and should be field cut to to clear the oven chimney as outlined in red, approx- the approximate shape outlined in red.
- Page 10 Drilling or cutting a hole for a gas line is acceptable. Use only Stone Age authorized equip- ment with this fireplace. 4.0 Operating Instructions G.
- Page 11 results in sparking. Burning softwood exclusively will 4.2 Tools require more frequent inspection and cleaning of the Special tools are available for the management of oven chimney. fires and inserting and removing wood and food. The- Experienced fire builders often use small amounts of se tools can be obtained online, or from local retailers.
-
Page 12: Cleaning, Inspection And Maintenance
such as the type of wood used, ambient temperature least twice a year during the heating season to deter- and humidity, oven temperature, and thickness of crust mine when a creosote buildup has occurred. If a sig- and toppings, that affect the outcome, Be prepared to nificant layer of creosote has accumulated (3 mm or spend a few times testing recipes and techniques while more), it should be removed to reduce the risk of a... -
Page 13: Finishing Specifications
K. After completion of cleaning, use a vacuum cleaner to remove all soot and residue from the fire- box. 6.0 Finishing Specifications Approximate finishing specifications, firebrick count, and mortar coverage are estimated in Table 4 below. Note that firebrick is included with this kit. Mortar coverage amounts may vary due to weather conditions, type of finish material, size of mortar joints, and skill and efficiency of the mason or install-... - Page 14 Riser Leg Rear Header Cross Leg Straight Lintel Base Plate Throat Lower/Middle Side Wall Back Plate 5L &R Upper Side Wall...
-
Page 15: Limited Warranty
Stone Age Manufacturing, Inc., shall be covered by their manufacturer’s warranties. This Limited Warranty covers only actual manufacturing defects in the Stone Age product and does not cover de- fects or faulty workmanship in the installation of the product or the ma- sonry or other structure in which it is installed.
Need help?
Do you have a question about the Mezzo SA-MPO-VFC and is the answer not in the manual?
Questions and answers