Table of Contents
Advertisement
1.
General information ................................................................................................... 7
1.1
Introduction ................................................................................................................ 8
1.2
Copyright ................................................................................................................... 9
1.3
Pictographs - Explanations .......................................................................................10
1.4
Basic safety instructions ............................................................................................11
1.5
Operating range and danger area for the operating personnel ..................................17
2.
Description of the machine ........................................................................................18
2.1
Brief description for the piston filler ...........................................................................18
2.2
Use ...........................................................................................................................19
2.3
Schematic diamgram in case of alternative operation ...............................................21
2.4
Image of the piston filler ............................................................................................22
2.5
Safety devices and their safety functions ..................................................................24
3.
Transport, setup, installation .....................................................................................25
3.1
Transport ..................................................................................................................25
3.2
Intermediate storage .................................................................................................26
3.3
Installation .................................................................................................................26
3.4
Fuse protection .........................................................................................................26
3.5
Aligning the machine .................................................................................................27
3.6
Space required for operation and maintenance .........................................................27
3.7
Dimensions, weight and technical specifications .......................................................28
3.8
Initial operation..........................................................................................................29
3.9
Safety instructions .....................................................................................................32
4.
Operating the piston filler ..........................................................................................35
4.1
General safety instructions ........................................................................................35
4.2
Operating elements/function .....................................................................................36
Version 1.1
TABLE OF CONTENTS
RKF 130
General information
Page 1 of 128
Advertisement
Table of Contents
Troubleshooting

Related Manuals for REX RKF 130


Summary of Contents for REX RKF 130
-
Page 1: Table Of Contents
RKF 130 General information TABLE OF CONTENTS General information ....................7 Introduction ........................ 8 Copyright ........................9 Pictographs - Explanations ..................10 Basic safety instructions ....................11 Operating range and danger area for the operating personnel ........17 Description of the machine ..................18 Brief description for the piston filler ................18... - Page 2 RKF 130 General information Description of the touch screen .................40 Description of the touch control system ..............44 Description of the buttons ..................55 Setting a straight filling programme ................58 Setting a portioning programm ..................61 Setting a twisting-off programme ................65 Special functions .......................69 4.10...
- Page 3 Application-technological error, cause and error removal ........123 De-commissioning ....................125 De-commissioning the piston filler ................125 Explanations ......................126 Delivery explanation ....................126 CE Declaration of conformity RKF 130 ..............127 Notes ........................128 Version 1.1 Page 3 of 128...
- Page 4 RKF 130 General information TABLE OF FIGURES Figure 1: RKF 130 danger area ....................17 Figure 2: Image ........................22 Figure 3: Functional elements and their arrangement on the piston filler ......23 Figure 4: Machine wheels .....................25 Figure 5: RKF 130 ........................28 Figure 6: Knee lever switch ....................37...
- Page 5 RKF 130 General information Figure 26: “Align pipe” special function .................70 Figure 27: Setup mask ......................71 Figure 28: Language options ....................72 Figure 29: Setting the date ....................73 Figure 30: Setting the time ....................73 Figure 31: Screen settings mask ..................74 Figure 32: Recipe management mask ..................75 Figure 33: Recipe statistics ....................76...
- Page 6 The information or drawings reproduced here may neither be duplicated nor misused nor communicated to a third party without our prior approval. Note: the overall documentation for the RKF 130 piston filler comprises the following manual: 1. The operating manual including spare parts documentation, circuit diagram and oil-flow diagram as well as 2.
-
Page 7: General Information
RKF 130 General information 1. GENERAL INFORMATION MANUFACTURER REX-Technologie GmbH & Co. KG Irlachstraße 31 5303 Thalgau Austria www.rex-austria.com OPERATOR Name Address PIN, location MACHINE MODEL Type Machine number Year of manufacture TRAINED PERSONNEL Name Name Name Version 1.1 Page 7 of 128... -
Page 8: Introduction
INTRODUCTION This operating manual contains important information and must be read, understood and complied with by persons who work with the RKF 130 piston filler or are responsible for its operation. The complete operating manual must always be kept close to the RKF 130 piston filler. -
Page 9: Copyright
RKF 130 General information COPYRIGHT Only REX-Technologie GmbH & Co. KG retains the copyright for documents such as Operating manual Drawings Photos Spare parts lists Circuit diagram Programmes etc. provided by us for using the piston filler. The customer/operator only has the non- transferable right to use these documents for purposes of assistance for proper operation or maintenance of the piston filler. -
Page 10: Pictographs - Explanations
RKF 130 General information PICTOGRAPHS - EXPLANATIONS 1. Pictograph for "Danger to persons" 2. Pictograph for "Danger to machine" 3. Pictograph for "Qualified electrician/electronic technician required" 4. Pictograph for "Qualified mechanic required" 5. Pictograph for "Lubrication" 6. Pictograph for "Special tool required"... -
Page 11: Basic Safety Instructions
RKF 130 General information BASIC SAFETY INSTRUCTIONS • Warnings and symbols Pictographs are used for emphasising important information in the operating manual. They are shown on the preceding sheet in chapter 1.3 Pictographs - Explanations. These marked texts are particularly important for the safety of man and machine, for flawless functioning of the piston filler. - Page 12 RKF 130 General information The personnel authorised to work with the piston filler must have read the operating manual before starting the work, basically chapter 4 General safety instructions. This is particularly important for work that is carried out only occasionally on the piston filler (retrofitting, maintenance, repairs).
- Page 13 RKF 130 General information The person responsible for operating the piston filler must be authorised to decline a machine operation requested by a third party, which can have an adverse effect on the safety and functioning. Allow personnel who are being trained, instructed or who are pursuing a general training program, to work on the piston filler only under constant supervision of an experienced person.
- Page 14 RKF 130 General information • Safety instructions for particular stages of operation Normal mode Avoid any working method which is questionable from a safety viewpoint. This is particularly applicable when using products whose condition does not clearly ensure proper functioning of the piston filler.
- Page 15 RKF 130 General information The person in-charge must be informed once the special work is complete. The person in-charge must ensure that the work has been carried out properly and that the piston filler can be restarted safely. He/she can unlock the main switch only after checking and release the machine for operation.
- Page 16 Modifications in or reconstructions of the piston filler or extensions to the machine are prohibited without prior written approval of REX-Technologie GmbH & Co. KG! Only original spare and accessory parts of REX-Technologie GmbH & Co. KG may be used. Otherwise, REX-Technologie GmbH & Co. KG reserves the right to all warranty and guarantee claims.
-
Page 17: Operating Range And Danger Area For The Operating Personnel
RKF 130 General information OPERATING RANGE AND DANGER AREA FOR THE OPERATING PERSONNEL RKF130 has the following danger areas (see Figure 1: RKF 130 danger area): Operating range Danger area Figure 1: RKF 130 danger area Type RKF 130 1277-1312 1080-1115 Version 1.1... -
Page 18: Description Of The Machine
RKF 130 Description of the machine 2. DESCRIPTION OF THE MACHINE BRIEF DESCRIPTION FOR THE PISTON FILLER Only plastically deformable compressible non-flammable non-explosive filling material may be filled, portioned and twisted off in the piston filler, even in a frozen state up to maximum -4 °C. -
Page 19: Use
RKF 130 Description of the machine 2.2.1 Range of use and intended use 1. This piston filler is designed for filling, portioning and twisting off of organic foodstuffs of the following type and quality: Meat and meat products having a diameter of maximum 45 mm Meat and meat products having a diameter of maximum 45 mm and having a temperature of maximum 40 °C and not colder than -4 °C (attention: the filling... - Page 20 RKF 130 Description of the machine 2.2.2 Unauthorised use This piston filler may not be used for the following purposes: Using meat and meat products in blocks having a diameter greater than 45 mm Using frozen meat, frozen meat products and other frozen foodstuffs having a temperature colder than -4 °C...
-
Page 21: Schematic Diamgram In Case Of Alternative Operation
RKF 130 Description of the machine SCHEMATIC DIAMGRAM IN CASE OF ALTERNATIVE OPERATION Disinfection not Using the piston filler Using the piston filler required for products meant for products not for human meant for human ―――――――――――――― consumption consumption → Cleaning &... -
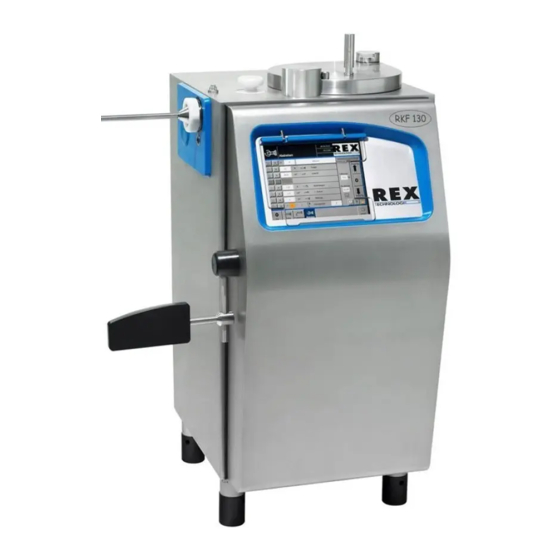
Page 22: Image Of The Piston Filler
The piston filler fulfils the requirements of the EU Machinery Directive and the EU directives for using meat and meat products. The body of the RKF 130 piston filler basically comprises a self-supporting stainless steel construction. It deals with all the static and dynamic loads that crop up during operation. -
Page 23: Figure 3: Functional Elements And Their Arrangement On The Piston Filler
RKF 130 Description of the machine • Machine depiction Figure 3: Functional elements and their arrangement on the piston filler Version 1.1 Page 23 of 128... -
Page 24: Safety Devices And Their Safety Functions
RKF 130 Description of the machine • Explanations for the above machine depiction Pos. Name Explanation Rotary piston Plastic Filling pipe Stainless steel Water drain Stainless steel Roasting cylinder Stainless steel Machine body Stainless steel Knee lever Plastic Plastic feet... -
Page 25: Transport, Setup, Installation
RKF 130 Transport, setup, installation 3. TRANSPORT, SETUP, INSTALLATION TRANSPORT The piston filler is assembled, including the installed roasting and rotary piston delivered in a wooden crate. After unloading, the further transport takes place appropriately with the lift truck. Attention: The piston filler must be lifted using the lift truck such that there is no danger of overturning when transporting. -
Page 26: Intermediate Storage
RKF 130 Transport, setup, installation Attention: The piston filler must not be transported at an angle or horizontally. (the hydraulic oil may leak) Attention: The brakes must be released when moving the piston filler with installed rollers. There is a severe danger of overturning when... -
Page 27: Aligning The Machine
RKF 130 Transport, setup, installation ALIGNING THE MACHINE The piston filler must be aligned horizontally to the location determined for it. This can be done just by twisting it on the plastic feet. The machine feet must be turned by a maximum of 35 mm from the threaded connector end. -
Page 28: Dimensions, Weight And Technical Specifications
RKF 130 Transport, setup, installation DIMENSIONS, WEIGHT AND TECHNICAL SPECIFICATIONS Figure 5: RKF 130 Type RKF 130 Cylinder capacity 30 litres Filling pressure 15 bar Portioning speed Maximum 350 port./min Weight 400 kg Connected wattage 3.5 KW Clipper connection Optional Page 28 of 128 Version 1.1... -
Page 29: Initial Operation
RKF 130 Transport, setup, installation INITIAL OPERATION • Electrical connection Pay attention to the label on feed cable without fail. Instructions for installation and start-up: Installation and start-up work may be carried out only by qualified electricians or by instructed experts who have been trusted with the mode of operation, in compliance with the valid nations regulations e.g. - Page 30 RKF 130 Transport, setup, installation • Preliminary activities The following work and checks are necessary before the initial operation: Comparison of line voltage and frequency The details on the machine label and the meter of the power station must match.
- Page 31 RKF 130 Transport, setup, installation Oil level in the hydraulic unit The oil level in the hydraulic unit must be checked on the oil gauge glass (refer to chapter 4 Operating the piston filler ). If the oil level is too low, it must be topped up (refer to chapter 5 Maintenance...
-
Page 32: Safety Instructions
RKF 130 Transport, setup, installation SAFETY INSTRUCTIONS 3.9.1 Safety risks that cannot be excluded (Risks, which cannot be avoided completely in spite of installing safety equipment) Never grasp the roasting cylinder when closing the roasting cylinder cover! Risk of injury or severing for fingers and limbs! - Page 33 RKF 130 Transport, setup, installation 3.9.2 "Check" machine status before switching it on Ensure the following before switching on the piston filler: roasting piston is fully available and arranged along with the seal, rotary piston, roasting cylinder seal as well as filling pipe nut movable parts are not jammed or damaged electrical equipment such as switches, cables, plugs, pushbuttons etc.
- Page 34 RKF 130 Transport, setup, installation 3.9.3 Instructing customers explaining the BASIC functionality of the piston filler and data on the basis of chapter 2 Description of the machine explaining general safety instructions on the basis of chapter 1.4 Basic safety instructions as well as 4 Operating the piston filler explaining every work step on the basis of chapter 2.5 Safety devices and their safety...
-
Page 35: Operating The Piston Filler
RKF 130 Operating the piston filler 4. OPERATING THE PISTON FILLER GENERAL SAFETY INSTRUCTIONS Never switch on the piston filler without having eliminated every possibility of danger to human beings in advance! Dangers can never be eliminated completely, but can be reduced by complying with the important safety rules. -
Page 36: Operating Elements/Function
RKF 130 Operating the piston filler OPERATING ELEMENTS/FUNCTION Please note: The touch screen may be operated only with fingers (with or without gloves). The touch screen must not be operated using pointed, sharp, metallic objects and also not with ballpoint pens or pencils. -
Page 37: Figure 6: Knee Lever Switch
RKF 130 Operating the piston filler • Explanation of the knee lever function It must be said right at the beginning that the properties explained now apply not only to the knee lever, but that a switch, which is connected to the connections 3 and 4 of the clip machine power point, (e.g. - Page 38 RKF 130 Operating the piston filler Manual operation (single portioning): The piston filler produces as long as the knee lever is pressed. If the knee lever is released, the piston filler immediately stops the straight filing; if it is portioning, the piston filler stops at the end of the last filled portion, unless the portion interruption is activated.
-
Page 39: Figure 7: Clipper Power Point
RKF 130 Operating the piston filler • Clipper power point The power point must be used for connecting different clip machines or REX attachments. Figure 7: Clipper power point • Main switch The main switch opens or closes the voltage supply of the piston filler to the... -
Page 40: Description Of The Touch Screen
RKF 130 Operating the piston filler DESCRIPTION OF THE TOUCH SCREEN Figure 9: Pre-cleaning mask On starting the piston filler, you automatically reach the pre-cleaning mask if the roasting cylinder cover is open. The control system automatically switches to the selected operating mode on closing the roasting cylinder cover. -
Page 41: Figure 10: Touch Screen
RKF 130 Operating the piston filler Figure 10: Touch screen On the pages 40-83, the numbers in brackets refer to Figure 10: Touch screen. The respective operating mode icon is displayed in this field. The selected operating mode or information mask is displayed. - Page 42 RKF 130 Operating the piston filler Date display The filling capacity is displayed in kilograms The remaining quantity is displayed in litres Service interval information Customer or dealer logo that can be set individually The respective mask page is displayed...
- Page 43 RKF 130 Operating the piston filler display field for the number of filled portions in the Single/Permanent portioning mode or setting field for the portions to be filled in the Piece specification mode Selection button for reducing the selected value...
-
Page 44: Description Of The Touch Control System
RKF 130 Operating the piston filler DESCRIPTION OF THE TOUCH CONTROL SYSTEM 4.4.1 General information • Detailed instructions for using the touch screen The electronic control system is made up of a touch screen with an integrated CPU assembly and external switching modules. Hence, it must be ensured that there is not excess voltage (even static) inside the device. - Page 45 RKF 130 Operating the piston filler • The control system supports the following operating modes: Straight filling The piston filler produces as long as uninterrupted sausage meat, such as the knee lever is pressed (pay attention to the single/permanent portioning switching!).
-
Page 46: Figure 11: Standby Mode
RKF 130 Operating the piston filler 4.4.2 Switching on the piston filler After the piston filler has been connected to the network using the main switch, it takes approximately 30 seconds to boot the control system. The screen is largely black in the process and the control system then goes into the standby mode. - Page 47 RKF 130 Operating the piston filler 4.4.3 Operating elements • Function of the machine control buttons (if the piston filler is switched on) The drives and accessory devices are activated in the piston filler after pressing the On button (26). It is now possible to achieve the responses described below using the following...
-
Page 48: Figure 12: Operating Elements
RKF 130 Operating the piston filler Figure 12: Operating elements Page 48 of 128 Version 1.1... - Page 49 RKF 130 Operating the piston filler • Operating elements of the keyboard (Figure 14: Programme name keyboard field, page 51) or numeric field (Figure 16: Changing the default setting directly, page 53) Confirmation button The respective value or name is accepted or the procedure is confirmed by pressing the confirmation button.
-
Page 50: Figure 13: Searching For A Filling Programme
RKF 130 Operating the piston filler 4.4.4 Searching for the filling programme or selecting a free programme location 1. By pressing the buttons 28 "-" or 29 "+", the programme number from 1 to 200 can be changed in steps. -
Page 51: Figure 14: Programme Name Keyboard Field
RKF 130 Operating the piston filler 3. Entering the programme name: A keyboard field opens on pressing the field 32, using which the desired programme name can be entered. Figure 14: Programme name keyboard field Version 1.1 Page 51 of 128... -
Page 52: Figure 15: Changing The Default Setting With "+" Or "-" Button
RKF 130 Operating the piston filler 4.4.5 Changing default settings 1. The default setting can be changed in steps by pressing the respective "+" (28) or "-" (29) button. Figure 15: Changing the default setting with "+" or "-" button Page 52 of 128 Version 1.1... -
Page 53: Figure 16: Changing The Default Setting Directly
RKF 130 Operating the piston filler 2. A number pad, on which the values can be changed directly, opens by simply pressing the default setting (30). Figure 16: Changing the default setting directly Version 1.1 Page 53 of 128... - Page 54 RKF 130 Operating the piston filler Keyboard input field 3. The respective setting ranges for the selected value are displayed above in the numeric field. Maximum default setting Set value Minimum default setting Page 54 of 128 Version 1.1...
-
Page 55: Description Of The Buttons
RKF 130 Operating the piston filler DESCRIPTION OF THE BUTTONS 4.5.1 Speed This value in pieces per minute (pc/min) determines the speed during the portioning procedure. If the speed is selected in % in the correction mask, the speed can be set from 1-100%. - Page 56 RKF 130 Operating the piston filler 4.5.6 Hydraulic ramp The filling output can be set to a high or low value here (setting range from 50-150%). Very high filling output can result in a casing blow-up or pear- shaped sausages and too less filling output results in poorer portioning performance.
- Page 57 RKF 130 Operating the piston filler 4.5.13 Additional twisting-off of the 1 portion The set value (setting range 0-10 rotations) is extended by the set number of rotations for the 1 portion. This prevents the first twisting-off position from twisting-off in a sausage chain.
-
Page 58: Setting A Straight Filling Programme
RKF 130 Operating the piston filler SETTING A STRAIGHT FILLING PROGRAMME 1. Press the Fill (25) button in the Operating mode bar 2. Select the programme location (31) 3. Assign the sausage name (32) 4. The following values can be selected with the help of the respective button:... -
Page 59: Figure 18: Fill Correction Mask
RKF 130 Operating the piston filler 6. The fill correction mask opens on pressing the Fill button (25) again. The standard values of the parameter can be changed for optimisation. 7. The following value can be selected with the help of the respective button: Acceleration ramp for roasting piston (36) 8. - Page 60 RKF 130 Operating the piston filler 9. A dialog field opens on pressing the Save button (20). The Save action has to be confirmed again in this field or the programme location must be selected. (20) Dialog field The settings changed right now are overwritten in the currently selected programme by pressing the “Save”...
-
Page 61: Setting A Portioning Programm
RKF 130 Operating the piston filler SETTING A PORTIONING PROGRAMM 1. Press the 24 button in the Operating mode bar 2. Select the programme location (31) 3. Assign the sausage name (32) 4. The following values can be selected with the help of the respective button: Speed (pc./min or %) -
Page 62: Figure 20: Portioning Correction Mask
RKF 130 Operating the piston filler The standard values of the parameter can be changed for optimisation. 6. The following values can be selected with the help of the respective buttons: Acceleration ramp for roasting piston Weight correction Lead or lag of the clip signal Portioning interruption 7. -
Page 63: Figure 21: Portioning Correction Mask 2
RKF 130 Operating the piston filler The following values can be selected with the help of the respective buttons: Speed of the 1 portion Correcting the last portion Weight preselection Delay in the 2 clipper impulse Moving depending on the speed Stop: in pairs 8. - Page 64 RKF 130 Operating the piston filler 10. A dialog field opens on pressing the Save button (20). The Save action has to be confirmed again in this field or the programme location must be selected. (20) Dialog field The settings changed right now are overwritten in the currently selected programme by pressing the “Save”...
-
Page 65: Setting A Twisting-Off Programme
RKF 130 Operating the piston filler SETTING A TWISTING-OFF PROGRAMME 1. Press the 23 button in the Operating mode bar. 2. Select the programme location (31) 3. Assign the sausage name (32) 4. The following values can be selected with the help of the respective buttons: Speed (pc./min or %) -
Page 66: Figure 23: Twisting-Off Correction Mask
RKF 130 Operating the piston filler 5. The first twisting-off correction mask opens on pressing the Twisting-off button (23) again. The standard values of the parameter can be changed for optimisation. 6. The following values can be selected with the help of the respective button:... -
Page 67: Figure 24: Twisting-Off Correction Mask 2
RKF 130 Operating the piston filler 8. The following values can be selected with the help of the respective buttons: Speed of the 1 portion Correcting the last portion Weight preselection Moving depending on the speed Stop: in pairs 9. You again return to the main mask by pressing the Twisting-off button (24) or the Back button (17) again. - Page 68 RKF 130 Operating the piston filler 10. A dialog field opens on pressing the Save button (20). The Save action has to be confirmed again in this field or the programme location must be selected. (20) Dialog field The settings changed right now are overwritten in the currently selected programme by pressing the “Save”...
-
Page 69: Special Functions
RKF 130 Operating the piston filler SPECIAL FUNCTIONS An information mask, in which various special functions and settings are possible, opens on pressing the Info button (19). Figure 25: Information mask The current operating hours of the machine are displayed in the "Service information"... -
Page 70: Align Pipe" Special Function
RKF 130 Operating the piston filler 4.10 “ALIGN PIPE” SPECIAL FUNCTION A dialog field opens after the “Align pipe” button is pressed in the Info mask. Info mask Figure 26: “Align pipe” special function If the knee lever is pressed, the pipe starts rotating which makes the alignment possible. The twisting pipe stops if the knee lever is released. -
Page 71: Setting The Setup Mask, Language Options, Time And Date
RKF 130 Operating the piston filler 4.11 SETTING THE SETUP MASK, LANGUAGE OPTIONS, TIME AND DATE • Setup mask The machine operator can configure settings (local time, date, etc.) in the setup mask. In addition, the desired language can be selected in the Language options. Important information such as machine number, machine code, …... -
Page 72: Figure 28: Language Options
RKF 130 Operating the piston filler • Language options A window, in which the desired language can be selected (right to add languages reserved), opens on pressing the display field of the set language. Figure 28: Language options Page 72 of 128... -
Page 73: Figure 29: Setting The Date
Figure 29: Setting the date Figure 30: Setting the time The other settings or changes such as versions, release code and screen background lighting can only be configured by authorised REX dealers. Version 1.1 Page 73 of 128... -
Page 74: Screen Settings
You can select in "Settings" whether the date (5), the time (4) and kilo/hour (3) must be superimposed in the main mask. The "Logo" column is reserved for the authorised REX dealers or technicians for settings. Page 74 of 128... -
Page 75: Recipe Management
RKF 130 Operating the piston filler 4.13 RECIPE MANAGEMENT On pressing “Recipe Management”, a mask opens in which all the set filling programmes can be displayed, sorted, deleted, and renamed as well as programme-specific production data can be read. Recipe management mask Figure 32: Recipe management mask Version 1.1... -
Page 76: Figure 33: Recipe Statistics
RKF 130 Operating the piston filler With "Import" and "Export", there is an option of importing diverse recipe or programme data of other piston fillers or save existing programme data on data carriers by connecting a USB stick to the CPU control system interface meant for it. -
Page 77: Figure 34: Favourites Mask
RKF 130 Operating the piston filler Favourites mask Figure 34: Favourites mask The Favourites mask opens on pressing the Favourites button in recipe management. An additional programme mask (it appears as the first one) can be viewed in the respective programme mode (filling / portioning / twisting-off) after activating and selecting the programme numbers for the preferred setting parameter. -
Page 78: Note
RKF 130 Operating the piston filler 4.14 NOTE Different notes can be saved in this mask. Figure 35: Note Page 78 of 128 Version 1.1... -
Page 79: Login
RKF 130 Operating the piston filler 4.15 LOGIN This mask is reserved for the authorised REX dealers or technicians for settings. Version 1.1 Page 79 of 128... -
Page 80: Info Log
RKF 130 Operating the piston filler 4.16 INFO LOG The complete process – all the executed work steps – is recorded here. The data is saved in chronological order. This data is important for the technician if an error message appears. -
Page 81: Service Plan
RKF 130 Operating the piston filler 4.17 SERVICE PLAN A service plan list can be opened in this mask, where the necessary or pending servicing and maintenance work is listed in detail. The maintenance work that has already been carried out must have been carried out at the prescribed intervals (refer to chapter 5.4 Maintenance and... -
Page 82: Status Report
RKF 130 Operating the piston filler 4.18 STATUS REPORT A status report regarding the error can be released in case of a programme error. The report is saved automatically. Your authorised dealer can read this data and process it further. -
Page 83: Alarms, Faults
RKF 130 Operating the piston filler 4.19 ALARMS, FAULTS • Error Messages The piston filler interrupts the operation for every single pending error message and opens the alarm mask independently or by pressing the alarm button. Figure 38: Alarm mask All the faults along with the alarm number, the time as well as an alarm description are displayed in this alarm mask. -
Page 84: Troubleshooting
RKF 130 Operating the piston filler 4.20 TROUBLESHOOTING A fault is selected by pressing the pending fault. For every alarm, the possible cause including help for troubleshooting is saved in the Help button. Help button: A window containing instructions for possible causes of the fault including their elimination is displayed after pressing the button. -
Page 85: Figure 40: Alarm Mask 2
RKF 130 Operating the piston filler The error must be acknowledged after it has been eliminated. Figure 40: Alarm mask 2 Version 1.1 Page 85 of 128... -
Page 86: Emergency Programme
If the measuring ruler of the roasting piston is defective, there is an option of operating the piston filler in an emergency programme. The roasting piston can be driven in the emergency programme only by actuating the knee lever. Attention: Please contact your authorised REX dealer immediately for eliminating the fault! Page 86 of 128... -
Page 87: Roasting And Rotary Pistons
RKF 130 Operating the piston filler 4.22 ROASTING AND ROTARY PISTONS Installation of the correct parts in the correct sequence is a prerequisite for RKF 130 to function properly. Figure 42: Installation sequence for roasting and rotary pistons Version 1.1... - Page 88 RKF 130 Operating the piston filler Installation Pos. Name Remarks sequence See remarks Roasting cylinder Firmly installed on the machine body Attached to the roasting piston (pos. See remarks Roasting piston seal Apply or spray the seal with food- safe or edible grease or oil before the installation;...
-
Page 89: Attaching The Straight Filling Pipe And Twisting Pipe
RKF 130 Operating the piston filler 4.23 ATTACHING THE STRAIGHT FILLING PIPE AND TWISTING PIPE Filling pipes (1) can be easily screwed on to the outlet (3) of the piston filler using the filling pipe nut (2). Figure 43: Attaching straight filling pipe 1 Version 1.1... -
Page 90: Figure 44: Attaching Straight Filling Pipe 2
RKF 130 Operating the piston filler Then press the locking device (4) and tighten the filling pipe nut (5) with the twisting key (5). Figure 44: Attaching straight filling pipe 2 Page 90 of 128 Version 1.1... -
Page 91: Water Drain
RKF 130 Operating the piston filler 4.24 WATER DRAIN The water drain pipe (1) remains unlocked. The rotary pistons are sealed. Figure 45: Water drain Version 1.1 Page 91 of 128... -
Page 92: Attaching The Twisting Pipes And Rotating Casing Holding Device
RKF 130 Operating the piston filler 4.25 ATTACHING THE TWISTING PIPES AND ROTATING CASING HOLDING DEVICE The rotating casing holding device helps to twist off artificial and natural casings automatically. Depending on the skill of the operator, it is possible to hold the casings by hand or attach a casing holding device. - Page 93 RKF 130 Operating the piston filler • The following steps should be followed 1. Switch off the piston filler with the Off button 2. Place the casing holding device carefully on the twisting flange 3. Turn the lock of the casing holding device...
- Page 94 RKF 130 Operating the piston filler 4. Screw the twisting pipe to the outlet. The twisting drive can be secured against twisting by pressing the lock button on the twisting drive. The twisting pipe can fixed using the accessory key.
- Page 95 RKF 130 Operating the piston filler 6. Attach the air sensor plate to the casing holding device by twisting it 7 and 8. The artificial casing rollers can be attached to or removed from the casing holding device depending on the use of artificial or natural casings.
-
Page 96: Attaching Twisting Off Tubes And Rigid Casing Holding Device
RKF 130 Operating the piston filler 4.26 ATTACHING TWISTING OFF TUBES AND RIGID CASING HOLDING DEVICE The rigid casing holding device serves only for automatic twisting off of natural casings. Holding the casing by hand or by attaching a casing holding device is possible, depending on the skill of the operator. - Page 97 RKF 130 Operating the piston filler • The following steps should be followed 1. Switch off piston filler with the off button 2. Fit the casing holding device carefully on the twisting off flange 3. Seal casing holding device to the right, till stop, rotate and tighten the sealing screw 4.
- Page 98 RKF 130 Operating the piston filler 5. Unscrew twisting off tube on the run out. Safeguard the twisting off gear against twisting by pressing the locking button on the twisting off gear. Fasten the twisting off tube with the accessory key.
- Page 99 RKF 130 Operating the piston filler • Selecting the correct twisting off tube Listing casing calibre – twisting off tube diameter Casing types/calibre - Ø (mm) Holding device apparatus 14-16 16-18 18-20 16-18 17-23 18-20 20-22 11-12 23-26 18-20 20-22...
-
Page 100: Processing Instructions For Casings
RKF 130 Operating the piston filler 4.27 PROCESSING INSTRUCTIONS FOR CASINGS The instructions of the casing manufacturer for storing and processing the casings should be followed unconditionally. The processed natural casings can be drawn up with the casing hoisting device directly on the special twisting off socket. -
Page 101: Production
RKF 130 Operating the piston filler 4.28 PRODUCTION • Starting production Figure 48: Piston filler control elements The numbers in brackets refer to Figure 3: Functional elements and their arrangement on the piston filler, page 23. The start of the industrial operation of the piston filler takes place as follows: Following the general safety instructions e.g. - Page 102 RKF 130 Operating the piston filler Switch on the piston filler with the on button (Chapter 4.2 Operating elements/function page 36) Select the desired program The piston filler is started by pressing the toggle lever (6). The filling material is fed by the roasting piston in the rotating piston.
- Page 103 RKF 130 Operating the piston filler • Restarting production Set the desired filling program and restart by pressing the toggle lever. Attention: Do not operate the piston filler without filling material! In case of non-compliance, no guarantee by the machine manufacturer or his agencies! •...
- Page 104 Switch on piston filler using the on button (chapter 4.2 Operating elements/function) 3. In case of switch off due to unconfirmed fault report: • Consult an authorised REX contract dealer or a REX technician for testing at all costs • Determine and remove the cause of the fault report •...
-
Page 105: End Of Production
RKF 130 Operating the piston filler 4.29 END OF PRODUCTION The end of production has arrived, if: the intended quantity of filling material is processed no further filling material is available for foreseeable time the piston filler must be put out of operation due to a long lasting fault or due to other reasons. -
Page 106: Maintenance
RKF 130 Maintenance 5. MAINTENANCE CLEANING AND CLEANING PLAN • Safety instructions The off button should be pressed before beginning with cleaning (4.2 Operating elements/function). The main switch should be set on position "0" Caution when using a high-pressure cleaner (danger of damaging the electrical... -
Page 107: Cleaning The Piston Filler
RKF 130 Maintenance CLEANING THE PISTON FILLER Piston fillers in which products are processed for human consumption should be cleaned and disinfected after every end of production, after work breaks > 1-1.5 hours, but at least 1 x daily. Lime or protein deposits should be removed at least 1x per month with an acidic cleanser, e.g. - Page 108 RKF 130 Maintenance 5.2.2 Table: Material type and cleaning procedure Cleaning relevant parts and their allowed cleaning procedure Parts identification as per Figure 3: Possible cleaning Pos. Functional elements and their Material type procedure arrangement on the piston filler page 23...
- Page 109 RKF 130 Maintenance 5.2.4 Cleaning for alkaline cleaning procedure Cleaning Devices/ Workflow Cleaner Instructions method agent Coarse Water, manual, Water hose, Begin immediately cleaning, max. 50-60°C mechanical scraper, after end of removing the trowel production product residues Dismantling 2-5 % solution of...
- Page 110 RKF 130 Maintenance Cleaning plan is applicable only for the stainless steel machine parts (Co-ordination with the cleaner and disinfectant manufacturer is required for other materials) The piston filler should be treated as per this cleaning plan always after end of production, after work breaks of more than 1-1.5 hours, but at least 1x daily...
- Page 111 RKF 130 Maintenance 5.2.6 Single instruction for cleaning the touch screen The surface of the touch screen must be cleaned with a damp, clean, soft cloth with water, better still with a glass cleaner. The glass cleaner should be sprayed on the cloth and not directly on the surface of the touch screen.
-
Page 112: Figure 49: Cleaning The Piston Filler
RKF 130 Maintenance 5.2.8 Single instruction for cleaning non-removable machine parts Cleaning of the non-removable machine parts should also be executed independently and in parallel with the cleaning of the removable machine parts. Is applicable here also in every case:... - Page 113 RKF 130 Maintenance Rinse all parts treated with the cleaning solution with approx. 60-70°C hot water having drinking water quality. High pressure cleaners, low pressure cleaning devices, spray pistols or water hoses can be used for this. However while doing so observe the safety instructions of this chapter unconditionally.
-
Page 114: Maintenance And Servicing
Work on electrical devices may be executed only by qualified electricians. Only original "REX" replacement parts or exchange parts may be used. In case of non-compliance, the warrantee deed from the machine manufacturer or his agencies or commercial agencies is cancelled. - Page 115 RKF 130 Maintenance Checking the roasting cylinder cover switch for function. If any defect is determined, then the piston filler should be shut down immediately and may not be started any more before the defects have been rectified. Test the status of the power supply cable, plug and socket visually for damages.
- Page 116 (every 1000 working hours, corresponds to 6 months for 8hrs/day, however at least yearly) Allow maintenance work to be executed only by REX technicians or by trained technicians of our authorised contract dealers. The works to be executed during maintenance are always listed in the service template of our touch control.
- Page 117 RKF 130 Maintenance Service plan The pre-requisite for retaining warranty claims is that it should be possible to execute all maintenances and to prove them with the help of complete servicing lists for maintenances and/or they should be entered in the touch control system.
- Page 118 RKF 130 Maintenance The following tests should generally be executed at intervals: Checking all bearings Cleaning, checking, exchanging the seals if necessary Checking the roasting and rotating piston for wear. if necessary exchange the parts, when there is increased wear Seals and bearing replacement of the drive for the rotating piston and oil change of the hydraulic control unit.
-
Page 119: Lubrication
If no grease escape is apparent, then REX customer service must be notified immediately. The casing holding device should be examined at intervals for high lubrication. - Page 120 RKF 130 Maintenance • Code letter and symbol for lubricants, hydraulic fluids and greases as per DIN 51502 Synthetic oil based oils Hydraulic oils DIN 51524/2 White oil or synthetic oil based greases Consistency classification NLGI 1 or 2 as per DIN 51818...
-
Page 121: Troubleshooting And Repair
RKF 130 Troubleshooting and repair TROUBLESHOOTING AND REPAIR CHECK LIST • Safety instructions The guidelines in chapters 1.4 or 4.1 should be followed in case of all servicing and inspection works. Especially, the main switch should be switched off (position "0") and should be secured with a lock. In addition it... - Page 122 RKF 130 Troubleshooting and repair 6.1.2 Portioning piston Error: Cause: Error removal: Piston does not No hydraulic pressure: rotate - No hydraulic oil Check oil status, refill if required - Proportional valve Renew proportional valve defective - Hydraulic pressure too low...
-
Page 123: Application-Technological Error, Cause And Error Removal
RKF 130 Troubleshooting and repair APPLICATION-TECHNOLOGICAL ERROR, CAUSE AND ERROR REMOVAL Error: Cause: Error removal: Imprecise portions Roasting piston seal not Install seal installed Rotating piston not used Use rotating piston correctly correctly Rotating piston seals Renew seals defective Roasting cylinder cover not... - Page 124 RKF 130 Troubleshooting and repair • Filling and portioning problems RKF 130 Problem Possible cause Removal • Filling break set Set longer filling break too short • • Filling material too Cool filling material • Too long filling Use shorter filling tube tube •...
-
Page 125: Commissioning
RKF 130 De-commissioning 7. DE-COMMISSIONING DE-COMMISSIONING THE PISTON FILLER • Drain off all oils from the diverse components of the piston filler (hydraulic power unit, gears,...) and clean up The statutory environmental regulations must be followed and adhered to for removing old oil. -
Page 126: Explanations
RKF 130 Explanations 8. EXPLANATIONS DELIVERY EXPLANATION _________________________________ Company: _________________________________ _________________________________ _________________________________ Customer no.: The piston filler of ________ Type Machine no.:____________ was delivered. The piston filler was installed on: ________ by:_________________ demonstrated on: ________ by:_________________ / started. All protective gears and safety instructions were explained and illustrated on the piston filler on the basis of the operating instruction when demonstrating/starting up. -
Page 127: Ce Declaration Of Conformity Rkf 130
RKF 130 Explanations CE DECLARATION OF CONFORMITY RKF 130 CE Declaration of Conformity With this, we declare that the machine specified below according to the concept and design in the implementation introduced by us conforms to the basic health and safety requirements as per Annex I of the EU guideline machines and the requirements of the additional EU guidelines mentioned below. -
Page 128: Notes
RKF 130 Explanations NOTES Page 128 of 128 Version 1.1...
Need help?
Do you have a question about the RKF 130 and is the answer not in the manual?
Questions and answers