Advertisement
Quick Links
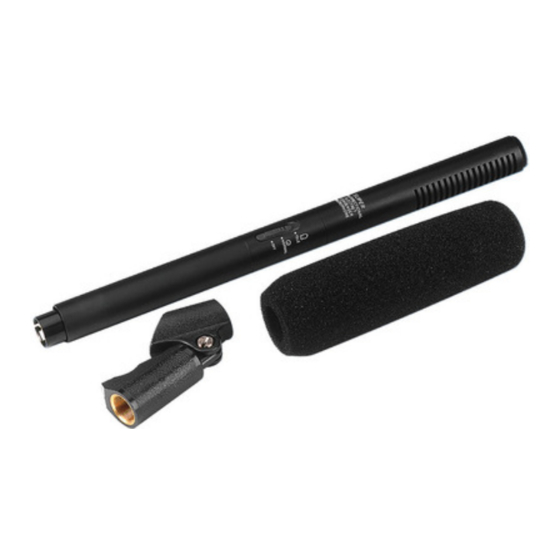
ECM-925P
Bestell-Nr. • Order No. 23.1990
ELECTRONICS FOR SPECIALISTS
ELECTRONICS FOR SPECIALISTS
Elektret-Richtmikrofon
Diese Anleitung richtet sich an Benutzer ohne
besondere Fachkenntnisse. Bitte lesen Sie die
Anleitung vor dem Betrieb gründlich durch und
heben Sie sie für ein späteres Nachlesen auf.
1 Einsatzmöglichkeiten
Das Mikrofon ECM-925P mit umschaltbarer Richt-
charakteristik (Niere / Superniere) ist besonders für
Aufnahmen geeignet, bei denen wegen störender
Nebengeräusche eine starke Richtwirkung erfor-
derlich ist. Es wird mit einem Mikrofonhalter, einem
Windschutz und einem 5 m langen Low-Noise-Kabel
geliefert. Die Stromversorgung kann wahlweise über
eine Phantomspeisung von 9 – 48 V (⎓) erfolgen oder
über eine 1,5-V-Batterie.
2 Wichtige Hinweise für den Gebrauch
Das Mikrofon entspricht allen relevanten Richtlinien
der EU und trägt deshalb das
-Zeichen.
•
Schützen Sie das Mikrofon vor Feuchtigkeit und
Hitze (zulässiger Einsatztemperaturbereich 0 °C bis
40 °C). Das Mikrofon ist nicht wetterfest. Achten
Sie deshalb bei Außenaufnahmen auf Schutz vor
Regen und sonstigem Niederschlag.
•
Verwenden Sie für die Reinigung nur ein trocke-
nes, weiches Tuch, auf keinen Fall Chemikalien
oder Wasser.
•
Wird das Mikrofon zweckentfremdet, falsch ange-
Electret Directional Microphone
These instructions are intended for users with-
out any specific technical knowledge. Please
read the instructions carefully prior to operation
and keep them for later reference.
1 Applications
The microphone ECM-925P with switchable pick-up
pattern (cardioid / supercardioid) is ideally suited for
recordings which require a strong directivity due
to interfering ambient noise. It is supplied with a
microphone support, a windshield and a 5 m low
noise cable. The power supply can be made alter-
natively via a phantom power of 9 – 48 V (⎓) or via
a 1.5 V battery.
2 Important Notes
The microphone corresponds to all relevant directives
of the EU and is therefore marked with
•
Protect the microphone against humidity and heat
(admissible ambient temperature range 0 – 40 °C).
The microphone is not weatherproof. Therefore,
in case of outdoor recordings, make sure that it
is protected against rain and other precipitation.
•
For cleaning only use a dry, soft cloth; never use
chemicals or water.
•
No guarantee claims for the microphone and
no liability for any resulting personal damage or
3
2
Beschaltung • Circuit diagram
ELECTRONICS FOR SPECIALISTS
schlossen oder nicht fachgerecht repariert, kann
keine Haftung für daraus resultierende Sach- oder
Personenschäden und keine Garantie für das Mik-
rofon übernommen werden.
Soll das Mikrofon endgültig aus dem Be-
trieb genommen werden, übergeben Sie
es zur umweltgerechten Entsorgung einem
örtlichen Recyclingbetrieb.
Werfen Sie verbrauchte Batterien nicht in den
Hausmüll, sondern geben Sie sie nur in den Son-
dermüll (z. B. Sammelbehälter bei Ihrem Elektro-
fachhändler).
3 Inbetriebnahme
1) Ist der Mikrofoneingang, an dem das Mikrofon
angeschlossen werden soll, nicht mit einer Phan-
tomspeisung von 9 – 48 V (⎓) ausgestattet, eine
1,5-V-Batterie vom Typ Mignon (AA) einsetzen.
Dazu am unteren Ende des Mikrofons die Schraub-
hülse abschrauben. Die Batterie so herum, wie im
Batteriefach aufgedruckt, einsetzen.
Bei längerem Nichtgebrauch sollte die Batterie
herausgenommen werden. So bleibt das Mikrofon
bei einem eventuellen Auslaufen der Batterie un-
beschädigt.
2) Die beiliegende Halterung auf ein Stativ mit
16-mm-Gewinde (
fon darauf stecken. Bei Bedarf den beiliegenden
Windschutz aufstecken.
material damage will be accepted if the micro-
phone is used for other purposes than originally
intended, if it is not correctly connected or not
repaired in an expert way.
If the microphone is to be put out of oper-
ation definitively, take it to a local recycling
plant for a disposal which is not harmful to
the environment.
Never put discharged batteries into the household
rubbish; always take them to the special waste
disposal (e. g. collective container at your electrical
supply shop).
3 Setting into Operation
1) If the microphone input, to which the microphone
is to be connected, is not provided with a phan-
tom power of 9 – 48 V (⎓), insert a 1.5 V battery of
.
size AA. For this purpose unscrew the screw sleeve
at the lower end of the microphone. Insert the
battery as indicated in the battery compartment.
If the microphone is not used for a longer time,
the battery should be taken out. Thus, the micro-
phone will not be damaged in case the battery
should leak.
2) Screw the supplied support onto a stand with
16 mm thread (
it. If required, place the supplied wind shield.
1
20 Hz
50
100
Frequenzgang • Frequency response
MONACOR INTERNATIONAL GmbH & Co. KG • Zum Falsch 36 • 28307 Bremen • Germany
Copyright
by MONACOR INTERNATIONAL. All rights reserved.
©
ELECTRONICS FOR SPECIALISTS
5
⁄
") schrauben und das Mikro-
8
⁄
"), and put the microphone onto
5
8
200
500
1kHz
2
ELECTRONICS FOR SPECIALISTS
ELECTRONICS
3) Das Mikrofon über das beiliegende Anschluss kabel
an den Mikrofoneingang eines Audiogerätes (z. B.
Mischpult, Aufnahmegerät, Verstärker) anschließen.
4) Mit dem Schiebeschalter die Richtcharakteristik
auswählen:
NORMAL = Niere, TELE = Superniere
Das Mikrofon ist damit eingeschaltet.
5) Wird das Mikrofon nicht benötigt, den Schiebe-
schalter in die untere Position stellen. Das Mikro-
fon ist damit abgeschaltet.
4 Technische Daten
Frequenzbereich: � � � � � � � � � 80 – 12 000 Hz
Empfindlichkeit, Impedanz
Normal (Niere): � � � � � � � � 3 mV/ Pa bei 1 kHz, 1,0 kΩ
Tele (Superniere): � � � � � � � 15 mV/ Pa bei 1 kHz, 2,3 kΩ
maximaler Schalldruck: � � � � 120 dB
Signal / Rauschabstand: � � � � > 40 dB
Stromversorgung: � � � � � � � � Phantomspeisung 9 – 48 V (⎓)
Einsatztemperatur: � � � � � � � 0 – 40 °C
Gehäuse:� � � � � � � � � � � � � � � Metall
Abmessungen, Gewicht: � � � ⌀ 25 mm × 285 mm
Gewicht ohne Batterie: � � � � 460 g
Anschluss: � � � � � � � � � � � � � � XLR, sym�
Änderungen vorbehalten.
3) Connect the microphone via the supplied cable to
the microphone input of an audio unit (e. g. mixer,
recorder, amplifier).
4) Select the directivity with the sliding switch:
NORMAL = cardioid, TELE = supercardioid
Thus, the microphone is switched on.
5) If the microphone is not used, set the sliding
switch to the lower position. Thus, the micro-
phone is switched off.
4 Specifications
Frequency range: � � � � � � � � � 80 – 12 000 Hz
Sensitivity, impedance
normal (cardioid): � � � � � � 3 mV/ Pa at 1 kHz, 1�0 kΩ
tele (supercardioid): � � � � � 15 mV/ Pa at 1 kHz, 2�3 kΩ
Max� SPL: � � � � � � � � � � � � � � 120 dB
S / N ratio: � � � � � � � � � � � � � � > 40 dB
Power supply: � � � � � � � � � � � phantom power 9 – 48 V (⎓)
Ambient temperature: � � � � � 0 – 40 °C
Housing: � � � � � � � � � � � � � � � metal
Dimensions: � � � � � � � � � � � � ⌀ 25 mm × 285 mm
Weight w/o battery: � � � � � � � 460 g
Connection: � � � � � � � � � � � � XLR, bal�
Subject to technical modification.
-50 dB
-60 dB
-70 dB
-80 dB
-90 dB
-80 dB
5
10
20 kHz
Polardiagramm • Polar pattern
A-0102.99.04.08.2016
oder 1,5-V-Batterie, Größe
Mignon (AA)
or 1�5 V battery, size AA
-50 dB
-60 dB
-70 dB
-80 dB
-90 dB
Front
Back
Tele
-80 dB
Normal
Advertisement

Related Manuals for Monacor ECM-925P


Summary of Contents for Monacor ECM-925P
- Page 1 20 Hz 1kHz 20 kHz Beschaltung • Circuit diagram Frequenzgang • Frequency response Polardiagramm • Polar pattern MONACOR INTERNATIONAL GmbH & Co. KG • Zum Falsch 36 • 28307 Bremen • Germany A-0102.99.04.08.2016 Copyright by MONACOR INTERNATIONAL. All rights reserved. ©...
- Page 2 Schéma électrique • Schema elettrico Réponse en fréquence • Risposta in frequenza Diagramme polaire • Diagramma direttivo MONACOR INTERNATIONAL GmbH & Co. KG • Zum Falsch 36 • 28307 Bremen • Germany A-0102.99.04.08.2016 Copyright by MONACOR INTERNATIONAL. All rights reserved.