Table of Contents
Advertisement
Quick Links
Atik One with guider kit - Assembly
Thank you for purchasing the Atik One guider kit. It was designed to ease the task of autoguiding, while eliminating differential flexure,
something that is a nightmare for any astrophotographer.
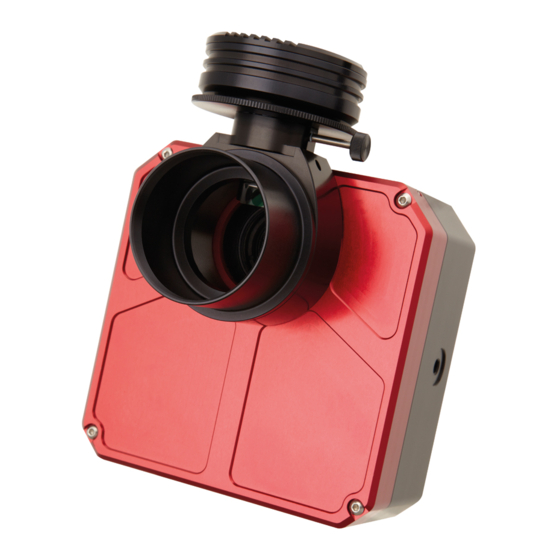
Components of the kit
The Kit is shipped in 2 boxes, and includes all you need to start imaging right away:
Attaching the guider module to the Atik One
Attaching the guider module to the Atik One is a very simple task. Just follow these instructions:
1
1- Take the 2" adapter off the main body.
3
3- Verify that the 3 screws are secure (careful not to
over-tighten). The module should now be securely at-
tached to the Atik One camera.
1 - Atik One camera; 2 - Atik GP (attached to OAG); 3 -
OAG body with 2" adapter; 4 - mounting screws
1
2
4
3
2
2- Align the module with the 3 holes and attach it to the
Atik One camera, using the 3 supplied screws.
4
4- Screw back in the 2" adapter onto the module.
Page 1
Advertisement
Table of Contents

Subscribe to Our Youtube Channel
Related Manuals for ATIK Cameras One


Summary of Contents for ATIK Cameras One
- Page 1 Atik One with guider kit - Assembly Thank you for purchasing the Atik One guider kit. It was designed to ease the task of autoguiding, while eliminating differential flexure, something that is a nightmare for any astrophotographer. Components of the kit The Kit is shipped in 2 boxes, and includes all you need to start imaging right away: 1 - Atik One camera;...
- Page 2 CCD. Focusing your OAG One of the great features of the guider module is the extremely smooth focus mechanism: Simply adjust the focusing ring counter-clockwise, and the camera support will smoothly and precisely go up: turn clockwise, and it will go down.
- Page 3 - Now plug the Guider camera to the auxilliary USB port on the Atik One. Again, a “New hardware found” message should immediately be visible. Just follow the prompts, clicking on “Continue anyway” if prompted. TheAtik GP camera is now installed and ready to use.
- Page 4 ASCOM and on the advanced settings, select “Atik Internal Filter Wheel”. Once you press “Connect”, a prompt will ask for you to select which will be camera 1. Usually this will be the Atik One, so just press “ok”. Filter wheel will initialize and position itself on position 1. Everything will now be ready to go.
Need help?
Do you have a question about the One and is the answer not in the manual?
Questions and answers