Table of Contents
Advertisement
Advertisement
Table of Contents

Related Manuals for Equipson Light Shark Series

Summary of Contents for Equipson Light Shark Series
- Page 1 LS-WING V1.0...
- Page 2 The guarantee of the product or service will not be extended if: (1) the product is repaired, modified or altered, unless the repair, modification or alteration is authorized in writing by Equipson SA; (2) the serial number of the product cannot be clearly read or is not present.
- Page 3 1-Overview About LS-Wing Overview of the LS-Wing 2-First steps Selecting the mode of use of the LS-Wing Wing mode of the LightShark system MIDI controller mode MIDI notes OSC/UDP controller mode 3-Access via web server Connection options Connecting from a mobile device Connection from a PC 4-Settings Device settings...
- Page 4 Software update Backup 8-Factory Reset Reset modes...
- Page 5 Section 1: Overview About LS-Wing LS-Wing is an innovative hardware offering several products in one: a Wing for LS-1 / LS- Core, an OSC/UDP hardware controller and a MIDI controller. LS-Wing can send/receive OSC commands over ethernet from any software or hardware supporting this protocol.
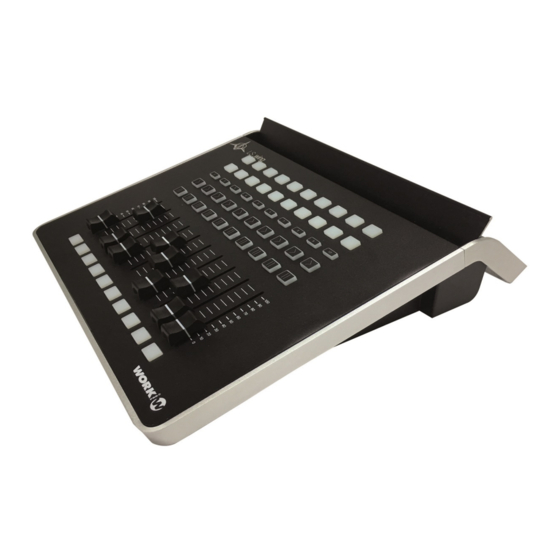
- Page 6 Overview of the LS-Wing The LS-Wing control surface offers the user a control system with 10 Faders and a set of 60 RGB buttons. Thanks to its small size, it can be transported as hand luggage. On the back, there is a holder to hold devices such as tablets.
- Page 7 Rear Panel Connection port for 5v LLC-1 lamp ( XLR-3 ) DMX outputs 1 and 2 (XLR-5 ) Ethernet switch 2x USB type A ports for Data 2x USB type A ports for +5V DC 1x USB 2.0 type B port Power connection ( PowerCON TRUE 1 ) Dimensions (WxHxD): 325X100X330 mm Weight: 2,7Kg...
- Page 8 Section 2: First Steps Selecting the mode of use of the LS-Wing It is possible to select the operation mode of the LS-Wing during system startup. Once the power is turned on, the lower buttons will flash for 30s , during that time the user can select the operating mode by pressing one of the buttons 1 to 5 in the PlayBack selection area: Key 1: LightShark Wing mode to control PlayBack 1 to 10.
- Page 9 MIDI controller mode In this mode, the LS-Wing will function as a MIDI control surface and can be used with any program or device that supports this protocol. The note assignment is as follows:...
- Page 10 MIDI notes Element Channel Type Note Value Executor Button 1-1 Note OFF( 64 ) / ON ( 127 ) Executor Button 1-2 Note OFF( 64 ) / ON ( 127 ) Executor Button 1-3 Note OFF( 64 ) / ON ( 127 ) Executor Button 1-4 Note OFF( 64 ) / ON ( 127 )
- Page 11 Element Channel Type Note Value Go Button 8 0-127 Go Button 9 0-127 Go Button 10 0-127 Pause Button 1 0-127 Pause Button 2 0-127 Pause Button 3 0-127 Pause Button 4 0-127 Pause Button 5 0-127 Pause Button 6 0-127 Pause Button 7 0-127...
- Page 12 Section 3: Access via web server Connection options The LS-Wing uses an integrated Web Server to provide all its functions to computers, tablets and smartphones that have a web browser. You only need to connect through the Ethernet port of your computer. Due to the technology used by lightShark, the use of the following web browsers is recommended: FireFox v67 onwards: https://www.mozilla.org...
- Page 13 Connecting from a mobile device To connect to LightShark devices, over the wired network using a tablet device, the steps are as follows: 1 Ensure that the ethernet adapter is properly connected to the tablet. Then connect an ethernet cable between the adapter and the lightShark device. 2 Go to the preferences, and in the sidebar you will find the new Ethernet interface.
- Page 14 Then set the interface to "Manual" and set the IP address and Subnet mask as in the following example: 192.168.1.15 255.255.255.0 It is possible to add the lightShark website to the iOS or Android home screen. This will create an icon and will automatically access LS-Wing in full screen mode without having to open the web browser.
- Page 15 Then select the "Add to Home Screen" option. You may have to scroll over on the icons to access this. 192.168.1.10 LS-Wing Press “Add”: 192.168.1.10 http://192.168.1.10...
- Page 16 Connection from a PC -The following steps detail the process of connecting via a computer using the wired network interface instead of the wireless network. Network configuration in macOS Access the System Preferences and then select "Network".
- Page 17 From the left side menu select the network interface to which the lightShark device is connected. 192.168.1.15 192.168.1.15 255.255.255.0 Then set the interface to "Manually". 192.168.1.15 192.168.1.15 255.255.255.0...
- Page 18 Then set the IP address and Subnet Mask as in the following example: 192.168.1.15 192.168.1.15 255.255.255.0 Start Safari and enter the address : 192.168.1.10 192.168.1.10...
- Page 19 Network configuration in Windows10 Access the Windows Settings and then select "Network and Internet". Select the "Change Adapter Options" option.
- Page 20 Right click on the network interface to which lightShark is connected, then select "Properties". Then "Double click" on "Internet Protocol version 4 (TCP/IPv4)".
- Page 21 Enter the network configuration as shown in the following example and accept the changes: 192.168.1.15 255.255.255.0 Start your web browser and enter the address "192.168.1.10" as shown below: 192.168.1.10...
- Page 22 Section 4: Settings Device settings The LS-Wing has a simple but comprehensive user interface. From it the user can make the necessary adjustments and configurations. The interface is organized in 5 different views: WING Settings From this window the user can make the necessary connectivity settings. IMAGEN PROVISIONAL Device Name, the user will be able to set a host name to the wing to differentiate it in case of connecting several units to the same network.
- Page 23 TCP/UDP Remote, it is possible to control each of the buttons or faders of the device remotely. For this purpose, a series of fixed commands are defined later on. The communication port will be 5678. In the section Remote Control Settings the list of commands is detailed. OSC Remote, it is possible to control each of the device's buttons or faders remotely via OSC.
- Page 24 Node Settings From this window, the user can make all the settings related to the configuration of the input/output universes of the LS-Wing . IMAGEN PROVISIONAL IMAGEN PROVISIONAL DMX Port, LS-Wing includes a 2 universe node that can be completely configured independently.
- Page 25 Section 5: Configuration in OSC/UDP Mode Target Adjustments The targets are the software or target devices to be controlled from the LS-Wing. LS-Wing includes an internal library of devices so that the user can make the necessary configurations without having to write any command or code. Targets, Through the circular buttons, the user can select the targets to make the necessary configuration: Circular button with a + : The "slot"...
- Page 26 To add a new target, the steps are the following: 1º-Click on a circle containing a + 2º-Click on the circle at the bottom of the window, a column will be displayed with the different devices added in the libraries, ordered by manufacturer name.
- Page 27 Create a Custom Mapping By clicking on one of the circles that shows the + icon, we access the configuration menu that will allow us to create a new Custom Mapping.
- Page 28 ASSIGN A FUNCTION TO A FADER/BUTTON To assign a function to a button or slider, a button or slider must first be selected in the image on the left. When the object is selected, it will light up in red and we can add a command through the "Add"...
- Page 29 Clicking on the arrow icon of the taget displays a column to the right, showing the different groups of commands created in the library. By clicking on the arrow icon of a group of commands, it is possible to access all the commands contained in that group.
- Page 30 Once you have added all the commands and assigned the times, you must press "Save" to save the changes.
- Page 31 COMMAND AND DELAY ORDER Each action can be delayed so that it runs a certain number of milliseconds after the button is activated. Delays can be configured to be either Absolute (default) or Relative. Absolute: All actions are executed in a certain number of milliseconds from the start of the button ( or fader ) press.
- Page 32 Section 6: Remote Control Settings It is possible to control the LS-Wing remotely, simulating the pressing of buttons or the adjustment of fader levels, through OSC, UDP or DMX. This functionality is very useful in case you have programmed different actions or commands in the LS-Wing and you want to trigger them from an external device.
- Page 33 Remote control via DMX To control the LS-Wing via DMX, ArtNet or sACN reception must be enabled from the settings window as explained on section 4.1. Channel Parameter Range Value 000-127 Release CH-1 Executor Button 1-1 128-255 Press 000-127 Release CH-2 Executor Button 1-2 128-255...
- Page 34 Channel Parameter Range Value 000-127 Release CH-21 Flash Button 1 128-255 Press 000-127 Release CH-22 Flash Button 2 128-255 Press 000-127 Release CH-23 Flash Button 3 128-255 Press 000-127 Release CH-24 Flash Button 4 128-255 Press 000-127 Release CH-25 Flash Button 5 128-255 Press 000-127...
- Page 35 Channel Parameter Range Value 000-127 Release CH-41 Go Button 1 128-255 Press 000-127 Release CH-42 Go Button 2 128-255 Press 000-127 Release CH-43 Go Button 3 128-255 Press 000-127 Release CH-44 Go Button 4 128-255 Press 000-127 Release CH-45 Go Button 5 128-255 Press 000-127...
- Page 36 Channel Parameter Range Value 000-127 Release CH-61 Fader 1 Level 128-255 Press 000-127 Release CH-62 Fader 2 Level 128-255 Press 000-127 Release CH-63 Fader 3 Level 128-255 Press 000-127 Release CH-64 Fader 4 Level 128-255 Press 000-127 Release CH-65 Fader 5 Level 128-255 Press 000-127...
- Page 37 Assigning LS-Wing functions In the target library it is possible to select "LS-Wing". This function allows the user to assign LS-Wing actions to a button. Actions: -Switch to Page 1 -Switch to Page 2 -Turn off the Leds of all buttons -Lock physical access to the console -Lock access to the web server Numerical correspondence...
- Page 38 Section 7: Software and library updates Updating libraries Through the download area of the Lightshar / LS-Wing website, it is possible to download the latest library packages. Update procedure: 1º- Download the library package, it is a file with the extension .devpkg 2º- Open the web browser and connect to LS-Wing 3º- In the "Info"...
- Page 39 Software Update Through the download area of the Lightshar / LS-Wing website, it is possible to download the latest software version. Update procedure: 1º- Download the software from the LS-Wing website, it is a file with the extension .lswupdt 2º- Open the web browser and connect to the LS-Wing 3º- In the "Info"...
- Page 40 Backup It is possible to back up the current status of the LS-Wing. Generate a Backup File : 1º- Open the web browser and connect to the LS-Wing 2º- In the "Info" tab click on "Save" in the BackUp File section 3º- When you click on "Save"...
- Page 41 Section 8: Factory Reset Reset modes Different types of reset are possible, depending on the key combination used: PLAY PAUSE Network+Software+Settings Reset: PLAY+PAUSE+1 Newtwork Reset: PLAY+PAUSE+2 Settings Reset: PLAY+PAUSE+3 Delete the Mappings: PLAY+PAUSE+4...
- Page 42 Section 9: Datasheet...
Need help?
Do you have a question about the Light Shark Series and is the answer not in the manual?
Questions and answers