Table of Contents
Advertisement
Quick Links
4K HDMI KVM USB/RS232/IR/Analog Audio CAT5e Extender over
ITEM NO:
HKM01BT-4K: 4K HDMI KVM over IP - Transmitter
HKM01BR-4K: 4K HDMI KVM over IP - Receiver
Features:
Extend and distribute 4K HDMI signal with bi-directional RS232, USB signal, IR and analog audio
signals over LAN.
Supports resolutions up to 4K@30Hz Ultra HD.
HDCP 2.2 compliant.
Transmission range up to 150M over CAT5e/CAT6.
Support SFP optical transceiver, single mode transmission distance up to 60KM.
Support Windows based management software, using PC for easy setting input/output link.
Support Android/iOS APP for channel select and management.
Support IR remote control or front panel button for channel select and management.
Support up to 8x8 video wall.
Support output resolution up/down scale: 2160p 60Hz(YUV420) input to 2160p 30Hz or 1080p
60Hz output.
Supports full duplex Bi-Directional RS232 communication (115200 MAX) by control software on a
PC, or other automated control system to control devices attached to the extenders.
Built in RS232 distribution function, to send RS232 signal from one TX to multiple RX.
RS232 port support external Keypad/Console control. (Custom made available)
Support Dolby TrueHD® , and DTS-HD Master™ ,LPCM audio up to 7.1 channels 192Khz
Built in Bi-Directional analog audio transmission (only in unicast mode).
Built in Bi-Directional IR extension.
HKM01BT-4K transmitter unit built in HDMI local loop output.
HKM01BR-4K receiver unit with 4 ports USB devices (2 port USB 1.1 front & 2 Port USB 2.0 rear),
to extend USB peripheral devices, such as flash disk, hard disk, keyboard, mouse, etc.
Use IGMP and Jumbo frame protocol Gigabit Switch Hub to do HD signal distribution and transmissio
Support point to point and multiple source devices to multi-display connections via Gigabit network
switch.
Support total of transmitter unit up to 1000 pieces, receiver unit over 60000 pieces based on the
number of ports on your network switch.
Perfect for large scale remote HD content access and security monitoring systems, digital
signage applications.
Option Model: TPN002U
1U 19" Rack Mounting Panel, allow fix two unit of HKM01BT-4K, HKM01BR-4K
IP Series
Advertisement
Table of Contents

Related Manuals for SC&T HKM01BT-4K

Summary of Contents for SC&T HKM01BT-4K
- Page 1 Support total of transmitter unit up to 1000 pieces, receiver unit over 60000 pieces based on the number of ports on your network switch. Perfect for large scale remote HD content access and security monitoring systems, digital signage applications. Option Model: TPN002U 1U 19” Rack Mounting Panel, allow fix two unit of HKM01BT-4K, HKM01BR-4K...
-
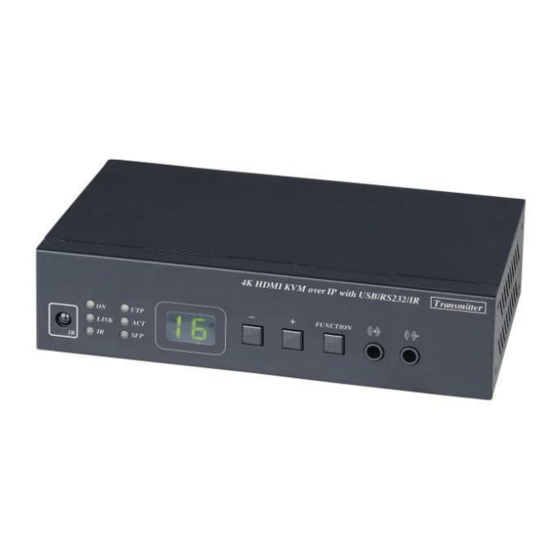
Page 3: Panel View
Panel View: Transmitters HKM01BT-4K Receivers HKM01BR-4K Panel Button Function: Button Menu Short Press Reduce Value Increase Value Press together Enter Menu/Cancel Press 3 seconds Carry Decomposition Press 6 seconds Lock/Unlock Button Press and hold then power on Factory Default Engineering Mode Set Factory Default then enter Engineering Mode In engineering mode Power and Link LED will be flash together, IP address of unit will be set to Static IP 192.168.0.88 temporarily, users can login to the web page by browser to change settings or... -
Page 4: Led Indication Status
LED Indication Status: Panel LED Status Description Boot completed Flash Twice Booting Power Green LED Transmitter: standby( by IR remote power button only) Flash Slowly Receiver: video output be turned off Breathing(Fading) Screen saver mode (not available for transmitter) Connected &... - Page 5 Cable & Transmission Distance: Link Cable use high quality Cat.5e UTP/STP/FTP or Cat.6 UTP cable Transmission distance will be affected by equipment (Switch HUB), cable quality…etc. When using CAT.5e/CAT.6 cable connect transmitter and receiver directly without Ethernet switch, the maximum transmission distance up to 150M. You can also use model no: SR01 repeater for extended longer distance or using Gigabit Switch hub which support IGMP protocol and Jumbo Frame 8K for signal distribution or extend distance.
-
Page 6: Remote Control Button Function
Remote Control Function: You could use the IR infrared remote control to preset channel selection. Using the IR remote control aim to the front panel of receiver or external IR receiver cable will be ok. Initial at first time use the remote control or after change battery of remote control, the IR remote control and the equipment Remote ID must be using same ID. -
Page 7: Remote Control Operation
Remote Control Operation: Select Channel: or or or Mode 1: use to select channel and press ENTER to confirm. Mode 2: enter the channel number and press ENTER to confirm the input channel. Select Function: or or or Mode 1: press MENU then use to select function, press ENTER to confirm. - Page 8 0=Pass-Through 1=HD 720p 60Hz, 2=Full HD 1080p 60Hz 3=Full HD 1080p 50Hz 4=Ultra HD 2160p 30Hz Video Select Video output resolution setting 5=Ultra HD 2160p 25Hz 6=WXGA 1366x768 60Hz 7=WXGA+ 1440x900 60Hz 8=WUXGA 1920x1200 60Hz 9=SXGA+ 1400x1050 60Hz 10=Customize 0 = Graphic Mode Video Quality Video Quality setting 1 ~ 5 = Mode 1 ~ 5...
- Page 9 Direct Access Menu Run menu function even hide Menu Item “Advanced 0 = Disable Display/Hide “Advanced Menu” Menu” 1 = Enable Screensaver Screen Saver setting 0 = No Option Screen Off Option Behavior After Screen Off 1 = Mute Analog Audio 2 = Stop Connection Diagnostic Information Diagnostic Information...
- Page 10 RS-232 Control: User could use RS-232 port of transmitters to operate/setup the receivers at same channel by program like Hyper Terminal which built-in Windows XP and before version. Hyper Terminal setting:〔115200 bps (8-N-1), Flow control: None〕(Properties -> Settings -> ASCII Setup…...
- Page 11 Command and Parameters List: Command Parameters Description Remark Show current channel number [ 0~999 ] Switch to specified channel [ 0~999 ] NAME ? Check current channel name [ 0~999 ] NAME “string” Set channel name, 28 character MAX Transmitter not support NAME ? Show channel name setting parameter NAME...
- Page 12 Status of IR extension FUNC ? FUNC [ ENABLE | DISABLE ] Enable/disable IR extension Status of IR routing ROUTING ? Set IR routing follow or specified ROUTING [ FOLLOW | 0~999 ] Status of IR control setting CTRL ? Transmitter not support Enable/disable IR control CTRL [ ENABLE | DISABLE ]...
- Page 13 Status of current IP address Status of MAC address QUERY Status of video resolution RESOLUTION Status of firmware version VERSION BAUD ? Status of auxiliary baudrate BAUD [ 0~9 ] Set auxiliary baudrate NEWLINE ? Status of auxiliary newline Set auxiliary newline AUXILIARY NEWLINE [ 0~3 ] TRIGGER ?
- Page 14 Caution: 1. Transmitter/receiver boot time require 30 seconds and will be able to control after booting. 2. First time reboot after reset to default will be longer than 30 seconds. 3. Not recommend to work with existing LAN connection to avoid large video, data transmission or multicast packets to slow down your other LAN devices.
- Page 15 APP Control Function: APP name: Remote Control Center (Basic control as IR remote for end user ) Google Play Download Link iTunes Download Link Google Play Download QR code iTunes Download QR code APP name: Remote Control Center PRO (Advanced control for installer) Google Play Download Link iTunes Download Link Google Play Download QR code...
- Page 16 Web Setting Function: System provide detail settings over web browser, you could input the IP address of transmitter / receiver at link column of browser if you know the exact IP address of them. There are four ways to get the IP address of receiver: 1.
- Page 17 Bonjour plug-in installation: a. Click “BonjourSDKSetup.exe” to install Bonjour plug-in for Internet Explorer. b. Click “Next” to continue. c. Click “I accept the terms in the license agreement” to continue. d. Click “Next” to continue.
- Page 18 e. Click “Install” to start installation. f. Click “Finish” to exit installation. g. Right click on “My Network Place” “Properties” then right click on “Local Area Connection” “Properties” then double click on “Internet Protocol (TCP/IP)” to setting as below: (IP address 169.254.111.111, sub mask 255.255.0.0)
- Page 19 Login in to the web setting: Use CAT5 cable to connect transmitter/receiver RJ45 port to PC LAN port, direct input known IP address of TX/RX, or open IE browser then select View Explorer Bars Bonjour. Double click on “HTTP on ast3-tx-xxxx(x= channel of transmitter)” or “HTTP on ast3-rx-xxxxxxxxxxxx (x= MAC address of receiver)”, it will pop up web setup in Bonjour windows as below: Click Network page you will see the IP address of transmitter/receiver...
- Page 20 System: Version Information Firmware version information Update Firmware Update system firmware Utilities System tools Factory Default Set system to factory default Reboot Reboot system Default EDID Set EDID to default Console API Command Run Console API command ...
-
Page 21: Video Wall
Video Wall: Basic Setup Bezel and Gap Compensation: Set screen, bezel and gap size Wall Size an Position Layout: Set video size, position and layout Preferences: Set extension way and rotation Advance Setup: Step 1: Select target to control ... - Page 22 Network: IP Setup: IP Mode could be Auto IP, DHCP, Static three mode Host default setting is Static IP, client default setting is Auto IP For mass deploying please use static or DHCP mode. Notice: if there is no DHCP server in network the host/client will keep reboot, you need to set the host/client to factory default Press channel button “-”...
- Page 23 Functions: For transmitter: Enable Video over IP: This function setup the video signals send from network, default is checked. Enable Video Wall: This function setup the video wall, default is not checked. Maximum Bit Rate: Set maximum bit rate. ...
- Page 24 USB over IP: Enable USB over IP: Enable/disable USB extender function. Operation Mode: Set USB operation mode. Compatibility Mode: Set USB compatibility mode. Serial over IP: This function setup Serial (RS232) signal sends from network Operation Mode: Default is “Type 2 (Recommended.
-
Page 25: Specification
Package: HKM01BT-4K Package Include: Transmitter x 1 USB A to B cable x 1 IR emitter cable x 1 DC 5V 2Amp power adapter x 1 Software CD x1 HKM01BR-4K Package Include: Receiver IR emitter cable x 1 IR remote control x1...
Need help?
Do you have a question about the HKM01BT-4K and is the answer not in the manual?
Questions and answers