Advertisement
Quick Links
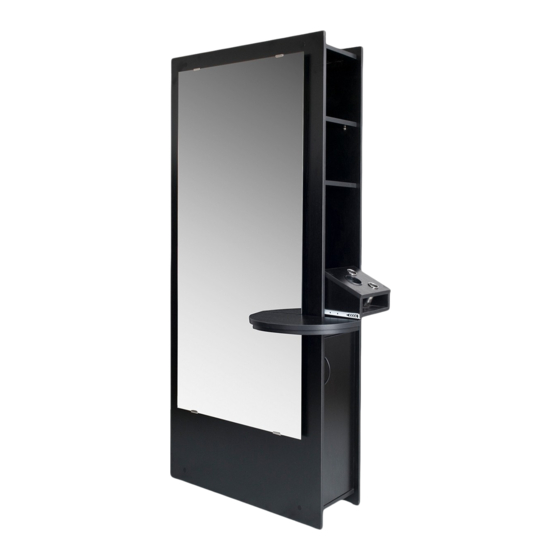
The Allegro Styling Station Assembly Instructions
Key -
M – Mirror + Mirror Backboard
J – Large Panel that mirror will attach to
B1 – Top Board of Station
B2 – Bottom Board of Station
E1 – Upper Permanent Shelf (Directly underneath B1)
E2 – Lower Permanent Shelf (Directly underneath the Appliance Drawer H)
H – Appliance Drawer
F – Shelves
D - Door
1. Unpack all boxes. Confirm that package contents are complete.
2. Detach mirror from Panel J. This will be done by removing the two screws from
the backside of the Panel J that are screwed into the backside of the mirror
backboard. This will be done by using a using the supplied Allen Wrench / Hex
4mm. Refer to Appendix A, Picture 1 that references from where to detach the
mirror. Please take note or mark which side Place mirror very carefully to the side
in a safe position until later steps.
3. Place Panel C on one of its long edges.
4. Attach B1 (Top Board of Station) and B2 (Bottom Board of Station) to the top
and bottom edges of Panel C as shown in Appendix A, Picture 2a and 2b. B1 and
B2 are the top and bottom boards of the station. Panel C is the center divider of
the station. Use provided screws to attach B1 and B2 to Panel C by screwing in to
the bottom and top edges of Panel C.
5. Attach Panel A (the backside panel of the complete station – the larger panel that
did not have the mirror attached to it) to Panel C, B1, B2. Panel A will have the
hinge plates pre-attached to the inside of the panel and will also have plastic feet
at the bottom. This will be done by using the provided screws to screw into the
pre-dilled screw holes on the edges of Panel C, B1, and B2 from the backside of
Panel A (the side without the hinges). Refer to Pictures 3a, 3b, and 3c in
Appendix A.
Advertisement

Related Manuals for BUY-RITE Allegro Styling Station


Summary of Contents for BUY-RITE Allegro Styling Station
- Page 1 The Allegro Styling Station Assembly Instructions Key - M – Mirror + Mirror Backboard J – Large Panel that mirror will attach to B1 – Top Board of Station B2 – Bottom Board of Station E1 – Upper Permanent Shelf (Directly underneath B1) E2 –...
- Page 2 6. Place structure on its side so that Panel A is on its longest edge and B1/B2 are both laying on its shorter edges (refer to Picture 4a and 4b). 7. Attach permanent Shelf’s E1 and E2 to the middle of Panel A. This will be done by using provided screws to screw into the pre-drilled screw holes on the edges of permanent Shelf E1 and E2 from the backside of Panel A (the side that will go against the wall).
- Page 3 13. Attach Half-Moon shelf to the front-side of Panel J. To do this, remove the bolts from the Half-Moon Shelf by using a 14mm wrench. In order to attach the Half- Moon shelf, you will need to place bolts through the back-side of Panel J to line up with the backside of the half-moon shelf.
- Page 4 Appendix A Picture 1 -...
- Page 5 Picture 2a -...
- Page 6 Picture 2b -...
- Page 7 Picture 3a –...
- Page 8 Picture 3b –...
- Page 9 Picture 3c –...
- Page 10 Picture 4a –...
- Page 11 Picture 4b –...
- Page 12 Picture 4c –...
- Page 13 Picture 4d –...
- Page 14 Picture 5a...
- Page 15 Picture 5b –...
- Page 16 Picture 6a –...
- Page 17 Picture 7a –...
- Page 18 Picture 7b –...
- Page 19 Picture 7c –...
- Page 20 Picture 8a –...
- Page 21 Picture 8b –...
- Page 22 Picture 9a –...
- Page 23 Picture 9b –...
Need help?
Do you have a question about the Allegro Styling Station and is the answer not in the manual?
Questions and answers