Table of Contents
Advertisement
Advertisement
Table of Contents

Related Manuals for Kambic OBM


Summary of Contents for Kambic OBM
- Page 1 User Manual Calibration Bath...
- Page 2 Kambic d.o.o. Kambic d.o.o. shall in no event be liable for incidental or consequential damages, including without limitations, lost profits, loss of income, loss of business opportunities, loss of use, and other related exposures, caused by incorrect use of product.
-
Page 3: Table Of Contents
User Manual CONTENT 1. WARNINGS AND SAFETY PRECAUTIONS... 2. INTRODUCTIONS ..........3. TECHNICAL DATA ..........3.1 Front view............. 3.2 Rear view ............. 3.3 Top view ............... 4. INSTRUCTIONS FOR USE ........4.1 Basic Setup ............4.2 Control Panel with OLED display and keyboard .. -
Page 4: Warnings And Safety Precautions
In no event shall Kambic d.o.o. be held liable for any damages, direct or incidental related to the use of this product and manual. Product can be equipped with variety of accessories and options. This warning list might include elements that are applicable only with certain models and accessories. - Page 5 User Manual WARNING Never use with toxic, corrosive, flammable or organic materials unless special precautions are in place to prevent injury to personnel or damage to equipment. WARNING Never operate the appliance with the housing removed! RISK OF FAILURE Due to exceptional volumes of fluid expansion at elevated temperatures, regularly check the fluid level in the bath! DANGER Temperature fluid expansion may cause overspill!
-
Page 6: Introductions
User Manual INTRODUCTIONS Calibration bath OBM was developed and manufactured specifically for the calibration of temperature instruments, probes and liquid thermometers at temperatures from 35°C to 220°C. Fluid calibration baths ensure high temperature stability and uniformity across working volume. To ensure such specifications all calibration baths of our brand are designed with a special double cylinder construction with uniform vertical flow in the working volume. -
Page 7: Technical Data
User Manual TECHNICAL DATA Width 225 mm Height 638mm Depth 330 mm Working chamber dimensions 50 x 210 mm Volume ~ 1 L Temperature range + 35 °C …+ 220 °C Temperature Stability from ± 0.005 °C to ± 0.05 °C Better than ±... -
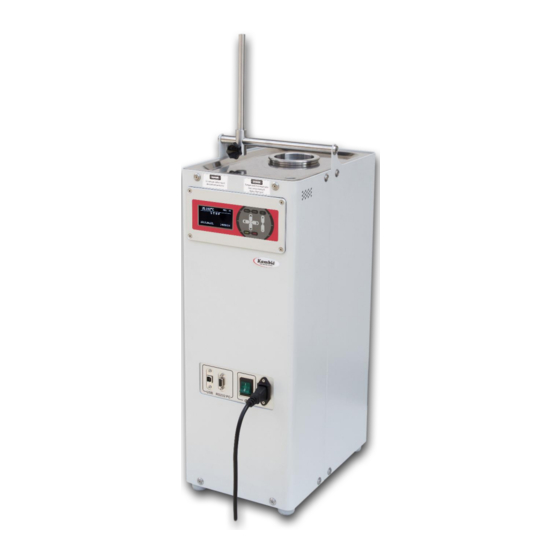
Page 8: Front View
User Manual 3.1 Front view Carrying handle Bath working chamber Rubber cap Control panel Front housing Back housing USB port Power cord connection RS 232 PC port Refrigeration system compartment – air intake Main switch Rubber legs 3.2 Rear view Tank drain plug Perforated back... -
Page 9: Top View
User Manual 3.2 Rear view Openings on inner tank wall Removable inner tank wall Bath working chamber... -
Page 10: Instructions For Use
User Manual INSTRUCTIONS FOR USE 4.1 Basic setup Step 1: Remove rubber cap and fill the bath with appropriate fluid (up to 80%) Step 2: Connect the power cord into the power supply 230V±10%; 50Hz Step 3: Put the main switch in position 1 (on the back of the device) Step 4: Press button and in... -
Page 11: Main Screen (Running)
User Manual 4.2.1 Main screen (running) Main screen while cycle is running: Bath temperature Heating power Temperature status Current program number Setpoint temperature Stirrer speed in % 4.2.2 Main screen (not running) After button is pressed you see this screen: Bath temperature Heating power 0% Bath status (not running) -
Page 12: Program Selection And Start
User Manual 4.2.3 Program selection and start The bath must be in Main screen (not running): Press button to enter Program Start Menu: Program number Program 0 is reserved for manual With buttons select desired program. Select from 0 to 10. program and 1 to 10 is automatic program. - Page 13 User Manual When cycle has started you see this screen for manual program : Bath temperature Heating power Temperature status Current program Setpoint temperature Stirrer speed Bath temperature: current measured bath temperature is 19.85°C Heating power: current heater duty cycle (from to 100%) Temperature status:...
- Page 14 User Manual When cycle has started you see this screen for automatic program : Bath temperature Heating power Temperature status Current program Setpoint temperature Stirrer speed Step dwell time Step information Bath temperature: current measured bath temperature is 26.31°C Heating power: current heater duty cycle (from to 100%) Temperature status:...
-
Page 15: Menu And Navigation
User Manual 4.2.4 Menu and navigation Press button to enter MAIN MENU: The Main Menu includes three submenus: Program Setup, Instrument Setup and Service: Use navigation buttons to select and then press button to enter selected submenu. Press button to go back one level. MAIN MENU Program Setup Instrument Setup... -
Page 16: Program Setup
User Manual 4.3 Program Setup Use navigation buttons to select parameter and then press button to edit parameter. With buttons change value of parameter. To move cursor left and right use button. Press button to confirm or button cancel changes. After edit press button to go back to MAIN... - Page 17 User Manual Program: choose desire program number to edit settings - manual program, 1÷10 for automatic program). choose the required number of temperature steps Steps: (set range from to 10). choose Stirring: speed for stirrer for fluid mixing (set range from to 100%) Fluid mixing speed After changing this parameter wait for a few...
-
Page 18: Instrument Setup
User Manual 4.4 Instrument Setup Use navigation buttons to select parameter and then press button to edit parameter. With buttons change value of parameter. To move cursor left and right use button. Press button to confirm or button cancel changes. Press button to go back one level. -
Page 19: Time And Date
User Manual 4.4.2 Time and Date Set time and date: Time format: hh:mm:ss Date format: yyyy.mm.dd 4.4.3 System Parameters Setup system parameters. To change parameter you must first enter password: Default values Max SETP limit: 220°C Heat power limit: 100% USB COM Baudrate: 230400 RS232 Baudrate:... -
Page 20: Bath Calibration
User Manual 4.4.4 Bath Calibration Setup bath temperature PT100 probe corrections. To change parameter you must first enter password: Default values At: 50°C 49.600°C At: 100°C 99.500°C At: 150°C 149.500°C At: 200°C 199.500°C At: 220°C 219.500°C 4.4.5 PID parameters Setup bath PID parameters. To change parameter you must first enter password: Default values PID Pb: 2.35°C... -
Page 21: Change Password
User Manual 4.4.6 Change Password For password setup first enter old password: The factory default password is 1000. Now you can enter now password: Confirmation screen for password has changed:... -
Page 22: Service
User Manual 4.5 Service When you enter Service screen you see information of bath model, bath serial number, firmware version, operating hours and after service hours:... -
Page 23: Service And Maintenance
Maintenance and service within the warranty period may only be performed by the authorized service person. Please advise Kambic in before alternation & modification. It is not allowed to change or rebuild any part of the construction without producer's written permit. -
Page 24: Draining The Bath
User Manual 5.1 Draining the Bath All our calibration baths are designed and equipped with tank drain plug for draining of the bath fluid. The location of the drain plug is at back of the bath. After drain screw back the plug. -
Page 25: Requires Space And Conections
User Manual REQUIRES SPACE AND CONECTIONS The appliance must be installed at least 100 mm away from the nearest wall. It must also be in a dry and well ventilated room. Additional space or relocation of the apparatus may be necessary when carrying out any maintenance or servicing. -
Page 26: Safe Use And Safety Elements
User Manual SAFE USE AND SAFETY ELEMENTS It is not allowed to heat-up any material which could form explosive atmosphere. Do not store any fluids on top of the housing! Microprocessor controller has a special safety system which turns heaters off if temperature rises for more than 5 °C above set temperature. -
Page 27: Dismantling And Disposal
User Manual DISMANTLING AND DISPOSAL This symbol means do not dispose of your product with your other household waste. Instead, you should protect human health and the environment by handing over your waste equipment to a designated collection point for the recycling of waste electrical and electronic equipment. -
Page 28: Abbrivations
User Manual ABBRIVATIONS TEMP chamber temperature SETPT set temperature heating power proportional–integral–derivative (control loop) light-emitting diode RS 232 standard communication interface Universal Serial Bus... -
Page 29: Troubleshooting
User Manual TROUBLESHOOTING Fluid drip from bath ➔ check fluid level Low temperature stability & uniformity ➔ check fluid level and fluid flow ➔ check stirring operating ➔ check fluid viscosity ➔ check temperature sensor Increased noise ➔ check stirring ➔... -
Page 30: Attachments
User Manual ATTACHMENTS 11.1 Wiring diagram 11.2 Declarations 11.3 RS232 Communication protocol...
Need help?
Do you have a question about the OBM and is the answer not in the manual?
Questions and answers