
Related Manuals for Rx Systems AutoSealer 1002

Summary of Contents for Rx Systems AutoSealer 1002
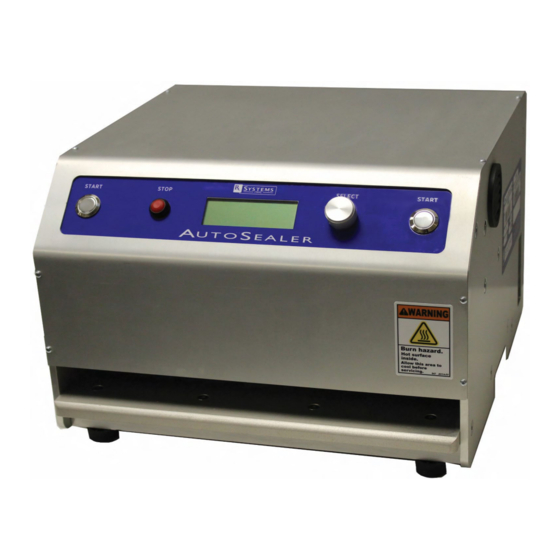
- Page 1 User Guide AutoSealer 1002 Operation & Service 121 Point West Boulevard St. Charles, MO 63301 1-800-922-9142 fax:1-636-925-0041 TSR@RxSystems.com RxSystems.com...
-
Page 2: Table Of Contents
Table of Contents 1. Introduction page 1 2. Specifications and Features page 2 2.1 Specifications page 2 2.2 Features page 2 3. Identification of Controls page 3 3.1 Power Inlet Module page 3 3.2 Cooling Fan And Air Intakes page 3 3.3 Select Dial page 4 3.4 Control Status Display... -
Page 3: Introduction
1. Introduction Rx Systems, Inc is very pleased you decided to join the growing number of AutoSealer owners. This User Guide will make you familiar with the features, operating principles, procedures, necessary maintenance and troubleshooting of the Rx Systems AutoSealer. -
Page 4: Specifications And Features
2. Specifications and Features 2.1 Specifications • Length: 14.5" • Width: 17" • Height: 9.75" • Weight: 47 lbs • Electrical: 115 VAC, 12 Amp, 1380 Watts, 60 Hz 2.2 Features • Controlled Temperature, Time and Pressure for a worry-free Seal. -
Page 5: Identification Of Controls
Identification of Controls 3.1 Power Inlet Module • All in One; Power Plug, Power Switch and Breaker • Use Approved Power Cord Only (provided). 3.2 Cooling Fan & Air Intake Vent • Cool air from Air Intake Vent flows through the AutoSealer and exhausts from Cooling Fan;... -
Page 6: Select Dial
3. Identification of Controls (continued) 3.3 Select Dial Used to Interact with AutoSealer Menu. When instructed, do one of the following; • Press & Release • Press & Hold • Twist Left or Twist Right 3.4 Control Status Display • Shows Live; Status, Operation, Temperature, Seal Time and Batch Count. -
Page 7: Initial Setup
4. Initial Setup Remove the AutoSelaer from it's packaging. • If ordered, a Sealing Paddle will be (packaged) on top. • For future shipping purposes, save all of the packaging materials. • This approved packaging is required for shipping. • Remove the Cardboard Insert from inside the mouth of the AutoSealer before operating machine. -
Page 8: Daily Power Up Routine
5. Daily Power Up Routine 5.1 Turn the Power Switch ON. Press & Release the Select Dial to Turn Heat ON & Raise Heat Plate. Allow the AutoSealer to heat up 10 to 15 minutes. AutoSealer will not operate until it is up to set temperature. When the AutoSealer is ready the screen will show Your AutoSealer is now ready for operation. -
Page 9: Daily Operation
6. Daily Operation The AutoSealer will automatically seal pill cards at a constant temperature and pressure over a set time - you only need to push both cycle buttons to start the sealing cycle. However, before you do there are some preperations you need to make. -
Page 10: Understanding The Menu (User Controls)
7. Understanding the Menu (User Controls) 7.1 Heat O & On Press and Hold the Select Dial for 1 Second To turn the Heat OFF Twist Select Dial Left To turn the Heat ON Twist Select Dial Right 7.2 Batch Count Press and Release the Select Dial To NOT Reset the Batch Count Twist Dial Left... -
Page 11: Understanding The Menu (Admin Controls)
8. Understanding the Menu (Admin Controls) 8.1 Temperature adjustment Press and Hold the Stop Button AND the Select Dial for 1 Second To Decrease the Temperature Set Point Twist Select Dial Left Default is 315°F To Increase the Temperature Set Point Twist Select Dial Right 8.2 Seal Time Adjustment Press and Release the Select Dial To Decrease the Seal Time... -
Page 12: Parts List
9. AS1002 Parts Part Number Description AS100201 Servo Power Supply AS100202 Heat Plate - Complete Assembly AS100203 Spindle - Complete Assembly AS100204 Servo Motor w/ Cables AS100205 Pulleys - Complete Assembly AS100206 Belt only AS100207 Circuit Board AS100208 Control Panel - Complete Assembly AS100209 RH Button only AS100210... -
Page 13: Troubleshooting
-- Check Inputs on "System Maintenance" Screen (Found in Admin Controls) Stuck Paddle, No Motion, Heat Broken Timing Belt - See Parts List - Contact Rx Systems - Remove Power Cord Plate will not return (go Up) and Cover, Carefully Rotate Pulley by hand to insure free movement... -
Page 14: Schematic
11. Schematic Page 12... - Page 15 12. Options and Related Products Paddles Uni-Series Sealing Paddles Uni-90 1-up Uni-30/31/32 2-up Uni-60/62 1-up Uni-60/62 2-up Uni-90 1-up Uni-90 2-up Item #1403 Item #1410 Item #1405 Item #1412 Item #1403 Item #1413 M-Series Sealing Paddles M-30/31/32 1-up M-30/31/32 2-up M-60/62 1-up M-60/62 2-up M-90 1-up...
-
Page 16: Accessories
12. Accessories and Related Products (continued) Sealing Tray, Control 30 Uni 30/31/32 Uni 60/62 Uni 90 Control 30 Item #1332 Item #1362 Item #1390 Item #1315 M-Series Heat Sealing Accessories M-30/31/32 M-60/62 M-90 M-90 2-up Control 30 Item #M332 Item #M362 Item #M390 Item #M413 Item #M335... - Page 17 12. Accessories and Related Products (continued) Pressure Board Rails Deblisterer AutoFiller Page 15...
-
Page 18: Warranty
3 years to reflect updated shipping costs. Maximum increase will be $10 per year. Tech Support can determine what parts can be replaced by your staff, or if the unit needs to be picked up by Rx Systems. Phone support is provided to assist your staff with part replacement. - Page 19 Please sign this page (or if mul�ple purchases, each one should be signed), then fax or mail to Rx Systems, Inc. AN INVOICE WILL BE MAILED IN A FEW DAYS. The terms and condi�ons on the next pages are part of this Agreement. Any addi�onal or different terms proposed by the customer are rejected unless expressly agreed to in wri�ng by Rx Systems, Inc.
- Page 20 Extended warranty: Rx Systems warrants the Equipment listed on previous page and will repair or replace defec�ve parts with the choice of repair or replacement at Rx Systems’ op�on. This warranty is limited to no more than two such repairs or replacements per year.
- Page 21 �me of the discovery of the same is given by registered le�er, addressed to Rx Systems, Inc. at its head office posted within fourteen days a�er such discovery; (b) Rx Systems, Inc. fails to remedy the defect or breach by subs�tu�on of parts or otherwise within a reasonable �me a�er receipt of such...
- Page 22 14. Maintenance and Repair History Date Condition Work Performed Part/s Replaced By: Page 20...
Need help?
Do you have a question about the AutoSealer 1002 and is the answer not in the manual?
Questions and answers