Table of Contents
Advertisement
Quick Links
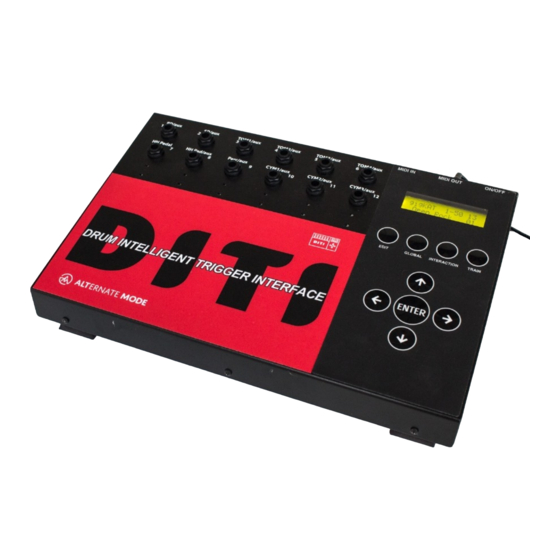
DRUM INTELLIGENT TRIGGER INTERFACE
DITI is the world's most powerful Trigger to MIDI Interface from Alternate Mode.
With 24 Trigger inputs, a large drum set can be MIDI converted with ease. The DITI is the first interface
of its kind to power and convert FSR drum triggers to MIDI. Products like our HybriHEAD™ and
HybriPAD™ are designed to work right out of the box with the DITI for unprecedented dynamic range and
control. Our new jamKAT, jamKAT'R and HybriKIT are multi-pad FSR pad configurations that are
preprogrammed on the DITI, offering the most powerful drum controllers ever made.
The DITI will capture your playing dynamics unlike anything else. Each input can be TRAINED to play
within your own personal performance style. Special Interaction Training ensures no false or double
triggering, a problem plaguing other trigger to MIDI interfaces.
The DITI can convert piezo triggers, dual zone piezo triggers, membrane switch triggers, cymbal choking
cymbals, and multi zone cymbals as well. The DITI can detect pad pressure on FSR pads allowing for
dampening, and Continuous Control data being sent. The DITI also has a continuous controller input for
hi hat. If all of this wasn't enough, the DITI incorporates many of the legendary features of the drumKAT,
allowing for Alternate Note Modes, Velocity Shifts Modes , Note Shift Modes, Advanced Pad Linking,
Transpositions and much more. There is also a special mode called SWITCHED BY, that alters the note
on a pad if it detects pressure on another.
The DITI has built in KIT TYPES that can store THOUSANDS of programs from the most popular drum
modules on the market. You simply call up your favorite sound module, and all of the sound modules
presets will be preloaded as Sound Patches. You can also create your own Kits and Sound Patches and
even create your own CHAIN so that you can make your own Song List of Presets.
As new drum modules and soft synths from other manufacturers become available, new KITS can be
downloaded from our SYSEX Database from our website. This keeps the DITI modern and current.
Perhaps the most interesting feature of the DITI is that the controller stores "profiles" of the various drum
triggers on the market. Simply plug in the trigger, identify what you plugged in, call up one of the pre
programmed Kits (for your favorite drum module or vst soft synth) and your done. But unlike a forced
default, you can learn to tweak to the finest detail to get the DITI to respond to your every desire.
! 1
Advertisement
Table of Contents

Subscribe to Our Youtube Channel
Related Manuals for Alternate Mode DITI

Summary of Contents for Alternate Mode DITI
- Page 1 DITI is the world’s most powerful Trigger to MIDI Interface from Alternate Mode. With 24 Trigger inputs, a large drum set can be MIDI converted with ease. The DITI is the first interface of its kind to power and convert FSR drum triggers to MIDI. Products like our HybriHEAD™ and HybriPAD™...
-
Page 2: Table Of Contents
DRUM INTELLIGENT TRIGGER INTERFACE DITI STARTUP GUIDE Pad Types Kit Types Training THINGS TO KNOW WITHOUT READING MANUAL CORE FEATURES OF THE DITI ONLINE TRAINING VIDEOS DITI ORGANIZATION EDITING THE DITI The Interface - 18 Editable Kits and Reinitialization - 19... - Page 3 Tips for Setting Gain – 84 Threshold - 85 Mask Time – 85 Dynamic Curve -86 Curve Listings -88 Dynamic Range – 90 Program Change Receive 93 Reinitializing the DITI -94 Data Dumping System Exclusive -91 Copy Current Kit -93 DISPLAY Notes/Numbers...
- Page 4 Copy Input 93 Copy Pad -93 Copy Pad Type – 94 MIDI Merge – 94 Scan Count – 95 Interaction Control – 95 Envelope Duration – 97 Interaction Level – 97 Envelope Threshold -98 Multi Zone Triggers – 101 Remote Editing Controlling Editing via the Trigger Pads Using the PMCP footswitch for Kit Advance and Kit Backwards INTERACTION MODE SCREENS Interaction Mode –...
-
Page 5: Diti Startup Guide
Drum Module or Virtual Synth that you are using. When you see your favorite module, the DITI is ready to go. If you don’t see your drum module, go to our website and download our every growing list of KIT TYPES. - Page 6 There are tons of PRESET KITs that are predefined for most of the drum modules on the market. These will have the name of the drum module as its name. As soon as you hit Enter, the DITI loads in the note numbers needed to access the drum module’s sounds.
- Page 7 Most drum modules have many sound programs (kits) in them. You can access them simply by using the left or right arrows on the DITI. You will see the name of the Sound Programs on the DITI as well as the drum module.
- Page 8 The DITI has the ability to LEARN how you play so that the full dynamics of the sound module are within your defined soft and hard hits. When you TRAIN a trigger pad, meaning when you “teach” the DITI what your soft and hard hits are, the DITI then takes the 127 levels of MIDI dynamics and spreads them inside this range of velocity.
- Page 9 ● Notice that the inputs on the DITI have names on it. BD = Bass Drum, SD = Snare Drum etc. By using the appropriate input for the trigger, you will eliminate the need to set the note number for the sound module because it will be automatically assigned when you call up the KIT.
- Page 10 DITI will show you the MAXIMUM value it saw. When you feel good about that, hit ENTER. ● Now the DITI will ask you to hit the pad soft. After you do that, hit ENTER. Start playing again. Notice how much better it plays. ●...
-
Page 11: Core Features Of The Diti
This is the basic operation of the DITI. Below is a list of some of the features that the DITI can do. You might need to dig into the manual to learn how to do some of these things. In PDF format, just hit the search key and type in the name of the function you need. - Page 12 There are also 33 USER KITS. You can create your own KITs from scratch, or copy one of the Factory Kits into a User for easy setup. There are a total of 50 KITS on the DITI. Each Kit can send out 50 discrete bank and program changes.
- Page 13 DITI ORANIZATION CHART 2.5 EDIT FUNCTIONS Pad Cntrol Gate Mode Sounds Note / Vel Shift MIDI CH SLOTS 1-32 Min Velocity Max Velocity Gate Roll 1-4 Layer Alternate Modes VelGate Cntrl Paths /Slot Shift Transpose HIHAT Transpose LINK Hi Hat Select...
- Page 14 SOUNDS FUNCTIONS 1-4 SWITCH 1-4 CrossFade 1-4 Layer Alternate Mode SIMULTANEOUS PAD CONTROL CONTROL VELOCITY SLOT SHIFT NOTE SHIFT PATHS SHIFT GLOBAL EDIT FUNCTIONS User Curve Select Edit Dynamic Input Type Mask Time Pad Type Gain Threshold Curve User Slot...
-
Page 15: Editing The Diti
THE INTERFACE When you first turn on the DITI, the screen displays the current software version. Immediately after that, the DITI goes into PLAY MODE. Play mode is the normal operation of the DITI when you are playing, not editing. -
Page 16: Editable Kits And Reinitialization
snare drums MIDI note number to a different note number, then all of the Sound Patches in that KIT will reflect that. This makes editing a KIT TYPE very fast and easy because it effects all 50 presets (sound patches) within that KIT TYPE. There are some parameters that are unique to each of the 50 Sound Patches within the KIT TYPE. -
Page 17: Plugging In Your Triggers
L.E.Ds On the DITI you will notice that there are 12 inputs. These are stereo inputs, meaning that it is possible to have up to 24 triggers active at once. Each trigger input also has a number assigned to it (1-12), and in turn each input number has a letter ( A or B ). This letter represents which channel you are editing. -
Page 18: The Four Edit Buttons
It is this requirement that has changed the nature of how the DITI operates. The DITI uses the RING or B channel of each input to power FSR sensors. Normally, the power channel does not function as a trigger channel. This means that the DITI with 12 FSR sensors would be a 12 trigger system. - Page 19 You can also jump from EDITING TYPE to EDITING TYPE without going back to PLAY Mode. In each case, the DITI remembers what you were editing last for each Type. To get back to PLAY mode, just tap on the same button one more time.
-
Page 20: The Arrows
THE ARROWS Notice that there are Up / Down arrows, Left / Right arrows and Enter. These buttons work the same way for all functions. The UP / DOWN Arrows change the VALUE of what you are editing The LEFT / RIGHT Arrows move through the different Screens (like a cursor) within the EDITING TYPE. -
Page 21: The Display
THE LEDs’ and TRIGGER INPUTS The DITI has twelve trigger inputs, but each input has an A and B, so it is possible to have 24 (piezo) pads. FSR pads need an input to power them, so if all of your trigger pads are FSR, the the DITI can accommodate 12 of them. - Page 22 You can use an adapter, STEREO Male ¼” jack to two female MONO jack inputs. This will allow you to have two single zone trigger pads on one input. The DITI will also accommodate dual zone piezo triggers, cymbals with choking, etc. More on that later.
-
Page 23: The Edit Button
Play Mode. If you are in Edit and you press on any of the other Functions, the DITI Jumps directly to the last edited screen in that function. These features will really help you get around the DITI in no time. -
Page 24: Midi Channel
This is a tremendous feature to use when you are Editing note numbers, channels, etc, but can be a problem when you are setting up the DITI for the first time, that is until after you have correctly loaded in the appropriate PAD TYPES for each input So for now, manually select the trigger pad you want to edit, then jump to the EDIT Screen by simply holding down the EDIT button. - Page 25 You can even tell the DITI to play chords. On the second line of the display, the SLOT “xx” tells you what Position (1 through 32) you are editing. Each of these 32 slots (positions) can be assigned to any of the 127 note numbers, plus special “KAT”...
- Page 26 SPECIAL DITI FUNCTIONS AFTER MIDI NOTE 127 Unique to the DITI (and trapKAT), there are special functions that can be assessed by advancing the MIDI note Number past 127. These are amazing features that make the DITI very powerful. ! 2 6...
- Page 27 (local setting) or the function will effect any pad in the kit that is assigned to GLOBAL. On the DITI, if you assign a Reset, Freeze or Reverse on SLOT ONE, then the function acts as a GLOBAL function and all pads will be effected. If you assign these functions on any other slot, then the affect will be local, for that pad only.
- Page 28 GLOBAL FUNCTIONS ASSIGNED in the FIRST FOUR NOTE SLOTS On the DITI, you can assign Global Functions to the first four slots on any pad. You must also change the SOUNDs function to SIMULTANEOUS in order for these functions to work. When Global Functions are assigned to these slots and Simultaneous is assigned in the SOUND screen , up to four Global Functions can be assigned at once.
- Page 29 This function comes in handy when you are using a membrane switch cymbal pad. The membrane switch on a trigger pad tells the DITI to play a different sound (slot two or three or five instead of one), when it is pressed. If the Choke function is assigned to SLOT 4, the cymbal pad will respond to choking when the pad is pressed.
-
Page 30: Transpose Modes -31
TF transpose enable screens The DITI has the ability to selectively TRANSPOSE any or all of the notes in a KIT. If you want to transpose the notes on just one pad with every strike, then simply substitute a MIDI note with a “t”... - Page 31 To transpose the DITI, simply assign the note number in ANY slot to a “T” value instead of a regular note value. T values (for transpose) go from T+1 (meaning transpose 1 step up) to T+12 (transpose 12 step up) to T-1 through T-12 (going down in half steps from -1 to -12 steps). All notes, including chords, alternate patterns, etc will be transposed in the kit.
- Page 32 Besides setting up any pad to be LINKED to one another, it is also possible to toggle that link on and off locally for that one pad or globally for the entire Kit. The special note numbers needed for these functions are LTOG-G (Link Toggle GLOBAL) or LTOG-L (Link Toggle Local) SLOT LINKING There is yet another way to use linking.
- Page 33 Press the Enter Key to Store the new Minimum Velocity. Notice that the “ * “ disappears. Soft to loud is represented by the numbers 000-127. 000 is the softest and 127 is the loudest. Setting this number allows you to control how soft your softest hit will sound. If you set this number to 64 for example, your softest strike would produce a medium volume.
-
Page 34: Dynamic Override -34
Gain, Mask Time, etc, each PAD TYPE stores a MINIMUM and MAXIMUM training level that was set at the factory. This means that when you identify what you plugged into the DITI’s input by calling up the PAD TYPE NAME, a built in training of soft and hard hits will be implemented without any input from you. - Page 35 When you are training a PAD TYPE, and have set the “TRAIN OVERRIDE” settings in the KIT EDIT screens to NO, the Training screen looks like this. When you are training a PAD, and have set the “TRAIN OVERRIDE” settings in the KIT midi to YES, the Training screen looks like this.
-
Page 36: Dampen Mode -36
The DAMPEN MODE function on the DITI is designed to dampen or choke a sound. Because FSR triggers work on pressure, the DITI can detect a slow rise in pressure caused by fingers pushing on a pad. When it detects this gesture, a dampening routine begins. Damping has been used on KAT controllers since the late 1980's. - Page 37 This is how dampening works on a piezo trigger. When you dynamically train a pad in the TRAIN Screen, the DITI asks you to hit the pad hard then soft. Your minimum and maximum velocity settings are superimposed within this dynamic playing range.
- Page 38 They Include INFINITE GATE When this setting is Entered, the DITI will only play NOTE ON Commands and will not send out any NOTE OFFs. Normally, the DITI sends out a NOTE OFF Command after the Programmed GATE Time expires.
-
Page 39: Pad Control Modes
SUSTAIN FSR PRESSURE Function When using FSR pads like the Aquarian inHEAD™ or onHEAD™, the DITI allows you to control the sustain of the sound simply by pressing on the pad. If you press and hold down the pad, one note will sound and will not shut off until you release the pad. This is how a piano works naturally, but it’s not the way other drum controllers function, unless of course it is an Alternate... -
Page 40: Note Shift Mode
NOTE SHIFT MODE Note Shift is a powerful feature that was first introduced on the drumKAT many years ago. This is how it works. When you assign any trigger input to NOTE SHIFT in the PAD CONTRL screen, your playing velocity (how hard you hit) on the pad determines what note number to play. -
Page 41: Velocity Shift
NOTE SHIFT range, tell the DITI when to turn on and off the NOTE SHIFT. Note that the min/max range settings of Note Shift go from 0000 to 1024 to match the 1024 levels of dynamics establish by the A/D converters. - Page 42 The CC# number is assigned in the Velocity Control Screen So if for example, you set the Velocity Control to PAN, as you play from soft to hard, the DITI will send out pan messages going from left to right within the RANGE of the minimum and maximum ranges.
- Page 43 Turn on VELOCITY SHIFT, and assign the Controller Number to 16 Set the range of the Velocity Shift, say 00-127 Now, as you play from soft to loud, you will hear the effect of the controller 16 to that note number. CONTROL PATHS Another variation of PAD Control is Control Paths.
-
Page 44: Slot Shift
You determine how many notes you want to shift to. When you set a slot of OFF, that will tell the DITI how many notes you want to shift by your playing volume. The DITI divides the amount of slots by they minimum and maximum velocity settings... -
Page 45: Assigning Fsr Trigger Switch
(another trigger) What the DITI does when this function is turned on is to decide if the sound should be a cross stick (slot two) or a rim shot (slot one) dependent on if there is pressure (your hand) on the snare drum (FSR pad that you are pressing). - Page 46 FOR SUSTAIN / PRESSURE / CONTINUOUS CONTROL Normally, when you call up a PAD Type that is set for FSR, the DITI will automatically preset the GAIN level that is optimized for triggering. When you want to use the pad to control sustain, a different GAIN is needed.
- Page 47 The DITI therefore can play up to 32 alternating notes per pad, plus a list of velocity shifting presets. There is also multi note capability. Below is a listing of SOUNDS types and a definition of how the pad functions when you strike it.
- Page 48 Here you can assign from one to four sounds that will layer in slots depending on how hard you hit. This means that you can have one to four sounds come in as you play from soft to loud. In the Global Section, you will find a screen where you can manually set the switch points. These settings affect all SWITCHES, CROSSFADES and LAYERING SOUND MODES.
- Page 49 If you want to have just 16 alternating notes, then simply assign the 17th NOTE SLOT to aREST (alternate reset). The DITI will then play SLOTS 1 through 16, then start over again. You can also take advantage of the aFREEZ and aREST2 functions to reset the alternate pattern at will or freeze the alternating pattern at the slot that you want.
- Page 50 This can be a very powerful function. Unlike the trapKAT that allows for one link or the drumKAT turbo that allows up to 3 linked pads, the DITI can link up to 6 pads at once. Striking just one pad can send out a whole host of sounds! To the right of the “link To”...
-
Page 51: Link Toggle
LINK TOGGLE Besides setting up any pad to be LINKED to one another, it is also possible to toggle that link on and off locally for that one pad or globally for the entire Kit. The special note numbers needed for these functions are LTOG-G (Link Toggle GLOBAL) or LTOG-L (Link Toggle Local) ! 5 1... -
Page 52: Hihat Select
GM HiHAT HATNOTE The DITI allows you to set trigger inputs 8A or 8B or 9A or 9B to HiHAT Select. There are three modes, GM, HATNOTE and NONE to play in conjunction with the HiHAT pedal on input 7A . - Page 53 Chick = MIDI NOTE #44 Closed = MIDI NOTE #42 Open+ MIDI NOTE # 46 When you first Select the GM Hi HAT, the DITI will pre assign these note numbers to the selected trigger pad (8 or 9) HATNOTE In this mode, the pad assigned to HATNOTE plays 8 different note numbers depending on the position of the HiHAT pedal.
- Page 54 Only Trigger input 8A-8B and 9A-9B can be assigned to HATNOTE MODE. It is also possible to change the default note values for these modes. The DITI automatically assigns these HiHAT note numbers to the Note Positions 1 through 8.
-
Page 55: Foot Controller
If you do not want to rely on the DITI or the VST Software to provide the velocity of the Chick, you can assign the CHIC TYPE to TRIGGER. Input 7B is then assigned to the chick sound. You will need a hiHAT pedal like the eHAT or the drumtech HatPedal that has a separate piezo output for the chick sound. - Page 56 Controller OFF MIDI MIXER /CONTROLLER The DITI has the ability to send up to 8 Controller Values when entering a Kit. Each CC# has its own MIDI Channel and stored Value. It can function as a MIDI MIXER, controlling the volume sliders on a soft synth mixer’s channel, or it can control knob settings on any synth.
-
Page 57: Patch Names
Assigning the EDIT PATCH NAME There are 33 User Kits in the DITI. Each Kit can have its own unique name. There are also 50 Sound Patches per KIT that are part of a KIT TYPE. These Sound Patches can also have their names changed by you. - Page 58 PATCH Bank, Program and Volume Change per Kit on an assigned MIDI Channel when calling up a KIT. When the user uses the left and right arrows, the DITI only sends out a program number,volume number and a new PATCH name. By default, the program number is incremented by one, but it is possible to change that number to any Bank, Program change number and Patch Name.
- Page 59 The DITI sounds out the Bank Change Command on the MIDI Channel that the PATCH Program Change Command is set to. Every time you enter a new KIT on the DITI, it automatically sends out the BANK, VOLUME and PROGRAM CHANGE assigned to the PATCH on the specified MIDI Channel.
-
Page 60: All Notes Off Command -57
Enter “the MIDI EQUALIZER”. Now you have the power to create a GLOBAL response curve for EACH KIT in the DITI. This is a real powerful feature, and we believe are to the first to ever implement it. -
Page 61: Understanding Kits And Kit Types
Program Change Number (assigned in the Edit Screen), and finally the Sound Patch Number 1-50 When you reinitialize the DITI, the DITI still remembers the ROM KIT TYPEs (the Factory Kits), but your individual USER Kits will be lost. - Page 62 The following is a list of parameters stored in a KIT TYPE Sound Module Name (KIT NAME) Up to 50 Sound Patches 12 PAD TYPES TRAINING for EACH INPUT A and B (includes dynamic levels, envelope, scan time, etc) MIDI FUNCTIONS INCLUDING Channel Slot 1-32 Note numbers Min and Max Velocity...
-
Page 63: Global Screens
To access this mode, use the Up/ Down arrows to find the trigger you are looking for. If Automatic is not displayed next to the Trigger Input number, then the DITI will rely on you to change the Trigger Input when you are editing. - Page 64 PAD TYPES BUILT INTO DITI ! 6 4...
-
Page 65: Pad Types
PAD TYPES onLINE altzone altzone for bass aquarian ebd aquarian kick dauz 6” pad ehat 2 ekic fsr controller fsr zone inhead full range inhead compressed inhead+rim onhead full range onhead compressed onhead +rim pmcp for hihat pmcp for c. control pmcp for trigger roland mesh roland cy15r bell... - Page 66 GLOBAL Edits for each trigger input. It is a time consuming task to set up every trigger input. It can also be intimidating and confusing because there is so much power under the hood of the DITI with lots of choices and variables at your fingertips.
-
Page 67: Importing And Exporting Pad Types -65
When working on a factory PAD Type, if you hit ENTER, the DITI will automatically save the edit and put you into the User pad type with the same name. You can reset the User Pad type back to its... - Page 68 DITI, it loads in the dynamic range values automatically. This is the best way to get started on the DITI. By simply telling the DITI what your hard and soft hits are, it will tailor the dynamics of the trigger to your own personal playing style. It also creates a Global envelope for that trigger input that helps control false and double triggering.
-
Page 69: Thresholds
Interaction TO REVIEW ABOUT PAD TYPES A PAD TYPE is like a separate entity in the DITI. Once you edit a FACTORY OR USER PAD TYPE, its settings apply to EVERY INPUT on EVERY KIT TYPE that uses that PAD TYPE. That means you only have to edit the PAD TYPE ONCE for the entire DITI for that particular trigger. - Page 70 a) copy that PAD TYPE to a USER PAD Type, retrain it to your liking, than use that instead OR b) override the PAD TYPES TRAINING completely but calling up the OVERRIDE screen in the KIT EDIT. When you do this, the Training that you do will be for that pad on that kit only.
- Page 71 That means DON’T lean on the pads while you are powering it up. So Here’s the Thing….. It’s always best to plug in all of your triggers before your turn on the DITI so that it an properly calibrate the pads for you If you do plug in an FSR pad while the DITI is on, simply press on the TRAIN button twice (on and off).
- Page 72 HiHAT CONTROLLER PRESSURE CONTROLLER Selecting the INPUT TYPE on the DITI defines what kind of trigger you are using on the input and also defines what the function is. When you enter the PAD TYPE on the proceeding screen, the DITI automatically sets this INPUT TYPE. You can however experiment with these settings or start from scratch by creating your own User PAD Type, then define what INPUT Type you need.
-
Page 73: Input Types
INPUT TYPE = FSR When a trigger input is set to FSR, this tells the DITI to set the B input as the power source for FSR sensors. Single zone FSR pads like the Aquarian inHEAD™ and onHEAD™ are pads that use this setting. In this case, a stereo cable is used. - Page 74 It may sound a bit confusing, but now you can use FSR pads with the DITI or you can plug them into a drum module with the use of the inBOX...
-
Page 75: Membrane Switch Trigger Pads -72
If we were using inputs 1 and 2 on the DITI, 1B would be set to FSR , and 1A would be set to TRIGGER. 3A and 3B would both be set to TRIGGER. The Input B on Trigger One powers all of the zones on the sensor and converts them to TRIGGERS. -
Page 76: Slots In Switch Mode -73
Here is where it gets real interesting…. When you TRAIN the edge, bell or rim of the trigger pad, the DITI reads the piezo’s voltage AGAIN, but this time from the position of the edge, bell or rim. This is a real powerful feature because the DITI creates a unique dynamic range setting from the piezo but at a further distance from the head. - Page 77 Some multi zone cymbals (i.e. Roland) uses two separate cables to control the different sounds on the cymbal pad. In order for the DITI to shut off notes from this other input, extra note offs and aftertouch commands are sent. If notes are assigned to Slots 6 or 7 and choking is detected, these extra commands are sent out as well.
-
Page 78: Fsr Dampen
DITI is called CHOKEON that is used in SLOT 4 of the TRIGGER. When CHOKEON is active, the DITI sends out a note off and a polyphonic aftertouch command for that note. It also has the ability to send out an alternative note number in slot 5. - Page 79 1-127 as pressure is applied to it. There are 127 different types of CC Messages. Things like modulation, HiHAT control, LFO control, are examples of the different types of CC messages that can be sent out. The DITI can send out any of these 127 messages.
-
Page 80: Positional Sensing -77
When an input type is set to CC, SLOT ONE is assigned to a CC Controller Number. But remember, the DITI can send out more than sound at a time. If you set the SOUND function to TWO SIMULATE SOUNDS, then the DITI can also send out a note number and its velocity along with the continuous controller data. - Page 81 FOR SUSTAIN / PRESSURE / CONTINUOUS CONTROL Normally, when you call up a PAD Type that is set for FSR, the DITI will automatically preset the GAIN level that is optimized for triggering. When you want to use the pad to control sustain, a different GAIN is needed.
- Page 82 Control Freeze is very similar to Control CC# but the difference is that when you press and hold on the pad, the DITI locks in that value. Now you can use pressure on the pad to control a Mixer or to define a value and position on of the synths knobs.
-
Page 83: Input Type = Hat Controller -79
The DITI can derive a chick sound from either the A input or the B. In the KIT EDIT Screens, you must choose between CONTROL or TRIGGER for the Chick Type. If you set the Chick Type to CONTROL, the chick is calculated by the speed of your movement. - Page 84 This pedal is an FSR HiHAT pedal. It has an incredible range and feel because we are using nubounce rubber as the spring mechanism. Alternate Mode sells the hatKAT2 as a stand alone trigger that you connect to your own pedal or we sell a bundle with our own bass drum pedal.
-
Page 85: Gain Control
Inputs A and B When a trigger is stuck, the DITI looks to see what input has the highest velocity. The DITI will only allow one signal to sound at a time. - Page 86 An explanation of the GAIN NAMES and what they mean. GAIN There are sixteen possible GAIN settings for the DITI, which may be broken down into three different groups. The first group of GAIN sensitivity goes from 1- 4, 1 being the highest sensitivity. These gain settings determines the sensitivity and range of a trigger.
- Page 87 Yes, there are many different types of Gain Structure Choices that you can pick on the DITI. This design allows the DITI to work with most of the trigger pads on the market. It also gives you the opportunity to see how the various GAIN settings affect how the trigger performs.
-
Page 88: Threshold
THRESHOLD THRESHOLD 000-200 This screen controls the low end sensitivity of the trigger pad. The lower the number, the more sensitive the pad becomes on small hits. Too low of a threshold setting can cause the pad to false trigger. Too high of a threshold setting can cause the pad to become insensitive to soft hits. -
Page 89: Dynamic Curve -86
What Gain Setting you use and how you play (your TRAINING of the DITI) will definitely have an effect on the curve. Also what sound module you use interacts with the DITI’s curve because it has its own set of velocity curves. - Page 90 The number that you are seeing in the curve is the actual MIDI VELOCITY Point. So when you are looking at a MIDI Scope and seeing velocity values as you are playing, you can go to that point in the curve and move it up or down to get the response you are looking for. BUILT IN DYNAMIC CURVES Altzone Compressed Linear...
-
Page 91: Curve Listings -88
CURVE LISTINGS Product Curves INPUT TYPE 16 Point CURVES USER DYNAMIC CURVE There are FIVE USER CURVES that you can create for yourself. After ENTERing the USER DYN CURVE Number that you want to edit, use the right arrow key to move through the SIXTEEN VALUE Points in the Curve. - Page 92 Values Parameters (0-15) are MIDI velocity points that you can raise or lower. When used in conjunction with a program like MIDI MONITOR, you can find the spot where you might want to raise or lower the velocity Value 15 represents the highest MIDI Velocity in the Curve. If you set this value below 127, then the curve will prevent any velocities above that setting regardless of how hard you play or what your maximum velocity setting is in the kit.
-
Page 93: Dynamic Range
Remember that there are two kinds of Trainings of Dynamics stored in the DITI. One is for the PAD TYPE. This means that every time you call up that PAD TYPE, its Training Dynamics will be used unless you decide to OVERRIDE It in the KIT EDIT Screens. -
Page 94: Reinitializing The Diti -94
TIP: It’s not likely that you are going to use all of the DEFAULT KITS that are preinstalled on the DITI. When you send an Individual KIT to the DITI via SYSEX, the DITI automatically stores that KIT into the current KIT location. This means that you can write over these default kits. - Page 95 DATA DUMP ALL KITS DATA DUMP GLOBAL The DITI will automatically receive SYSEX Dump Files. To send a SYSEX file, you must hit ENTER. Both the receiving and sending DITI will provide screen feedback on the progress and sucess of...
-
Page 96: Copy Current Kit -93
1-60 There are 33 USER KITS In the DITI. You can copy any Kit to any Kit by using this function. Call up the Current Kit that you are using and want to copy. Then use the up or down arrows to assign where you want to copy the kit to. -
Page 97: Copy Pad Type
COPY PAD TYPE The DITI has 9 USER PAD TYPES. You can copy the current PAD TYPE that you are editing, (u or f) and store it in one of them. You can also edit the names of this User Type. -
Page 98: Scan Count
Information coming in from the MIDI IN on the DITI can be routed to the MIDI OUT when the MIDI MERGE is set to ON. A good use for this would be when both triggers plugged into the DITI and another MIDI Controller plugged into the MIDI in jack can both route information to a single drum machine. -
Page 99: Interaction Control
The DITI has a special TRAIN function specifically design to address both of those issues. What it does it when you train for interaction, the DITI scans all of the other triggers and see if they are triggering. It suppresses those signals by imposing an envelope over the signal. It also temporarily raises the threshold on those offending pads. - Page 100 After you Train the pad, the DITI stores the envelope for that trigger. A value is placed in the ENVELOPE DURATION. That is a time value, approximately in mS. Sometimes the DITI gets heavy handed in protecting from false triggers and puts a large value in this location.
-
Page 101: Envelope Duration
To LOCK in this value, hold down the ENTER pad until you see an L. You can toggle this out Remember, if the Envelope Duration is set too high, the DITI will not be able to play fast strikes because the envelope duration functions similar to a mask time. -
Page 102: Envelope Threshold -98
ENVELOPE THRESHOLD This setting controls the sensitivity of the offending trigger pads. If you have trouble with a pad false triggering after you train it, raise the offending pad's ENVELOPE THRESHOLD. Remember, this is not for the pad that you trained for interaction. It is for the trigger that is still interacting. - Page 103 how long the envelope is used to prevent double triggering and pad interaction. This value can be reduced (but not increased) after Interaction Training by the user to manually reduce the time that the envelope is in effect. The Minimum Envelope should be set before Interaction Training. It sets the minimum value of the envelope and is used to adjust how difficult it is for the struck pad to double trigger.
- Page 104 More TECHNICAL EXPLANATION OF HOW TRIGGER INTERACTION WORKS The envelope is a "picture" of the signal produced when a pad is struck and is created during Envelope Training. The envelope is used to prevent two types of interaction: interaction between the pad that is struck and the other pads, and interaction between the pad that is struck and itself (double triggering).
-
Page 105: Multi Zone Triggers
If you have a three zone sensor for example, and are using inputs one and two on the DITI, the A channel on input one would be set to Trigger and the B channel set to FSR. This normally is set for you automatically when you call up the PAD TYPE. - Page 106 A measure of how slowly the signal must rise to be detected as a dampen motion. A smaller number means a slower rise is needed to be detected as a dampen motion. Lower Damp Threshold Applies only to Initial Attack Dampening. The reading must be greater than the Lower Damp Threshold long enough for the Damp Count to expire for the initial attack note to be dampened.
-
Page 107: Interaction Mode Screens
(and itself) when a pad is struck. When you select a pad and strike it (repeatedly), the DITI stores an Envelope that controls the thresholds and mask times of the other pads plugged IMPORTANT….wait about 1 second between hits so that the DITI doesn’t think triggers... -
Page 108: Train Mode Screens
TRAIN MAXIMUM DYNAMIC The DITI is now asking you to play the trigger with the maximum velocity that you expect to play at. Don’t overplay. Be realistic. Soon after you strike the pad, the display will give you a value... - Page 109 Buttons. If you hold down the button too long, it will jump back to the beginning of the Edit Screens. When you decide on the Train value, tap the ENTER key. The DITI will then ask you to Train the Minimum Dynamic.
- Page 110 TRAIN MODE. If your soft hit does not get a response from the DITI, it means that you either have to lower the threshold in the Global Screen or have to RAISE the Gain Setting. TIP: When you press on the TRAIN pad, the DITI resets the thresholds of all of the Trigger Inputs.
- Page 111 TRAINING YOUR HiHAT PEDAL Training your HiHAT pedal is similar to training your other pads on the DITI, but there are a few differences. Make sure that you are in the 7A input, padCTL before TRAINING. In order to get to the HiHAT Training Screen, you must press the TRAIN button and HOLD IT DOWN until you see the MAX CONTROLLER Screen.
- Page 112 Please note that this TRAINING is necessary for proper dynamics of your HiHAT pedal. In the Kit Edit Screens, you can tell the DITI if you are using a trigger (input b) or the controller (input a) for the chick and splash sounds.
- Page 113 DITI’s trigger pad inputs to replace the buttons. You can globally assign what pad you want to function as the button on the DITI. You don’t have to give up that pads playing function either because the DITI uses a foot switch (our PMCP foot switch) to tell the DITI that when pressed, it changes the trigger pads function from playing sounds to editing the DITI.
- Page 114 DITI 2.5 KIT DEMO VIDEO LINKS MelBELL https://www.youtube.com/watch?v=czhjut6pp5Y Hand drum https://www.youtube.com/watch?v=v2XJ5_1MI8w Tabla Toys https://www.youtube.com/watch?v=WeyHqaTpsuw Switch https://www.youtube.com/watch?v=HiX_QPRK0EQ Mel Trans https://www.youtube.com/watch?v=w6wKmv9nBGc Shakers https://www.youtube.com/watch?v=4EjWajvHpTw Mr. Snappy https://www.youtube.com/watch?v=Lt8hM72KWLo Marimba JAM https://www.youtube.com/watch?v=gIhGsPbBqQY Mystery Tune https://www.youtube.com/watch?v=XRn3b_WMLzY JamKAT in G https://www.youtube.com/watch?v=nKxp2uJ-HDs Pizz Craz https://www.youtube.com/watch?v=NbWpeqCmSGA Pizz Craz 2 https://www.youtube.com/watch?v=bfGMJFL4Lnw...
- Page 115 Mr. Snappy https://www.youtube.com/watch?v=2Iz25mII6A8 Press and Hold https://www.youtube.com/watch?v=lKxf6_cQNao Tune in 5 https://www.youtube.com/watch?v=zUN-_-Yax_I Brushes https://www.youtube.com/watch?v=4CJsB0WK67k J Brass https://www.youtube.com/watch?v=eJlCo-KnmEo alterJAM https://www.youtube.com/watch?v=Y0GmcM_J8Ks fluteKAT https://www.youtube.com/watch?v=5BacoYuzOaA Bass Drum https://www.youtube.com/watch?v=iJa5mE7KbjE Shakers https://www.youtube.com/watch?v=YHI451eSfJ0 ! 1 15...
- Page 116 INDEX 3 zone 58, 61, 75, 109 alternate freeze 23, 24, 113 alternate reset 23, 24, 34, 38, 66 alternating 22, 24, 34, 38 altzone 5, 8, 9, 60, 108 arrows 5, 7, 8, 12, 13, 20, 21, 22, 25, 26, 44, 46, 48, 72, 86, 95 automatic 5, 7, 13, 15, 16, 20, 34, 41, 46, 47, 48, 52, 55, 57, 61, 62, 65, 66, 83, 85, 87, 88, 91...
- Page 117 chick, chk 39, 40, 41, 42, 43, 47, 67, 95, 96,110 cymbal choke, chkNT, chkAF 9, 23, 25, 27, 61, 62, 63 continuous control 1, 9 , 10, 43, 39, 41, 64, 65, 66, 67, 69, 96 control 1, 9, 10, 21, 22, 25, 26, 29, 30, 31, 33, 40, 41, 42, 43, 46, 66, 67, 113 controller 1, 2, 5, 7, 9, 27, 29, 30, 31, 34, 39, 40, 41, 42, 43, 51, 55, 64,...
- Page 118 84, 85 Diti Direct 8, 57, 58, 60, 109 dual zone 9, 19, 59, 60, 61 Dynamic Curve 9, 26, 74, 75, 78, 83, 95 dynamic range 27, 52, 69, 72, 83, 95 EDIT 7, 10, 11, 12, 13, 15, 16, 18, 20, 21, 22, 26, 44, 46, 47, 48,...
- Page 119 gain control gate 8, 9, 12, 20, 28, 34, 62, 66 Global 9, 11, 14, 15, 20, 24, 26, 38, 39, 51, 52, 84, 85, 94, 95, 96 global screens 6, 20, 27, 39, 47, 51, 64, 94, 96 10, 39 GM HiHAT 39, 40 hard...
- Page 120 9, 28, 29, 34, 66 inhead 1, 5, 8, 9, 29, 48, 50, 51, 56, 57, 58, 59, 60, 75, 79, 80, 107, 108, 111, 112 input type 5, 14, 27, 34, 52, 55, 56, 57, 58, 59, 61, 64, 65, 66, 67, 69, 72, 77, 84 Inputs 1, 5, 7, 9, 13, 14, 18, 19, 20, 33, 39, 42, 53, 56, 58, 59, 66,...
- Page 121 45, 46 manual training mask time 5, 52, 73, 88, 92, 106, 107, 108, 109, 114 membrane switch 1, 9, 14, 25, 61, 62, 63 membrane switch pads 7, 56 mesh 19, 50, 51, 56, 79, 105 MIDI CHANNEL 9, 20, 21, 43, 44, 45, 46 midi merge MIDI velocity 25, 26, 74, 81...
- Page 122 7, 10, 12, 20, 21, 22, 23, 24, 25, 27, 28, 29, 30, 31, 34, 39, 40, 41, 43, 46, 53, 62, 63, 64, 65, 84 note shift 7, 13, 23, 24, 27, 28, 29, 30, 34, 41, 42, 43, 44, 45, 62, 63, 66, 69, 74, 86, 87 onhead 1, 5, 8, 9, 29, 48, 50, 51, 52, 56, 57, 58, 59, 75, 78, 79...
- Page 123 5, 12, 13, 16, 44, 46 SOUNDS 4, 12, 16, 18, 21, 22, 24, 31, 33, 34, 35, 36, 37, 38, 39, 40, 41, 43, 46, 59, 61, 62, 65, 66, 96 SPECIAL DITI FUNCTIONS ! 1 23...
- Page 124 sustain 9, 23, 29, 33, 36, 32, 33, 56 SWITCH 9, 25, 27, 33, 36, 55, 56, 58, 61, 63, 109 switch pad 27, 29, 30, 32, 33, 56 switches 32, 33, 61 system exclusive threshold 5, 65, 73, 76, 87, 88, 89, 90, 92, 94, 106, 107, 108, 109, 114 7, 8, 12, 13, 14, 18, 24, 27, 29, 32, 41, 42, 59, 61, 64, 67, 72, 79, 91, 95 tip ring...
- Page 125 1, 2, 5, 7, 8, 9, 13, 14, 15, 18, 19, 20, 21, 22, 25, 26, 27, 30, 32, 33, 34, 39, 40, 41, 42, 43, 47, 48, 51, 52, 53, 55, 56, 57, 58, 59, 60, 61, 62, 63, 64, 66, 67, 69, 70, 71, 72, 73, 74, 75, 76, 83, 86, 87, 88, 89, 90, 91, 92, 93, 96, 107, 108, 109, 113, 114, 115, 116 User Curve...
- Page 126 APPENDIX A ! 1 26...
- Page 127 The Aquarian InHEADs and onHEADs use a Tip/Sleeve configuration for their products. The DITI uses a TIP/RING configuration so that the B channel on the DITI can power the A channel. Alternate Mode offers a Converter Jack that connects to the Aquarian product and changes the configuration.
- Page 128 DITI Alternate Mode will sell special DITI DIRECT versions of the inHEADs and onHEADs that will have the female 1/4” plug on it so that these triggers can plug directly into the DITI. APPENDIX B ! 1 28...
- Page 129 It has an incredible dynamic range displaying even values across the entire MIDI spectrum. When plugged into any of the DITI’s other Inputs, with the PAD TYPE set to “PMCP for C.CNTRL”, the PCMP can send out any Controller Number and Value when pressed on. This can be used for things like Pitch Bend or Sustain or any other CC# function.
- Page 130 Aquarian Drumheads on the DITI without using the inBOX. By inserting this jack between the trigger and the DITI, the jack coverts the output of the trigger from Tip Sleeve to Tip Ring. The DITI needs this configuration in order to power the heads.
- Page 131 This converter jack allows you to connect two piezo type (or single zone) triggers to any single input on the DITI, which is then separated into the A and B inputs. This allows the DITI to be expanded from twelve up to twenty four triggers!
- Page 132 Configuration, needed by the DITI. Set the PAD TYPE on the DITI to “PMCP for C. CNTRL” The DITI will automatically set the GAIN to R4, the Max Train to 474 and the Min Train to 008 ! 1 32...
- Page 133 Tip Ring Configuration (DITI DIRECT) The other female 1/4” jack accepts a piezo trigger. The FSR is routed to the B Channel on the DITI. The Piezo is Routed to the Tip or A channel on the DITI. ! 1 33...
- Page 134 One of the female 1/4” jacks accepts an FSR trigger in the Tip Ring Configuration (DITI DIRECT) The other female 1/4” jack excepts a piezo trigger. The FSR is routed to the B Channel on the DITI. The Piezo is Routed to the Tip or A channel on the DITI. ! 1 34...
- Page 135 DITI FUNCTION & SCREEN LISTING INTERFACE UP-DOWN ARROWS ▪ CHANGE KIT in PLAY MODE ▪ CHANGE VALUES IN EDIT MODE LEFT – RIGHT ARROWS ▪ CHANGE SOUND PROGRAM in PLAY MODE ▪ MOVE CURSOR IN EDIT MODE ENTER ▪ Saves ALL EDITS ▪...
- Page 136 EDIT MODE BUTTON Stores Parameters of the KIT MIDI CHANNEL ▪ (1-16) ▪ MIDI NOTE ▪ Slots (1-16) ▪ Note numbers 00-127 ▪ Transposition values T-12---T+12 ▪ Special KAT Functions ▪ Off ▪ Sequencer Start, Stop, Continue ▪ Alternate Reset 1&2 ▪...
- Page 137 ▪ 1-4 Velocity Shift ▪ Alternating EQUALIZER ▪ Each KIT separate Equalizer Settings ▪ 10 Segments ▪ Auto Detect on Hit ▪ -9-+9 velocity change PAD CONTROL ▪ Off ▪ NOTE SHIFT ▪ NS Note Value 000- 127 ▪ Min / Max Range 0000 – 0000 ▪...
- Page 138 ▪ TRIGGER FOOT CONTROLLER ▪ Controller #04 ▪ Controller #01 ▪ Controller Volume ▪ Controller Pitch ▪ Off EDIT KIT NAME ▪ For USER KITS ONLY EDIT PATCH NAME ▪ PROGRAM CHANGE ▪ BANK LSB AND MSB ▪ VOLUME CHANGE ▪...
- Page 139 GLOBAL FUNCTIONS Stores PAD TYPE Parameters and GLOBAL Functions SELECT EDIT PAD ▪ 1A-1B------12A-12B ▪ Auto Detect PAD TYPE FUNCTIONS INCLUDE (Each Kit uses one PAD TYPE per Input) (PAD TYPES are GLOBAL) any change to a PAD TYPE Globally effects ALL Kits using that PAD TYPE ▪...
- Page 140 ▪ Aquarian EBD ▪ altZONE for Bass ▪ altZONE ▪ INPUT TYPE ▪ Trigger ▪ FSR ▪ HIHAT CONTROLLER ▪ CONTROLL CC# ▪ SWITCH FSRT EXCLUSIVE ▪ No /Yes GAIN ▪ 1-4 ▪ R1- R4 ▪ C1-C4 ▪ RC1-RC4 THRESHOLD ▪...
- Page 141 ▪ Spline S Curve ▪ Loud ▪ Hand Drum ▪ FSR Compressed ▪ FSR Shelf 1,2,3 ▪ User Curve 1-5 SCAN COUNT ▪ 02-100 KIT FUNCTIONS in GLOBAL MINIMUM and MAXIMUM DYNAMIC VALUES ▪ Values Stored when Training ▪ User can alter Min/Max Values ▪...
- Page 142 COPY CURRENT CURVE TO USER CURVE 1-5 MIDI MERGE TRAINING ENVELOPE INTERACT LEVEL ▪ 001-512 ENVELOPE LEVEL ▪ 000-100 MINIMUM ENVELOPE ▪ 00-100 ENVELOPE DURATION ▪ 10-400 ENVELOPE THRESHOLD ▪ 000-200 INTERACTION MODE ▪ TRAIN ENVELOPE tapping on pad trains pad for false triggering and interaction with other ▪...
- Page 143 KIT TYPE LISTINGS KIT TYPE ROLAND TD30 BANK DITI PC PROGRAM CHANGE# KIT NAME msb xx lsb xx Studio off off LA Metal Swingin Burnin Birch Nashville LoudROck JJ DnB Djembe Stage RockMaster LoudJazz Overhead Loooose Fusion Room RadioMix R&B...
- Page 144 SuperLoop process RockGig Hard BeBop Rock Solid 2nd Line ROBO SATURATED piccolo FATPressed BigHall KIT TYPE ROLAND TD-15_11 DITI PC PROGRAM CHANGE# KIT NAME Premium Alternative Heavy Compact Wah Wah Hop Ambient Crisp Disco Drum n Bass Savanna Brushes Studio...
- Page 145 Ballad Loose Rough Groove Breaker Raspy Beat House Hip Hop Latin Samba Ele Drum KIT TYPE ROLAND TD20 BANK DITI PC PROGRAM CHANGE# KIT NAME msb xx lsb xx 0 VPro off off Slamin METAL JazzCombo OverDrive Titanium RotoKIT ! 1 45...
- Page 146 UNIVERSE Skanky Brushes Spark Antique BreakBeats Studio Groover Mallet Drumline JazzGig Airtime Sploink Boogaloo Zeppy Arena Maple Shallow Ballad Raspy PopReggae BrassBiggie WetBooth 70s Record Lite Mellow Stadium TiteOctas 90s Power FxJungle Tekno TR 808 TR 909 Hex Drum Cosmosis Technology OrchPerc Survivor...
- Page 147 User Kit KIT TYPE Roland TD6 BANK DITI PC PROGRAM CHANGE# KIT NAME msb xx lsb xx 0 AcuStick off off` Rock It Groove Jazzy Ballad X TR 808 Brushes Tekno LatnPerc Orch Set HipHop JazzFunk Syn&Bass 1ManBand DryTight Guitars...
- Page 148 BrshSwel Electro TR 909 808Mix 909Mix 808...9 Dance808 Snowki KIT TYPE YAMAHA DTX500 BANK DITI PC PROGRAM CHANGE# KIT NAME msb 125 lsb 00 Oak Custom Maple Custom Beech Custom Rock Kit Gate Kit HipHop Kit Synth Drums Street Beat...
- Page 149 BrokenFunk GoGo1988 Re-O Elec 5/4 Backbone Groovin 8/8 Craze Bs @Base GM Standard KIT TYPE YAMAHA DTX v2 BANK DITI PC PROGRAM CHANGE# KIT NAME msb 125 lsb 00 Acoustkt RockLive PowerKit BigRoomD RockDry1 RockDry2 RockDry3 RockDry4 ! 1 49...
- Page 150 RockDry5 HipDanse HardGtBD kik3itm N.Y. 3 N.Y. 4 LivinIrg Hats!dog DownTown Space123 SD!Panic Reggae Tabla AlterPer SFX 1 SFX 2 Piano Vibe SteelDrm Strings Bass User Kit User Kit User Kit Acoustic Rock 1 Hip-Hop Industry N.Y. 1 N.Y. 2 Country BeBop Rock 2...
- Page 151 KIT TYPE YAMAHA DTX MULTI 12 BANK DITI PC PROGRAM CHANGE# KIT NAME msb=125 lsb=0 PercMaster 80s Electro Sweet RnB Tabla Hand Conga Hand HandScrtchl FillsMaker Movix FX Oak Custom HardRock Mbira Japan NuRezo Kit E Trad Kit Electro Kit...
- Page 152 Vibraphone SteelPan Balafon LargeMetal BrassyLight Vocal Drums Hipgig Cocktail Dr KIT TYPE ALESIS DM 10 BANK DITI PC PROGRAM CHANGE# KIT NAME msb xx lsb xx Fusion off off Big Mellow CableSnare Bop Brush Big Wet Clav Jam Wood Pop...
- Page 153 Levee Deep Jam Picc Verb Slick Jazz Picc Funk Think Thin Indo Ethno KIT TYPE ROLAND TD20X BANK DITI PC PROGRAM CHANGE# KIT NAME msb xx lsb xx TD 20X off off 50s King Cntrl Room Metal Core FunkGroove 40s Bop...
- Page 154 BluesRock DryStudio 2HH House TechFusion LetitBeat neotype jazzbop RawBeat Vintage Rock D-N-B GarageRock 80's Fumk Cashmirror Breaks 90s Rock jazzclub Jive AmbRock cosmic crossover Vintage Jazz Coolth U-Blue FunkyJungle natural LA beBop MBsHouse Bronze DarkComper Drums&DJ GATED RotoFXCity PopDelay 1985 Dizzy Brazil Perc Latin Drums...
- Page 155 KIT TYPE YAMAHA DTX900 BANK DITI PC PROGRAM CHANGE# KIT NAME msb 125 Oak Custom lsb 00 BirchCstmAbs Power Kit Power Kit Club Set HipHop Kit 70s NY Funk Master Jazz Funky PercsMaster MapleCstmAbs BeechCstmAbs Rock Kit Grunge R&B Electric Funk...
- Page 156 AfterHours RX5/11 Old School Human Kit Reggae Kit Cuban Brazil Asian African GM Standard KIT TYPE Pearl RED BOX BANK DITIPC PROGRAM CHANGE# KIT NAME msb xx lsb xx Temp Tasty off off 1Up 2 Down Heartland StudioCity NowMetal ShoTime ModJazz Picante 80sMonster...
- Page 157 TranzDance BoardTape 9inch Arena Live Classic Mo Bourbon St SoundTrack Brushes 70s Alive TechnoEcho KIT TYPE ROLAND TD 10 BANK DITI PC PROGRAM CHANGE# KIT NAME msb xx lsb xx StudioV off off BigRock Tight JazzSizl SuperBwl Freak'n OldScool Tex Mex...
- Page 158 Latin Set Orch Set BrasRing TR-808 TR-909 Dr Spin Memphis Cartoon KornBall X-Stick Big Band lowFI CarTUNE Natural Dirty 808 Ambient Far East HEAVy NextDoor Latin 3D Vintage MIDIbrsh SockHop Woody GoFigure 70's Rock Brushes Electro Rock Analog Fusion Jazz SLAPBACK COMpress LivnRoom...
- Page 159 KIT TYPE gigKAT Bank 4 1-50 BANK DITI PC PROGRAM CHANGE# KIT NAME msb 00 lsb 04 Open Rock Squash Rock Full Room East Space CopperRing Birch Wood DeadRocker Ring-tone Gadd'sLair Hinomaru KirkeeB 25thAnniv LA A Kit1 LA A Kit2...
- Page 160 Orngcrush Static LiteBrite Brush 1 Brush 2 PillowFuz Thigpen Fnessence Proc Pop KIT TYPE gigKAT Bank 4 51-100 BANK DITI PC PROGRAM CHANGE# KIT NAME msb 00 lsb 04 Jersey HardKnock CoralBox Cold Cash Spooge DJ Dub Beatx 101 Rhythmcon...
- Page 161 5Kits Templte Aud Kik/Snr Mono Aud Kik/Sn Streo Stereo Kick Drums Mono Kick Drums StereoSnareDrums MonoSnare Drums Tom toms Hi Hats Rdes&Crshs&Rolls E Perc/Sound FX Vocal Percussion Drum Percussion WoodMetlShakPerc Accessory A Accessory B Accessory C BongoConga Bendir Bodhran BodhrnBendir Djembe DumBekDjembe FrameDrums...
- Page 162 SoftBars XyLoomBa Asian Metal TablaBars SlitBars GourdBars MamboBars MIXnMatch Perc 1 MIXnMatch Perc 2 MIXnMatch Perc 3 MIXnMatch Perc 4 HoldnSilde Birdy BIrdy SacredShrine Tera Nova Oody Oody FlexiCrotale BitaGlitter DripnGlittr KIT TYPE gigKAT Bank 5 1-50 BANK DITIPC PROGRAM CHANGE# KIT NAME msb 00 lsb 05 Brt Natural Kit...
- Page 163 Moven Air Kit Alis Punch Kit Rock Trance Kit Ringling Pop Kit Marley Kit Ltric Nat Kit TrashPan Tom Kit Tin Man Kit Cheapo Dist Kit AngryBastard Kit Vibra Lunch Kit Ricochet Kit Frida Gate Kit Metallic Cut Kit Cannibal Kit Tunnel Feel Kit Tuna Slap Kit Plywood Kit...
- Page 164 msb 00 lsb 05 Succotash Kit Backsweep Kit Bug Zapper Kit Elektro Sand Kit Sandy Bottm Kit Box o Sand Kit Fine Grit Kit Matchmaker Kit Zucchinni Kit Pump da Well Kit Ltrk Reflux Kit Squash Clap Kit Scoopit Up Kit Tone Keeper Kit Phase E Kit Straw Blow Kit...
- Page 165 ResNoise Kit 144ms Gated Kit FatNoise Kit Hypd Natural Kit Rango Kit NoiseSlap Toms 16Layer Cake Kit HopRoom Kit ! 1 65...
- Page 166 ! 1 66...
Need help?
Do you have a question about the DITI and is the answer not in the manual?
Questions and answers