Avedro KXL Operator's Manual
Hide thumbs
Also See for KXL:
- Operator's manual (74 pages) ,
- Operator's manual (43 pages) ,
- Operator's manual (53 pages)

Subscribe to Our Youtube Channel
Related Manuals for Avedro KXL


Summary of Contents for Avedro KXL
- Page 1 Avedro, Inc. KXL System Operator’s Manual Copyright 2020. All Rights Reserved. Printed in U.S.A. KXL System Operator’s Manual ML-00040 Rev E...
- Page 2 Patents, Trademarks, Copyrights The KXL System may be covered by one or more patent applications issued or pending in the United States and worldwide. “KXL” and the Avedro logo design are registered trademarks or trademarks of Avedro, Inc. All software and documentation is subject to Avedro, Inc.
-
Page 3: Table Of Contents
Add New Patient ........................16 Create New Treatment Plan....................17 3.8.1 Select Eye to Treat ....................17 3.8.2 Selecting a KXL Default Treatment Type ............18 3.8.3 Custom Treatment Plans..................18 3.8.4 Modifying Custom Treatment Parameters ............. 19 Starting a Treatment ......................20 3.9.1... - Page 4 Adding Notes to a Patient Treatment Report ..........36 3.19.2 Exporting Treatment Report................37 3.19.3 Viewing a Treatment Report ................39 3.20 Powering Down the KXL System..................43 3.21 Accessing the Options Menu .....................44 3.21.1 Manage Clinic Preset Plans ..................44 3.21.2 System Settings Menu ..................
- Page 5 Figure 3-7. Save Clinic Preset Treatment Plan ..................19 Figure 3-8. Custom Treatment Plan – Continuous UV Mode ............20 Figure 3-9. Insert KXL Activation Card ..................... 21 Figure 3-10. Reading Activation Card ....................... 21 Figure 3-11. Card Treatment Balance ......................22 Figure 3-12.
- Page 6 Figure 4-5. Loosen Counterbalance Set Screw A ................56 Figure 4-6. Loosen Counterbalance Set Screw B ................57 Figure 4-7. Set Arm Tension with Strength Adjustment Screw C ..........57 Figure 4-8. Moving System Configuration .................... 58 KXL System Operator’s Manual ML-00040 Rev E...
-
Page 7: Foreword
AVEDRO | 1 of 69 Foreword Intended Use of Manual This manual is designed to serve the operators of the Avedro, Inc. KXL System. All operating instructions, product illustrations, screen graphics, troubleshooting/error messages, and other relevant information are contained in this manual. It is the operator’s responsibility to ensure that all safety instructions in this manual are applied strictly. -
Page 8: User Operation Assistance Statement
KXL System Operator’s Manual | Page 2 1.5 User Operation Assistance Statement Should you experience any difficulty in running your KXL System, please contact your local Avedro authorized representative. 1.6 Contraindications, Warnings and Cautions 1.6.1 Contraindications This section describes situations in which the device should not be used because the risk of use clearly outweighs any possible benefit. - Page 9 Avedro KXL System. For Equipment Classifications please refer to Chapter 5.0 Equipment Classifications. WARNING: Any repair or service must be carried out by Avedro trained personnel only. WARNING: Do NOT modify this equipment without authorization of the manufacturer.
- Page 10 WARNING: Do not use the instrument near water and be careful not to spill liquids on any part of it. WARNING: Do not operate the KXL System in the presence of flammable mixtures or anesthetics. WARNING: Never look directly into the UV light beam. Never direct the beam towards a person except for therapeutic purposes.
-
Page 11: Radiation Safety Warnings
CAUTION: The KXL System is a medical device. It may be operated, therefore, only in health care facilities or medical areas under the supervision of medically trained personnel. -
Page 12: Fcc Compliance Notice
• Properly shielded and grounded cables and connectors must be used in order to meet FCC emission limits. Proper cables and connectors are available from Avedro. Avedro is not responsible for any radio or television interference caused by unauthorized changes or modifications to this equipment. -
Page 13: Introduction
However, actual limits to power and energy are controlled by the RFID treatment card. The KXL is a portable system with an articulating arm to allow movement of the system for alignment of the UV Beam to the patient’s cornea. The... -
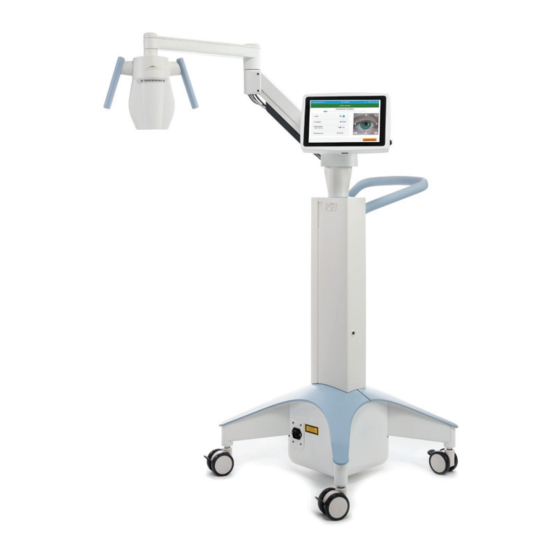
Page 14: Major Components
KXL System Operator’s Manual | Page 8 2.1.1 Major Components The major components of the KXL System include the following: • Optics Head with UV source and Camera • KXL console with user interface • Wireless remote control (with replaceable batteries) •... -
Page 15: Figure 2-2. System Illustrations With Callouts
AVEDRO | 9 of 69 User Interface/Console /RFID reader Figure 2-2. System Illustrations with Callouts ORIGINAL REMOTE CONTROL UPDATED REMOTE CONTROL Figure 2-3. Wireless Remote ML-00040 Rev E... -
Page 16: Figure 2-4. Kxl Label
KXL System Operator’s Manual | Page 10 Figure 2-4. KXL Label Figure 2-5. UV emitting Label Figure 2-6. Laser Classification Label ML-00040 Rev E... -
Page 17: System Operation
AVEDRO | 11 of 69 3 System Operation 3.1 Touchpad/Keyboard Use The table below identifies and describes important touchpad keys and icons unique to KXL System operation. Chapter 2 identifies and describes the KXL System’s major components. Touchpad Key Icon... - Page 18 KXL System Operator’s Manual | Page 12 Touchpad Key Icon Description/Function X button Cancels all the entries (various screens) on a screen and returns to the previous screen. Checkmark Directs the system to button accept the current (various screens) screen entries and to proceed to the next step.
-
Page 19: Uv Energy (Dose)
AVEDRO | 13 of 69 3.2 UV Energy (Dose) • The UV Energy (Dose) is the product of the UV Power (Intensity) and the UV Irradiation Time. The UV Energy and UV Power are adjustable and the calculated UV Irradiation Time is displayed. -
Page 20: Preparing The System
Take local regulations for use of portable electro-optical medical devices into consideration. 3.5 Powering Up the System • Turn ON the master power switch on the base of the KXL System, adjacent to the power cord plug. This switch provides AC mains power to the KXL System. -
Page 21: Existing Patient Data
AVEDRO | 15 of 69 NOTE: If there is a Start-up error, please note any error messages • and contact your distributor or Customer Service. • Please see Section 3.21 for Power Down sequence instructions. • The Patient List, shown in Figure 3.2, stores:... -
Page 22: Add New Patient
KXL System Operator’s Manual | Page 16 3.7 Add New Patient • To begin adding a new patient, select “Add new patient,” and the pop- up window shown in Figure 3-3 will appear. Figure 3-3. Enter Patient Information • If “Use anonymous patient” is selected, last name field will populate as anonymous and an incrementing number will populate in “first name”... -
Page 23: Create New Treatment Plan
AVEDRO | 17 of 69 3.8 Create New Treatment Plan • Select patient to treat from Patient Database • Press “Create new treatment plan to begin” Figure 3-4. Create New Treatment Plan 3.8.1 Select Eye to Treat • Choose the eye you wish to treat: OD or OS •... -
Page 24: Selecting A Kxl Default Treatment Type
Figure 3-6. Perform a Default Treatment Plan 3.8.3 Custom Treatment Plans • Any of the KXL Default plans can be edited to change energy dose, irradiance or other treatment parameters then saved for future use as a “Custom” treatment plan. -
Page 25: Modifying Custom Treatment Parameters
AVEDRO | 19 of 69 Figure 3-7. Save Clinic Preset Treatment Plan • Select “OK” then select the new clinic preset treatment plan from the “Custom” treatment type tab • Individual parameters may be edited in Custom treatment plans. • Press within the specific parameter and use the arrows to increase or decrease the desired field. -
Page 26: Starting A Treatment
KXL System Operator’s Manual | Page 20 Figure 3-8. Custom Treatment Plan – Continuous UV Mode • Enter the other desired Custom treatment parameters: o Total UV dose* o UV irradiance (3 – 45 mW/cm NOTE: Total treatment time is automatically calculated and displayed. -
Page 27: Single-Use Activation Cards
AVEDRO | 21 of 69 Figure 3-9. Insert KXL Activation Card 3.9.2 Single-use Activation Cards Keep card in place until read is complete. • Figure 3-10. Reading Activation Card The user will be alerted that only 1 treatment remains on the card as •... -
Page 28: Multi-Use Activation Cards
KXL System Operator’s Manual | Page 22 Figure 3-11. Card Treatment Balance The “OK” button will illuminate when the card has been read and • treatment credit has been accepted by the System. The user may remove the card at this time if desired. -
Page 29: Rfid Card-Controlled Limits
AVEDRO | 23 of 69 Figure 3-13. No Treatments Left 3.9.4 RFID Card-controlled Limits o If the user has programmed a UV dose range that is outside the allowable value(s) controlled by the RFID card, an ”Invalid treatment parameters” message will appear after “Perform treatment” has been selected. -
Page 30: Sync Alignment Remote
KXL System Operator’s Manual | Page 24 Figure 3-15. Invalid Treatment Parameters 3.9.5 Sync Alignment Remote o The Sync alignment remote message will be visible on the screen for 15 seconds as shown in Figure 3-16. Figure 3-16. Sync Remote o If using the Updated Remote (see Figure 2.3), press any directional... -
Page 31: Figure 3-17. System Setup Status
The various statuses of the Original Remote Indicator Light are shown in Figure 3-19. A constantly illuminated remote Indicator Light means that the • remote is synchronized with the KXL. If the Indicator Light is blinking constantly, replace batteries in the • remote immediately to ensure proper operation. -
Page 32: Preparing The Patient
Battery must be replaced Figure 3-20. Remote Indicator Light Status and Meaning NOTE: The KXL system performs an internal self-test prior to each treatment to verify proper UVA calibration. The internal self-test uses a redundant set of optical sensors to ensure that accurate levels of UVA will be delivered for each treatment. -
Page 33: Applying Riboflavin, Induction, And Alignment
Apply Riboflavin to the treatment eye in accordance with the Riboflavin Instructions for Use (IFU) and press “Start Timer.” Figure 3-21. Prepare For Treatment: Apply riboflavin CAUTION: Riboflavin is not a part of the KXL System described in this manual. For details, please refer to the Riboflavin’s Instructions for Use. -
Page 34: Figure 3-23. Alignment Of Red Crosshairs - X & Y Axes And Z Axis
• until the X/Y axes’ red crosshairs are aligned to the center of the pupil. Manually move the KXL head up and down to align the Z axis • second red crosshair to the center of the first red crosshair. -
Page 35: Initiating Treatment
CAUTION: UV light is emitted when the Avedro logo on the optical head flashes color from blue to green. WARNING: Make sure that the KXL System and the patient’s table or chair are secured and not moved after alignment and during treatment. -
Page 36: Pausing A Treatment
KXL System Operator’s Manual | Page 30 Figure 3-26. Treatment in Progress Screen o NOTE: When using Pulsed Treatment mode, UVA light will not be visible during the OFF periods. The User Interface will not change to “UV is OFF” during these cycles. -
Page 37: Cancelling Mid-Treatment
AVEDRO | 31 of 69 • To cancel or resume treatment select “Cancel treatment” or “Resume UV treatment” respectively. See Section 3.14 if cancelling a session. 3.14 Cancelling Mid-Treatment • A warning pop-up will appear when “Cancel treatment” is selected mid- treatment as shown in Figure 3-28. -
Page 38: Capturing Images
KXL System Operator’s Manual | Page 32 Figure 3-30. Partial Treatment Not Completed 3.15 Capturing Images • Images can be taken at any stage throughout the treatment process. • To capture an image, select the camera button in the top right hand corner of the eye image as shown in Figure 3-31. -
Page 39: Treatment Complete
AVEDRO | 33 of 69 3.16 Treatment Complete • At the completion of a treatment, a summary of treatment parameters will be displayed, and the screen will show “Treatment complete” as shown in Figure 3-32. Figure 3-32. Treatment Complete Screen •... -
Page 40: Figure 3-33. Select Trash To Delete
KXL System Operator’s Manual | Page 34 Figure 3-33. Select Trash to delete • Once a photo is selected for deletion, select “Yes” to delete the photo, or select “No” to keep the image. Figure 3-34. Select Yes to Delete •... -
Page 41: Patient Treatment Report
AVEDRO | 35 of 69 • Select “Done” to confirm which photos will be displayed in the treatment report. Figure 3-35. Select Done 3.19 Patient Treatment Report • A treatment report is generated containing patient information, treatment details, photos taken throughout treatment, and notes. A sample report is shown in Figure 3-36. -
Page 42: Adding Notes To A Patient Treatment Report
KXL System Operator’s Manual | Page 36 Figure 3-36. Sample Treatment Report 3.19.1 Adding Notes to a Patient Treatment Report o From the Patient Database screen, select the patient’s name. o Press the message icon as shown in Figure 3-37 to enter comments about the patient’s treatment. -
Page 43: Exporting Treatment Report
Report will be exported as PDF. Figure 3-39. Exporting Treatment Report o The screen will prompt to insert USB drive as shown in Figure 3-40. NOTE: Avedro does not supply USB drive for storing patient data. ML-00040 Rev E... -
Page 44: Figure 3-40. Insert Usb
KXL System Operator’s Manual | Page 38 Figure 3-40. Insert USB o If the USB is full or the system is unable to read the USB, an error message will be displayed as shown in Figure 3-41. Figure 3-41. USB Error and No Space Left on USB o If there is no issue with the USB, a message will appear stating “Generating treatment report.”... -
Page 45: Viewing A Treatment Report
AVEDRO | 39 of 69 Figure 3-43. Treatment report exported 3.19.3 Viewing a Treatment Report o Full treatment report can be reviewed on system or USB (if exported). o Any photos or comments added will be included in report. ML-00040 Rev E... -
Page 46: Figure 3-44. Page 1 Of 3: Treatment Details
KXL System Operator’s Manual | Page 40 Figure 3-44. Page 1 of 3: Treatment Details ML-00040 Rev E... -
Page 47: Figure 3-45. Page 2 Of 3: Comments
AVEDRO | 41 of 69 Figure 3-45. Page 2 of 3: Comments ML-00040 Rev E... -
Page 48: Figure 3-46. Page 3 Of 3: Photos
KXL System Operator’s Manual | Page 42 Figure 3-46. Page 3 of 3: Photos ML-00040 Rev E... -
Page 49: Powering Down The Kxl System
AVEDRO | 43 of 69 3.20 Powering Down the KXL System • Select “Power Off” on the Patient List homescreen as shown in Figure 3-47. Figure 3-47. Select “Power Off” • Confirm powering off system by selecting “Yes” as shown in Figure 3-48. -
Page 50: Accessing The Options Menu
KXL System Operator’s Manual | Page 44 • Turn the master power switch on the KXL base to the “Off” position as shown in Figure 3-49. Figure 3-49. Power Off Position 3.21 Accessing the Options Menu o From the Patient List homescreen, press the “Options” button to display the 4 Options menus, as shown in Figures 3-50. -
Page 51: System Settings Menu
AVEDRO | 45 of 69 Figure 3-51. Manage Clinic Preset Plans 3.21.2 System Settings Menu o Select “System settings” from the Options menu to access the System settings shown in Figure 3-52. Figure 3-52. System Settings Menu ML-00040 Rev E... -
Page 52: System Settings - Altering The System Volume
KXL System Operator’s Manual | Page 46 3.21.3 System Settings – Altering the System Volume o Select “Audio Volume” from the System Settings menu to alter the sound volume level. Figure 3-53. Edit Volume 3.21.4 System Settings – Altering Camera White Balance o Select “Camera white balance”... -
Page 53: System Settings - Altering Alignment Crosshairs' Intensity
AVEDRO | 47 of 69 3.21.5 System Settings – Altering Alignment Crosshairs’ Intensity o Select “Alignment Crosshairs Intensity” from the System Settings menu to alter the brightness of the alignment crosshairs. The screen shown in Figure 3-55 will appear. o Adjust crosshair brightness and select “Save.”... -
Page 54: System Settings - Export Service Log
KXL System Operator’s Manual | Page 48 3.21.7 System Settings – Export Service Log o Select “Export service log” from the System Settings menu. o Follow onscreen instructions to insert a USB drive to the USB port as shown in Figure 3-57. -
Page 55: System Settings - Clinic Preset Display Priority
3.21.11 Demo Mode NOTE: Not for use in treating patients o Demo mode allows users to train on use of the KXL System without requiring treatment cards and without using UV light. Select “Demo Mode” Select “Start” to use the System in Demo Mode o The KXL System screens will indicate that the System is currently in “Demo Mode”... -
Page 56: Figure 3-60. Patient List Indicates Demo Mode
KXL System Operator’s Manual | Page 50 Figure 3-60. Patient List Indicates Demo Mode Figure 3-61. Demo Mode is Indicated at Top of Screen ML-00040 Rev E... -
Page 57: Maintenance / Service
Avedro-authorized distributor. 4.2 Customer Maintenance • In general, there is no customer maintenance required for The KXL System. All technical maintenance or service will be performed by a qualified service representative while under service contract. If you have trouble with your system, refer to the Troubleshooting section below or call your local Avedro Representative. -
Page 58: Trouble Shooting
4.6 Trouble Shooting • The KXL System checks its status at start-up automatically. If the status is incorrect, the software prevents the operator from initiating treatments. -
Page 59: Figure 4-2. Alignment Remote Lost Sync - Original Remote
AVEDRO | 53 of 69 Figure 4-2. Alignment Remote Lost Sync – Original Remote ML-00040 Rev E... -
Page 60: Figure 4-3. Alignment Remote Lost Sync - Updated Remote
KXL System Operator’s Manual | Page 54 Figure 4-3. Alignment Remote Lost Sync – Updated Remote ML-00040 Rev E... -
Page 61: Directions For Disinfection
• If replacing the batteries does not allow the System to synchronize, contact your local Avedro Service Representative. 4.7 Directions for Disinfection • No components of the KXL System are designed to be sterilized by the operator. • ONLY external cleaning and disinfection is recommended. -
Page 62: Cleaning The Aperture
KXL System Operator’s Manual | Page 56 • While cleaning the surfaces of the device, ensure that cleaning fluids do not seep inside the device, as this leakage can damage the device. • Use a lint-free cloth dampened with isopropyl alcohol to clean the remote control. -
Page 63: Figure 4-6. Loosen Counterbalance Set Screw B
AVEDRO | 57 of 69 • Reposition the arm horizontally. Loosen the upper Counterbalance Set Screw B by turning the screw at least a ½ turn. Use a 3/32 Allen Wrench. See Figure 4-6. Figure 4-6. Loosen Counterbalance Set Screw B •... -
Page 64: Moving The System
Packing and transporting the system should be performed only by Avedro trained and authorized personnel. • Prior to moving the KXL System from one room to another, the monitor should be moved sideways, and the KXL Head should be positioned close to the cart handle with the elbow protruding at the back. -
Page 65: Storing The System
• Should the software become corrupted and fail to work correctly, call your local Avedro service representative. Software updates will only be carried out by Avedro service representatives. 4.14 Risks Associated with Disposing of Waste Products • When disposing of waste products, follow all applicable local regulations. -
Page 66: Equipment Classification
AVEDRO | 60 of 75 5 Equipment Classification According to EN60601-1 Medical Device Electrical Standard • Protection against electrical shock o Class 1 (external electrical power source) • Degree of protection against electric shock o Not classified, equipment not provided with applied part... - Page 67 Guidance and manufacturer’s declaration - electromagnetic emissions The KXL System is intended for use in the electromagnetic environment specified below. The customer or the user of the KXL System should assure that it is used in such an environment. Emissions test Compliance Electromagnetic environment —...
- Page 68 Guidance and manufacturer’s declaration — electromagnetic immunity The KXL System is intended for use in the electromagnetic environment specified below. The customer or the user of the KXL System should assure that it is used in such an environment. Compliance...
- Page 69 To assess the electromagnetic environment due to fixed RF transmitters, an electromagnetic site survey should be considered. If the measured field strength in the location in which the KXL System is used exceeds the applicable RF compliance level above, the KXL System should be observed to verify normal operation.
- Page 70 Recommended separation distances between portable and mobile RF communications equipment and the KXL System The KXL System is intended for use in an electromagnetic environment in which radiated RF disturbances are controlled. The customer or the user of the KXL...
- Page 71 AVEDRO | 65 of 69 The KXL System contains an RFID function which transmits and receives at the 13.56 MHz frequency. This functionality may be interfered with by other equipment, even if that other equipment complies with CISPR emission requirements.
-
Page 73: Symbol Library
AVEDRO | 67 of 69 6 Symbol Library Text Symbol Symbol Illustration Definition 1. No AP symbol in Danger, Risk of Explosion. presence of flammable Not for use anesthetics 2. AC symbol Alternating current 3. “I” in a book Attention: Consult... - Page 74 KXL System Operator’s Manual | Page 68 Text Symbol Symbol Illustration Definition 14. Broken glass Contents are fragile, handle with care 15. Two up arrows Keep arrows on carton pointing up 16. Water drop in a box Humidity limits (percentages below...
-
Page 75: Specifications
AVEDRO | 69 of 69 7 Specifications Specification Description Electrical Line voltages 100 – 240 volts AC Current 2A – 1A Single Phase RMS, 50/60 Hz Original Remote 2x AAA batteries Updated Remote 2x AA batteries List of cables and Accessories Wireless Remote...
Need help?
Do you have a question about the KXL and is the answer not in the manual?
Questions and answers