Table of Contents
Advertisement
Quick Links
Advertisement
Table of Contents

Related Manuals for Excelltel PH202


Summary of Contents for Excelltel PH202
-
Page 2: Table Of Contents
Table of Contents Chap 1 Specification....................2 Chap 2 Panel Illustration..................3 Chap 3 LCD Display....................4 Chap 4 Shortcut key Definition................5 Chap 5 Installation....................7 Chap 6 Using Guide....................8 1) Intercom Call :......................8 2) Outgoing Call....................... 8 3) Redial........................8 4) Speed Dial......................9 5) Call Transfer......................9 6) Call Hold....................... -
Page 3: Chap 1 Specification
Chap 1 Specification 1.Wring Length : The length of connecting 1 keyphone to the KTS board should be < 250m ; Connecting 2 keyphones to the same KTS board should be <150m ; Connecting 4 keyphones to the same KTS board should be <50m . -
Page 4: Chap 2 Panel Illustration
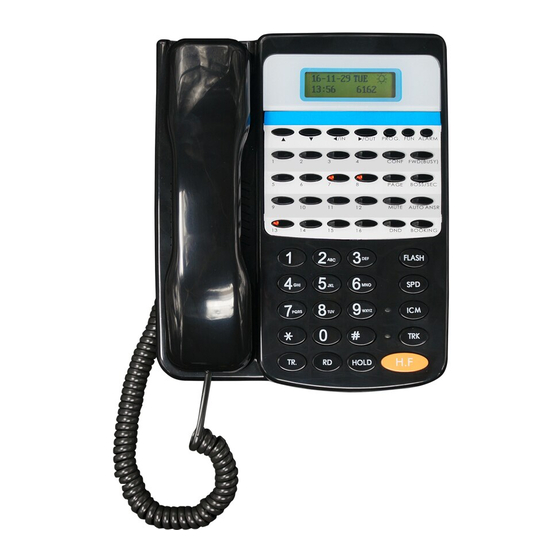
Chap 2 Panel Illustration... -
Page 5: Chap 3 Lcd Display
Chap 3 LCD Display... -
Page 6: Chap 4 Shortcut Key Definition
Chap 4 Shortcut key Definition DS S : Di r e c t St a t i o n Se l e ct i o n ke y s , PH 2 0 2 wi t h 16 DS S ke y s , on de f a u l t , DS S 1 -1 2 co r r e s p o n d i n g to CO li n e 1- 1 2 , DS S 13 - 1 6 co r r e s p o n d i n g to Ex t po r t 1- 4 . - Page 7 SP D : on ho o k st a t u s , pr e s s th i s ke y, an d in p u t sp e e d di a l i n g gr o u p nu m b e r, to ma k e sp e e d di a l i n g fu n c t i o n . Off ho o k st a t u s , pr e s s th i s ke y, in p u t sy s t e m sp e e d di a l i n g gr o u p nu m b e r, to ma k e pe e d di a l i n g fu n ct i o n .
-
Page 8: Chap 5 Installation
Chap 5 Installation Using four wires cable to connect key phone with 8 port KTS card ports of TP256 directly.One RJ45 port can connect with 2 key phone . Telephone port Telephone port PBX port When user need to lengthen the cable or make a 4 wire cable by himself, he should be attention to the sequence of cable: the two wires on middle are signal line . -
Page 9: Chap 6 Using Guide
Chap 6 Using Guide 1) Intercom Call : ① off ho o k + Ex t . N o + ta l k i n g ② di a l DS S ke y di r e c t l y ③... -
Page 10: Speed Dial
Pr e s s to qu e r y th e ou t g o i n g ca l l nu m b e r + +t a l k i n g 4) Speed Dial ① Pr e s s +the group number of speed dialing stored on key phone(01-32) ②... -
Page 11: Multi-Party Conference
8) Multi-party Conference Du r i n g th e co n v e r sa t i o n wi t h CO li n e ,a f t e r pr e s s th e key ,system will enter in conference status. 9) Function Key + programming code Function key means your dial *# . -
Page 12: Dnd Key
Cancel : Note: press this key, and input an extension number, will display “operation OK”,and the LED will be on . After cancel it, the LED will be off. 13) DND Key DND(Do not Disturb) : After press this key ,it will enter DND status . -
Page 13: Mute Key
Cancel : the LED will be off 16) Mute Key Mute : the LED will be on Cancel: the LED will be off 17) Call Booking Call Booking : the LED will be on Cancel : the LED will be off... -
Page 14: Chap 7 Using Setting
Chap 7 Using Setting Pressing one time, then system will enter USING SETTING status. LCD shows as follow : User Set Language 1)You can press the key to select the items .Like “Language”, “Backlight Setting”, “Ext Ring”, “CO.Ring”, “Doorphone Ring”, “Alarm Ring”, “System Query “... - Page 15 Take an example for how to set the 16 DSS keys corresponding to CO line ◆ Step 1: Press one time and enter setting status . User Set Language ◆ Step 2: Press 7 times or press one time .Show as below: User Set Reset Keyphone ◆...
- Page 16 Option : 01 to 16 5)Doorphone Ring Option : 01 to 16 6)Alarm Ring Option : 01 to 16 7)System Query You can see the version number and outgoing mode 8)Reset Keyphone Option : 00 to 32 ( CO.Line)
-
Page 17: Chap 8 Dss Setting
Chap 8 DSS Setting Take an example for how to set DSS12 to Ext. Port 008 ◆ Step 1 : Press three times and enter DSS status . Show as below 001 TRU 01 Remark : 001, it means the number of the DSS button (001 means it is the first DSS button) . - Page 18 ◆ Step 4:Press to go to the third part 001 and input 008 on the keyphone . Show as below. 012 EXT 008 ◆ Press to save and will hear beep tone . to back to the home page. ◆Press...
-
Page 19: Chap 9 Speed Dialing
Chap 9 Speed Dialing Press 4 times , and show as below . Speed Dial Press to select the group number of speed dialing . It is range from 01 to 32 . Or it can dial the two digit group number . After selecting the group number , then press to input the number you want. - Page 20 Speed Dial 008618923238930 ◆ Step 4 : Press to save ◆ Step 5 : Press to back to home page.
-
Page 21: Chap 10 How To Set Multiple Dss To Connect With Keyphone
Chap 10 How to set multiple DSS to connect with keyphone 1) Setting a DSS to No.2 DSS . Programming as below ①Connected the keyphone and PBX ②Always-press the second button of No.DSS ③At the same time ,remove the cable between No.1 DSS and keyphone and connect again . -
Page 22: Chap 11 Connection For Dss
1095 Budapest, Mester utca 34. 1141 Budapest, Fogarasi út 77. Tel.: *218-5542, 215-9771, 215-7550, Tel.: *220-7940, 220-7814, 220-7959, 216-7017, 216-7018 Fax: 218-5542 220-8881, 364-3428 Fax: 220-7940 Mobil: 30 940-1970, 20 949-2688 Mobil: 30 531-5454, 30 959-0930 E-mail: delton@delton. hu Web: www.delton.hu www. excelltel.hu...
Need help?
Do you have a question about the PH202 and is the answer not in the manual?
Questions and answers