Table of Contents
Advertisement
Quick Links
Advertisement
Table of Contents

Related Manuals for SWITLIK Techfloat

Summary of Contents for SWITLIK Techfloat
- Page 1 THROWABLE LIFT & RESCUE DEVICE Owner's Manual...
- Page 3 This publication is issued as the owner's manual for the Switlik Techfloat Throwable Lift & Rescue Device, part number TF-3500-1. All rights reserved. Copyright © 2019 by Switlik Parachute Company, Inc. This manual may not be reproduced in whole or in part, by any means, without permission.
-
Page 4: Table Of Contents
Temperature Auto-inflation Care & Servicing Instructions Cleaning Servicing Identification Label Cleaning-Detailed Servicing-Detailed Testing Preparing to Pack Rearming the Inflator Folding the Techfloat Packing the Techfloat Packing the Retrieval Line Final Assembly Replacing the Auto-Inflator Bobbin Storage Replacement Parts Servicing Record... -
Page 5: Warnings
WARNING! The Techfloat is designed to inflate automatically upon immersion in water. Do not allow the unit to get wet until it is actually needed. In the event that the unit does not automatically inflate, it must be manually activated with the pull tab for use as a flotation device. -
Page 6: Description
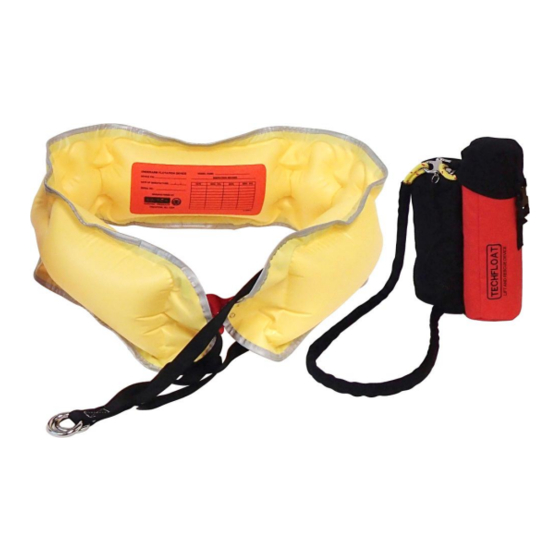
Description The Switlik Techfloat Throwable Lift and Rescue Device is designed to help first responders in situations involving a victim in the water. The device consists of an auto-inflating underarm sling (35 lbs buoyancy) with 100’ of floating line in a wearable valise that is designed to allow the user to maintain connection with the victim at all times during the rescue. -
Page 7: Operating Instructions
Operating Instructions Grab valise and sling over head and across chest. Black end cap faces forward on side opposite throwing arm. 2. Unbuckle end cap and pull Techfloat flotation device from valise by the webbing handle with your throwing hand. - Page 8 3. Throw flotation device near victim. On contact with the water, the Techfloat will inflate and victim can don under arms. NOTE: If the auto-inflator fails to function, the...
- Page 9 Operating Instructions 4. Pull in retrieval line with both hands after victim is secured in Underarm Flotation Device 5. Use rings on lifting straps to hoist victim, if necessary.
-
Page 10: Operating Limitations
Underarm Flotation Device Normal operating pressure: 2 psi TEMPERATURE: The Techfloat is designed to operate between a temperature range of 32º F and 140º F. At normal and higher temperatures, the raft will inflate to full-design shape within 10 seconds or less. At lower temperatures, inflation may take longer. -
Page 11: Care & Servicing Instructions
Care & Servicing Instructions CLEANING: The Techfloat valise and flotation device may be cleaned with mild soap and water. Never use harsh chemicals on or around this product. If exposed to harsh chemicals such as hydraulic fluids, oils or solvents, have the unit cleaned and inspected by an authorized service center. -
Page 12: Cleaning-Detailed
Allow to air dry. DO NOT PLACE IN DRYER. 2. When dry, untie the retrieval line from the Techfloat and place the unit on a clean work area, free of anything that could damage or puncture it. - Page 13 2. Remove trapped air from the device. a. Invert the dust cap on the oral tube, pressing it back into the end of the tube to deflate the Techfloat. b. Starting at the opposite end, roll the device towards the oral tube, squeezing out all the air.
-
Page 14: Rearming The Inflator
Care & Servicing Instructions c. When all the air has been expelled, pull out the dust cap to close the oral valve. Turn it back over and cap off the oral tube with it. REARMING THE INFLATOR 1. If not previously accomplished: a. - Page 15 Care & Servicing Instructions c. Check the cap and inflator to be sure they are clean and dry. 2. Check the date on the new bobbin in the rearm kit. The date should not be over three (3) years from today’s date. 3.
- Page 16 Care & Servicing Instructions 7. Install the CO cylinder. a. Place the hole in the Halkey-Roberts rearming instructions over the threaded end of the cylinder. Wrap the instructions around the cylinder. b. Thread the cylinder into the inflator assembly, using the right- hand rule, until it is bottomed out.
-
Page 17: Folding The Techfloat
Care & Servicing Instructions FOLDING THE TECHFLOAT 1. Lay out Techfloat on a clean, flat surface. The side with the red oral tube should be facing up. 2. Grab the end with the oral tube and pull it over to the opposite end... - Page 18 Care & Servicing Instructions 3. Grab the fold you just made and fold it over again to a length of about 11 inches.
- Page 19 Care & Servicing Instructions 4. Flip device over. The auto-inflator and cylinder will now be on the bottom. Do not twist the lifting straps.
- Page 20 Care & Servicing Instructions 5. Grab the top end of the device, with the female part of the buckle, and pull it back to the opposite end.
- Page 21 Care & Servicing Instructions 6. Connect the buckle. 7. Bring the end you just folded back over to the other end. Note that the lifting straps are laying between the snaps. The lifting rings should stick out just past the snaps.
- Page 22 Care & Servicing Instructions 8. Close the snaps.
- Page 23 Care & Servicing Instructions 9. The last fold should lay approximately in the middle of the device. The fold should almost match up to the fold on the bottom. 10. Fold the device over at this point. The auto-inflator and cylinder should now be on top.
-
Page 24: Packing The Techfloat
Care & Servicing Instructions PACKING THE TECHFLOAT 1. Loosen the lacing on the packing girdle. Attach the hook and pile fastener together. - Page 25 Keep the roll tight. d. Note the location of the oral tube inside the roll. 3. While holding the roll tight, slip the Techfloat into the packing girdle a. Orient the roll so that the lifting rings are on the same end as the throwing handle.
- Page 26 Care & Servicing Instructions 4. Push the roll all the way into the packing girdle until it stops against the webbing loop at the opposite end, then tighten the laces. 5. Pull the laces as tight as possible. Both sides of the packing girdle should almost be touching.
- Page 27 6. Tuck the excess laces inside the packing girdle, between the Techfloat and the girdle. DO NOT TIE THE EXCESS LACES AROUND THE TECHFLOAT PACK ITSELF. Tying the laces around the packing girdle could hinder the inflation of the...
-
Page 28: Packing The Retrieval Line
1. Prepare the line pouch for packing. a. Make sure the black line pouch is fully attached to the Techfloat valise. The line opening at the top should be at the same end as the black cap on the valise. - Page 29 Care & Servicing Instructions 3. As the pouch fills, pull the zipper up to help contain the line. 4. When the line is near the top of the pouch, pull the zipper closed and continue to flake the line in through the top.
-
Page 30: Final Assembly
FINAL ASSEMBLY The final steps consist of attaching the Techfloat flotation device to the retrieval line, then packing the device into the valise. 1. Pass the end of the retrieval line through the grommet in the packing girdle. - Page 31 Care & Servicing Instructions Follow the steps below to tie a bowline knot: 2. Secure the tail of the bowline knot with a piece of heavy-duty waterproof tape. Press the lifting rings down into the middle of the Techfloat pack.
- Page 32 Care & Servicing Instructions 3. Place the Techfloat pack into the valise. The laces on the packing girdle should be facing the retrieval line pouch. 4. Pull the end cap over the end of the valise, then buckle closed.
- Page 33 Care & Servicing Instructions 5. Flake any remaining retrieval line into the top of the line pouch. 6. Open the snap shackle at the end of the shoulder sling, then pass it through both the cord coming out of the line pouch and the webbing loop located at the base of the end cap.
- Page 34 Care & Servicing Instructions 1. Close the snap shackle and update Servicing Record, p.34. Final assembly is complete.
-
Page 35: Replacing The Auto-Inflator Bobbin
The Bobbin in the Auto-Inflator should be replaced every year. Follow the steps below to replace the bobbin. 2. Unbuckle the end cap on the Techfloat valise and remove the packing girdle. 3. Untie the retrieval line from the lifting rings. -
Page 36: Storage
Storage Proper storage of your Techfloat Lift and Rescue Device is very important. The better the care it receives, the longer it should last for you. When not in use, we recommend that you store the raft in a climate controlled environment and not leave it outside. -
Page 37: Replacement Parts
Replacement Parts S-4121-1 Techfloat Rearm Kit - items in kit- 820002 Bobbin S-4188-101 Green Clip S-3630-101 Seat Seal Gasket S-1780 33 gram Cylinder S-4122-1 Techfloat Owner’s Manual... -
Page 38: Servicing Record
Servicing Record TYPE OF SERVICE DATE (REPACK/REPAIR/BOBBIN) - Page 40 Switlik Parachute Company 1325 E. State Street Trenton, NJ 08607 (609) 587-3300 (609) 586-6647 FAX www.switlik.com P/N S-4122-1 (rev B, 6/19)
Need help?
Do you have a question about the Techfloat and is the answer not in the manual?
Questions and answers