Table of Contents
Advertisement
Advertisement
Table of Contents

Related Manuals for Cricut EasyPress 2


Summary of Contents for Cricut EasyPress 2
- Page 1 Welcome Book...
- Page 3 Welcome. You’re in! Welcome to the Cricut family. In the box. Unpack and admire your goodies. At a glance. Master your Cricut EasyPress controls. Instructions. Just a few easy steps to iron-on success. Make it last. Tips for the longest-lasting iron-on transfers.
- Page 4 Welcome Hello, future iron-on pro, We're so thrilled this Cricut EasyPress has found its way into your fabulous hands. Today is not ordinary. It's pivotal. It's the day that you enter the wonderful, creative world of crazy-simple iron-on transfers that last and last – and last! We can't wait to see what iron-on magic you make.
- Page 6 Warranty The photography shows the Cricut EasyPress 2, 9" x 9" (22.5 cm x 22.5 cm), but the steps are the same for 6" x 7" (15 cm x 17.5 cm), and 12" x 10" (30 cm x 25 cm). If you have any question, contact us at 1-877-7CRICUT or fi nd more information online at help.cricut.com/easypress.
- Page 7 Safe and easy to grip during use Advanced heat plate design Dry, even heat and ceramic coating produce flawless transfers Streamlined Safety Base Keeps Cricut EasyPress 2 in a protected, resting position Auto shutoff Shuts off automatically after 10 minutes of non-use...
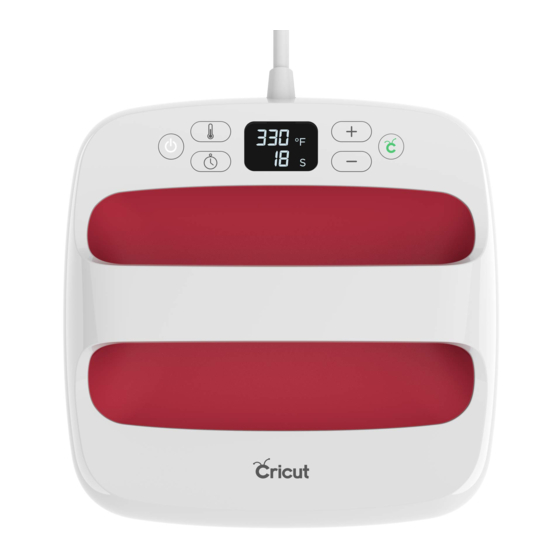
- Page 8 At a glance The simple Cricut EasyPress controls are the secret to your iron-on success. You’ll love the results. TIP: Temperature, time, and pressure vary by base material and iron-on type. Before beginning a new project, always confirm time and temperature settings and peel recommendations at cricut.com/ep-settings.
- Page 9 Set temperature What the lights mean Press button, then adjust value with plus (+) and Orange light means it’s heating up. minus (-) buttons. To switch from Fahrenheit to Green light means temperature has been reached. Celsius, press and hold the button.
- Page 10 We’ll take on a T-shirt in the following steps, but you can apply these instructions to anything your heart desires, from a purse to a pillowcase … to a wedding dress? (Yes, it’s been done!) We can’t wait to see the projects you make with Cricut EasyPress. Share your iron-on creations using #CricutMade & #CricutEasyPress.
- Page 11 Cricut EasyPress Mat (sold separately) or a fl uff y, folded bath towel. Set time and temperature Plug in and power on your Cricut EasyPress. Visit cricut.com/ep-settings to determine the specifi c settings for your project. The beep signals your press is ready for use.
- Page 12 Position your design where you want it. Make sure the shiny side (clear liner) faces up. Place the press on your design. Start the timer. Hold Cricut EasyPress in place and apply gentle pressure until it beeps. Preheat base material Place the press on your fabric for fi ve seconds to remove wrinkles and moisture.
- Page 13 The big fi nish To see if you should remove the liner when it's warm or cold, refer to cricut.com/ep-settings. If the liner does not lift easily, reapply and reheat for a few more seconds. Woo-hoo, that’s it! Flip and repeat Flip the material and apply heat on the back side of the design for 15 seconds.
- Page 14 For awesome results, always pre-wash and thoroughly dry your fabrics. When washing, do not use fabric softener. During iron-on application Avoid placing your Cricut EasyPress over seams, buttons, zippers, and anything bumpy. For best results, use with a Cricut EasyPress Mat with patent-pending layers to ensure flawless results. After iron-on application Wait at least 24 hours before washing.
- Page 16 Keep them on the tip of your tongue to get consistently phenomenal results for every possible project. We’ll continue to add more from our iron-on pros at help.cricut.com/easypress. We hope you enjoy them as much as we do! MAKE IT LAST...
- Page 17 If it’s fi rm, fl at, and waist height, you should be golden. Avoid ironing boards. For best results, we recommend a Cricut EasyPress Mat. (If you don't have a mat, not to worry! Visit cricut.com/ep-settings for material and surface suggestions).
- Page 18 See the full list at cricut.com/ep-settings. Seams, buttons, and bumps Do your best to work around pesky seams and embellishments to keep your fabric and design fl at for a perfect press. The Cricut EasyPress Mat's cushion helps as well! Learn more at help.cricut.com/easypress.
- Page 19 Learn more at help.cricut.com/easypress. Love the layer Make a multicolored and textured masterpiece with an iron-on technique called layering. We'll show you exactly how to do it and which iron-on types work best at help.cricut.com/easypress.
- Page 20 Large, in charge, and ideal for banners, blankets, larger T-shirts and other jumbo-sized projects. Cricut EasyPress Mat Protect your surface area and achieve flawless iron-on applications with this essential Cricut EasyPress companion. Its innovative construction eliminates moisture and evenly directs heat to your iron-on transfer.
- Page 22 We give you precise and rigorously tested settings for the very press that is now in your hand. • The real fun starts when you cut your own iron-on designs using your Cricut smart cutting machine and Design Space software. Cricut machines and Cricut EasyPress are optimized for Cricut iron-on ®...
- Page 24 Useful Links help.cricut.com youtube.com/officialcricut Answers to all your Cricut questions Instructional videos, news, and more learn.cricut.com facebook.com/officialcricut Educational videos, instruction manuals, Join the discussion and connect with and other learning materials the Cricut community cricut.com/blog cricut.com/contact-us News, announcements, tips, and inspiration...
Need help?
Do you have a question about the EasyPress 2 and is the answer not in the manual?
Questions and answers
What do the error messages mean and how can they be fixed? My heat press burned my shirt
The Cricut EasyPress 2 shows different error messages indicating specific issues:
1. Error Code E98: This can occur during a firmware update and may cause the EasyPress to stop working. A fix is available, but it is not officially announced. Users must follow specific steps (not detailed in the context) to resolve it.
2. Error Code E3: This error appears when the device fails to heat properly. It means the heating element is not activating despite the unit detecting temperature changes. The device shuts off after a few minutes due to this fault.
Fixes for these errors are not officially provided in the context. However, for E3, the issue seems related to the heating element not turning on, possibly requiring repair or replacement. For E98, a firmware-related fix exists but lacks official guidance.
This answer is automatically generated
what do the error messages mean and can they be corrected. My press just burned my tshirt
The Cricut EasyPress 2 can show several error messages, including:
- Error Code E98: This error can occur after a firmware update. It may render the device non-functional until corrected. A fix is available, but it is not officially communicated by support.
- Error Code E3: This error indicates the device is not heating properly. It may be due to the heating element not activating or the device not detecting a proper temperature change. When this happens, the unit shuts off after a few minutes.
These errors can sometimes be corrected. For E98, a specific fix exists though it's not widely shared. For E3, the issue may require technical repair or replacement, depending on the cause.
This answer is automatically generated
What is thee liner you use when pressing a design?