
Related Manuals for Stevens Aero Model QuickOats100


Summary of Contents for Stevens Aero Model QuickOats100
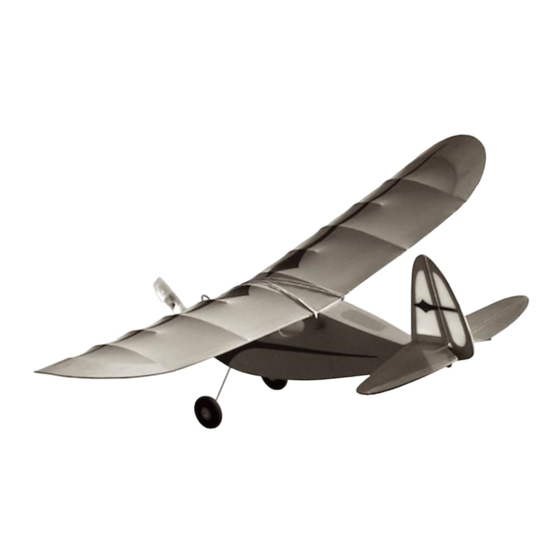
- Page 1 Wing Span: 21.75 inches | Wing Area: 100 square inches | Average Flying Weight: 2.0 ounces Build Instructions - Version 1.18 (revised 03.09.2020)
- Page 2 Build Instructions WARRANTY Stevens AeroModel guarantees this kit to be free from defects in both material and workmanship at the date of purchase. This warranty does not cover any component parts damaged by use or modification. In no case shall Stevens AeroModel’s liability exceed the original cost of the purchased kit. Further, Stevens AeroModel reserves the right to change or modify this warranty without notice.
- Page 3 Build Instructions QuickOats™ (100) - Kit Inventory Laser-cut wood, 7 sheets (See Sheet Wood Inventory, page 5) Build Instructions Photo Supplement Detail Set, 2 sheets, 11 in. x 17 in. Acetate Windscreen Taped to back of wood brick: 1 Landing gear, wire, .032 in. x 12 in. (1002) 2 Pushrods, wire, .020 in.
- Page 4 Build Instructions Suggested Items to Complete this Model Many of the suggested items listed below are available at your local hobby shop. For your convenience, Stevens AeroModel stocks all the power system components and most of the building supplies required to complete this kit.
- Page 5 Build Instructions Sheet Wood Inventory (1 of 1) QuickOats™ (100) - Build Instructions © 2010 Stevens AeroModel, all rights reserved. Page 5...
- Page 6 Build Instructions General Assembly Instructions Thank you for purchasing the QuickOats (100) from Stevens AeroModel. This model has been developed and manufactured using state-of-the-art CAD/CAM systems. Our kits feature a unique, interlocking construction process, that when compared to traditional building methods, saves countless hours of measuring, cutting, sanding, and fitting.
- Page 7 Build Instructions Empennage 9. Once again, following the “Tape Hinge The empennage consists of the horizontal Diagram” instruction given on the plan set, stabilizer, elevator, vertical stabilizer and rudder. leave a 1/32 in. gap between surfaces at Assemble parts required for each component of hinge line then, apply tape hinges to join the the empennage over top of your plan set.
- Page 8 Build Instructions Wing 15. Fit sub rib W8 spanning W1 main spar and The wing is composed of two spars (main and W7 leading edge jig. Tack glue part at W1 sub), leading edge, trailing edge, ribs and sub and W2 to retain. ribs.
- Page 9 Build Instructions 23. Hold center section of wing flat on a smooth surface, checking that both wing tips are an equal distance above the surface. 24. Fit and bond trailing edge W14 between ribs 25. Fit and bond leading edge webbing W15 between ribs W3.
- Page 10 Build Instructions Fuselage 32. Dry fit F5 motor mount assembly to F4 Fuselage parts are designated with a “F” followed fuselage side aligning tabs in motor mount by a numeric. Parts have been numbered so that with notches in fuselage side. the fuselage assembly and required parts follows in alpha-numeric order from F1 to F20.
- Page 11 Build Instructions 43. Matching tabs and notches, fit bottom sheeting F14 within fuselage assembly behind landing gear pocket and spanning fuselage sides. Bond F14 to retain. Attention: be careful not to allow glue to enter landing gear pocket. 44. Fit and bond F15 bottom sheeting spanning fuselage sides forward of former F3.
-
Page 12: Final Assembly
Build Instructions Final Assembly 59. Remove covering from tab on bottom of 51. Following “Landing Gear Detail” on plan set vertical stabilizer where it will insert through accurately bend landing gear using needle horizontal stabilizer and fuselage. Next, nose pliers and included 1/32 in. wire. remove covering over notch in top/aft deck of fuselage to receive vertical stabilizer. - Page 13 Build Instructions 66. Follow instructional given on plan set for Flight Control Setup creating rudder and elevator push-rods. Route push-rods through proper slots in Inspect wing for any warps that may have fuselage sides and holes provided in F3. It worked their way in when covering, or while may be helpful to trim covering from the the model was in storage, and remove prior to...
- Page 14 Build Instructions Pre-Flight Range check radio. Follow the radio makers guidelines for performing a proper range Have and experienced pilot assist you with pre- check. flighting your new model. Just like having someone proof read something you’ve written, Check for traffic. Proceed to the flight line having a second fresh set of eyes to inspect your (With your mentor/instructor if you are a final product is often helpful at avoiding disaster.
- Page 15 Build Instructions Congratulations! Once you’ve completed your first flights, you will have noticed that the Stevens AeroModel QuickOats (100) is a very stable model airplane. When built straight, and trimmed for level flight, it should readily return to “wings level” from any attitude.
Need help?
Do you have a question about the QuickOats100 and is the answer not in the manual?
Questions and answers