Advertisement
Table of Contents
- 1 Unpacking Instructions
- 2 Important Safety Information
- 3 Tools Required
- 4 Supplied Parts List
- 5 Mounting the Monitor Brackets to a TV with Flat Back
- 6 Mounting the Monitor Brackets to a TV with Curved Back
- 7 Mounting the Wall Plate to the Wall
- 8 Attaching Monitor to Wall Plate and Adding the Safety Bolts
- Download this manual
Advertisement
Table of Contents

Related Manuals for Techly ICA-PLB 109


Summary of Contents for Techly ICA-PLB 109
- Page 1 Full Motion led lcd tv Wall Mount Single Arm Istruzioni installazione Installation Instruction IcA-PlB 109 www.techly.it...
- Page 2 Full Motion led lcd tv Wall Mount Single Arm Gentile Cliente, Dear Customer, grazie per aver scelto un prodotto Techly. thanks for choosing a Techly product. Enjoy the using. Istruzioni disimballaggio Unpacking Instructions • Aprire il cartone con cura, rimuovere il contenuto e distenderlo su • Carefully open the carton, remove contents and lay out on un cartone o altro materiale protettivo per evitare danni.
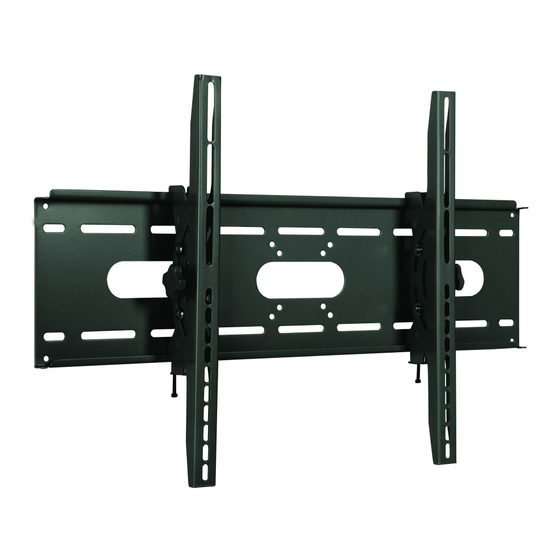
- Page 3 Full Motion led lcd tv Wall Mount Single Arm LISTA DELLE PARTI FORNITE | SUPPLIED PARTS LIST (1) Placca a muro-a (1) Staffa monitor sinistra-b (1) Staffa monitor destra-c (1) Chiave a brugola-d (1) Wall Plate-a (1) Left Monitor Bracket-b (1) Left Monitor Bracket-c (1) Allen Key-d (4) M4x12 Viti-e (4) M5x12 Viti-f (4) M6x12 Viti-g (4) M8x16 Viti-h (4) M4x12 Bolt-e (4) M5x12 Bolt-f (4) M6x12 Bolt-g (4) M8x16 Bolt-h (4) M4x30 Viti-i (4) M5x30 Viti-j (4) M6x35 Viti-k (4) M8x40 Viti-l (4) M4x30 Bolt-i (4) M5x30 Bolt-j (4) M6x35 Bolt-k (4) M8x40 Bolt-l (4) M4 Rondelle dentellate-m (4) M5 Rondelle dentellate-n...
- Page 4 Prima agganciate le staffe del monitor (b,c) sulla parte alta della placca a muro (a), First hook the Monitor Brackets (b,c) over the top of the wall Plate (a), then let the quindi fate ruotate la parte bassa della staffa attaccata al monitor verso la parte inferiore bottom of the Monitor Brackets rotate to the bottom of the Wall Plate as shown in the della staffa a muro come mostra lo schema A. Utilizzate il cacciavite per stringere le viti Diagram A. Use the screw driver to tighten the safety bolts. Then the Monitor Bracket di sicurezza. Quindi la staffa del monitor si posizionerà dietro la linguetta presente in will sit behind the bottom tab on the Wall Plate as shown in the Diagram B. basso sulla placca a muro come potete notare nello schema B. b ,c b ,c muro muro w al l w al l wall wall Schema A Schema B Diagram A Diagram B www.techly.it...
Need help?
Do you have a question about the ICA-PLB 109 and is the answer not in the manual?
Questions and answers