Advertisement
Quick Links
Advertisement

Related Manuals for Euroscreen Thor

Summary of Contents for Euroscreen Thor
- Page 1 27 feb. 2019, 08:02 Thor Made in Sweden...
- Page 2 Please read through the manual completely before installation and usage. Tack för att ni valt en Euroscreen som en del i er AV-installation. Vi ® hoppas den kan ge er många timmar av underhållning och/eller utbildning, beroende på...
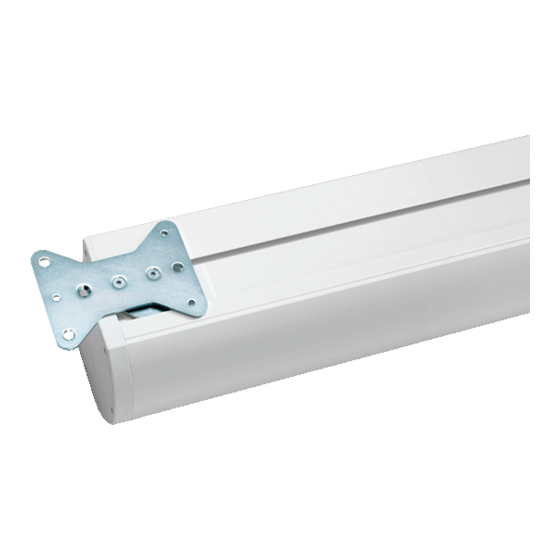
- Page 3 Overview / Översikt Case / Kassett fig 1 Valhalla bracket / Valhallakonsol DRAWN DRAWN Niclas 2013-09-23 Niclas 2013-09-23 CHECKED CHECKED TITLE TITLE Ø 8 APPROVED APPROVED SIZE DWG N SIZE DWG NO SCALE SCALE Ø 8 fig 2 Ceiling bracket / Takkonsol 6,50 fig 3...
- Page 4 Unpacking / Uppackning UK: Release the dowel from the bracket by removing the screws (fig 4 & 5). Remove the bracket and its fastening plate from the case (fig 6). fig 4 SE: Lossa bottenprofilen från konsolen genom att ta bort skruvförbandet (fig 4 & 5). Skruva av konsolen och ta ur fästplattan ur kassettspåret (fig 5).
- Page 5 Refit the screw in the bottom dowel (fig 7). Twist and remove the fastening plate from the casing (fig 8). fig 7 Skruva tillbaka skruven i bottenprofilen (fig 7). Vrid och ta bort fästplattan från kassetten (fig 8). fig 8 fig 9...
- Page 6 Valhalla Bracket / Valhalla Konsol EN: The Euroscreen ® Valhalla Bracket can be installed in the ceiling or on the wall. USE FASTENERS INTENDED FOR THE ACTUAL SURFACE. Try to level them up as good as possible, using spirit level or laser guide (fig 10).
- Page 7 Basic installation / Standard installation a) Mount the brackets on the wall or in the ceiling (fig 14) b) Hang the case on the hooks in the bracket (fig 15) c) Lock the bracket by turning the arm (fig 16) d) Raise/secure the case by turning the bottom screw (fig 17) fig 14...
- Page 8 Optional Mounts / Alternativa konsoler UK: The ”Thor” screen can be mounted on the wall or in the ceiling. Keep the screen horizontal at all times during installation. Wall mount using Z-brackets (accessory 485002): 1. Mount the wall brackets and make sure they are levelled.
- Page 9 Tensioning / Trådspänning (TabTension only) (endast TabTension) EN: To keep the surface flat you may need to fig 23 adjust the tensioning as the surface will change with time and temperature. This is done with the tensioning screw marked in fig 23. It is adjustable with 1/6 turn increments.
- Page 10 How to open case / Öppna kassetten EN: The front lid can be removed while the screen remains installed on fig 24 the wall. To open the case remove the screws shown in fig 24 on both ends. Lift and remove the lid (fig 25).
- Page 11 Height adjustment / Höjdjustering Some of the Thor screens (width depen- dable) has a built in height adjustment in case the ceiling for instance, doesn’t allow the installation to be level. There is approx. 5mm adjusting room up and 5mm down on each side of the screen.
- Page 12 European Parliament and of the European Council concerning the Registration, Evaluation, Authorisation and Restriction of Chemicals (REACH). All screen surfaces of Euroscreen ® projection screens are approved by the REACH regulation. ECHA European Chemicals Agency (ECHA) gathers information on the properties of manufacturers and importers chemical substances, which will allow their safe handling, and to register the information in a central database.
Need help?
Do you have a question about the Thor and is the answer not in the manual?
Questions and answers