Table of Contents
Advertisement
Quick Links
Advertisement
Table of Contents

Related Manuals for FONESTAR DMX-81


Summary of Contents for FONESTAR DMX-81
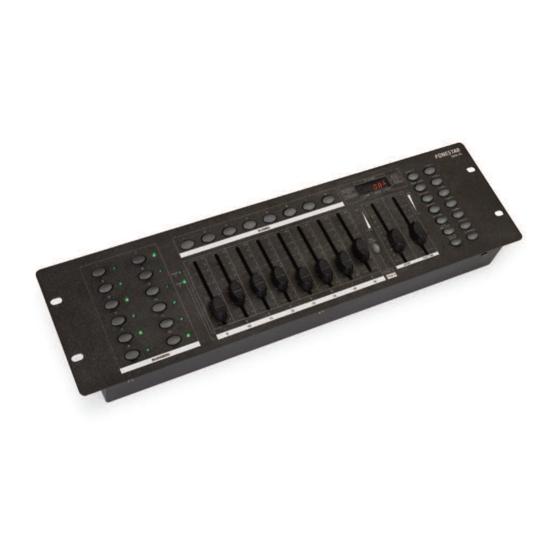
- Page 1 MX-81 192-CHANNEL DMX 512 CONTROL CONSOLE INSTRUCTION MANUAL...
- Page 2 We take this opportunity to thank you for buying this product. We recommend you read the instruction manual before switching on the machine and follow the instructions that are given. Keep the manual for future reference. SECURITY AND THE ENVIRONMENT ELECTRICAL SECURITY Check that the current in the mains connection where the machine is to be installed corresponds to the power supply of the machine.
-
Page 3: Exemption Of Liability
The characteristics of the equipment and the content of the manual can change without forewarning. FONESTAR, S.A. does not assume responsibilities regarding the inappropriate use of the equipment or the information supplied in this instruction manual, and specifically disclaims any implied liability for marketability or fitness for any other use. -
Page 4: Controls And Functions Front Panel
DESCRIPTION 192-channel DMX 512 control console. Allows lighting equipment connected on the same line to be controlled, with 12 accesses to up to 16 channels. It has 6 chase presets each with 240 programmable scenes, divided into 30 memory banks of 8 scenes each. Manual, automatic control or sound activation thanks to integrated microphone. - Page 5 A.- BANK UP, BANK DOWN: allows selection from among the 30 banks available, in order to select and program scenes. B.- PROGRAM: allows activation of the the scene programming mode. The PROGRAM indicator will flash on the display. C.- MIDI/ADD: allows functions selected in programming mode to be added. Note: control function via an external MIDI device not available.
-
Page 6: Rear Panel
1-2-3-4-5-6 sequence, only if they are programmed and activated. The DMX-81 model has 6 banks. OPERATING MODES The DMX-81 control console can operate in manual mode, in automatic mode or in sound activation mode. To select one of the modes follow the instructions below. -
Page 7: Automatic Mode
AUTOMATIC MODE In this mode you can choose between scene, bank or chase reproduction. To do this you should have previously programmed a scene or a chase. If you have not, then go to the PROGRAMMING section to store a scene. REPRODUCING A SCENE - Select the bank where the scene is stored using the BANK UP and BANK DOWN buttons. -
Page 8: Programming A Scene
PROGRAMMING PROGRAMMING A SCENE - Hold down the PROGRAM button for 3 seconds to access the programming mode. The LED PROGRAM indicator will flash constantly. - Select the scanners that correspond to the devices you wish to program. - Adjust the sliding controls for each channel, in accordance with the required setting. Press the PAGE SELECT button if the device has more than 8 channels, to program the value of channels 9 to 16. -
Page 9: Programming A Chase
TO COPY A COMPLETE BANK - Hold down the PROGRAM button for 3 seconds to access the programming mode. The LED PROGRAM indicator will flash constantly. - Select the bank where the scenes are stored using the BANK UP and BANK DOWN buttons. - Press MIDI/ADD button to store the program. - Page 10 ADDING A SCENE TO A SPECIFIC STEP IN A CHASE - Hold down the PROGRAM button for 3 seconds to access the programming mode. The LED PROGRAM indicator will flash constantly. - Select the chase to be edited using the CHASE 1-6 buttons. - Press the TAPSYNC/DISPLAY button and the total number of scenes will appear on the display.
- Page 11 RESETTING THE SYSTEM (DELETING PROGRAMMING) Function that restores the factory settings, deleting all the stored programs. - Switch off the DMX-81 control console. - Press and hold the the PROGRAM and BANK DOWN buttons and switch the control console on while you are holding down these buttons.
-
Page 12: Connection And Operating
DIP microswitches to assign a specific DMX address. The DMX-81 control console has 12 scanners to make management of the devices easier within its 192 channels. These scanners refer to fixed addresses with 16 channels between them. Below, the addresses of the scanners and the microswitches that should be activated in a device with a standard DMX configuration are shown. - Page 13 DMX ADDRESS SCANNER 1 SCANNER 2 SCANNER 3 1,5,6 SCANNER 4 SCANNER 5 1,5,7 SCANNER 6 1,6,7 SCANNER 7 1,5,6,7 SCANNER 8 SCANNER 9 1,5,8 SCANNER 10 1,6,8 SCANNER 11 1,5,6,8 SCANNER 12 - Several devices can be connected and controlled by a DMX-512. They must be interconnected using XLR cables with the following configuration.
-
Page 14: General Safety Recommendations
- Do not modify the lighting elements of the equipment without technical supervision or with material that has not been guaranteed by the supplier. TECHNICAL SPECIFICATIONS DMX-81 CHARACTERISTICS 192-channel DMX 512 control console. 12 accesses to up to 16 channels. -
Page 15: Warranty
2 months after being conscious of the problem. It is only necessary to contact FONESTAR if it is impossible or imposes an undue burden for them to solve it. To benefit from this warranty it is necessary to show the proof of purchase with the date clearly visible, with no corrections or crossing out. - Page 16 www.fonestar.com...
Need help?
Do you have a question about the DMX-81 and is the answer not in the manual?
Questions and answers