Table of Contents
Advertisement
Quick Links
エアーラインキット
AL - H1206
取 扱 説 明 書
日本語:P1 - P9 / English:P11 - P19
このたびは、 エアーラインキット「AL - H1206」をお買い求め頂きまして、 誠にありがとうございます。本製品は、
エアー流量の調整と自動給油をおこない、エアーグラインダにオイルミストを供給することができます。本製品を
ご使用頂くためには、エアーグラインダおよびコンプレッサが必要です。ご使用前に本取扱説明書および上記製品
の取扱説明書を良くお読み頂き、末永くご愛用くだされば幸いです。また、この取扱説明書は、ご使用になられる
方がいつでも見ることができる場所に保管してください。
1 .
安全上の注意事項・表示について
■ 使用前に必ずこの安全上の注意をよくお読み頂き、正しくお使いください。
■ ここに示した注意事項は、製品を安全にお使い頂き、あなたや他の人への危害や損害を未然に防止するものです。
危害や損害の大きさと切迫の程度に分類しています。いずれも安全に関する内容ですから、 必ずお守りください。
注意区分
警 告
「人が傷害を負ったり、物的損害の発生がある注意事項」を説明しています。
「軽傷または中程度の傷害、または、物的損害が発生する可能性がある注意事項」を説
注 意
明しています。
警 告
① 取り扱いについて
圧縮エアーは、取り扱いを誤ると危険です。
エアー圧機器を使用した機械 ・ 装置の組立や操作、 メンテナンス等、 十分な知識と経験を持った方が取り扱っ
てください。
② 流体の種類について
使用流体は圧縮エアーを使用してください。エアー圧力は、
使用してください。
③ 圧縮エアーについて
化学薬品、有機溶剤を含有する合成油、塩分、腐食性ガス等を含む圧縮エアーは、使用しないでください。
ボウルの破損や作動不良の原因になります。
④ 配管用ホース、給気ホースの接続
ホースは、確実に接続してください。使用中にホースが外れるとホースがあばれ、けがをするおそれがあ
ります。配管用ホース耐圧(
⑤ 継手部について
継手部に衝撃を与えたり、負荷がかかる接続をしないでください。破損によりエアー漏れや、継手が折れ
て配管用ホース、給気ホースがあばれるおそれがあります。
⑥ 落下について
エアーラインキットを取り付ける場合は、平らな面に確実に取り付けてください。エアーラインキットを
落下させた場合、故障やけがをするおそれがあります。
/ OPERATION MANUAL
危害や損害の大きさと切迫の程度
1.0MPa 以下)を守って使用してください。
/ Air Line Kit
1 次側 1.0MPa 以下、 2 次側 0.85MPa 以下で
OM-K0655 001
1
Advertisement
Table of Contents

Summary of Contents for Nakanishi AL-H1206
- Page 1 エアーラインキット / Air Line Kit AL - H1206 取 扱 説 明 書 / OPERATION MANUAL 日本語:P1 - P9 / English:P11 - P19 OM-K0655 001 このたびは、 エアーラインキット「AL - H1206」をお買い求め頂きまして、 誠にありがとうございます。本製品は、 エアー流量の調整と自動給油をおこない、エアーグラインダにオイルミストを供給することができます。本製品を ご使用頂くためには、エアーグラインダおよびコンプレッサが必要です。ご使用前に本取扱説明書および上記製品 の取扱説明書を良くお読み頂き、末永くご愛用くだされば幸いです。また、この取扱説明書は、ご使用になられる 方がいつでも見ることができる場所に保管してください。 安全上の注意事項・表示について ■ 使用前に必ずこの安全上の注意をよくお読み頂き、正しくお使いください。 ■ ここに示した注意事項は、製品を安全にお使い頂き、あなたや他の人への危害や損害を未然に防止するものです。 危害や損害の大きさと切迫の程度に分類しています。いずれも安全に関する内容ですから、 必ずお守りください。 注意区分 危害や損害の大きさと切迫の程度...
-
Page 2: Cautions For Handling And Operation
Thank you for purchasing the " AL - H1206 " Air Line Kit. This Air Line Kit designed for adjust the air supply Àow and oil amount for automatic mist lubrication to Air Grinder. The Air Grinder and a Compressor are required in addition to this Air Line Kit. -
Page 3: Basic Package
When opening the package, check if it includes all items listed in " Table. 1 Packing List Contents ". In the event of any shortage, please contact either NAKANISHI (see the " 4. CONTACT US " section) or your local dealer. -
Page 4: Warranty
Telephone No. : +81 (0) 289-64-3520 e-mail Address : webmaster-ie@nsk-nakanishi.co.jp 5 . FEATURES ① The Filter Regulator traps small amounts of water and impure substances from the input air supply. This Air Line Kit is not intended to be used or replace an Air Dryer. -
Page 5: Specifications
6 . SPECIFICATIONS Model AL - H1206 Primary air pressure Less than 1.0MPa (145psi) Secondary air pressure Less than 0.85MPa (123.3psi) Maximum Operation Pressure 1.0MPa (145psi) Maximum Peak Pressure Less than 1.5MPa (217.6psi) Maximum Peak Pressure at Hose Connection Less than 1.0MPa (145psi) Filtration of the Air Filter 5μm Primary Side Air Pressure : 0.7MPa (101.5psi) -
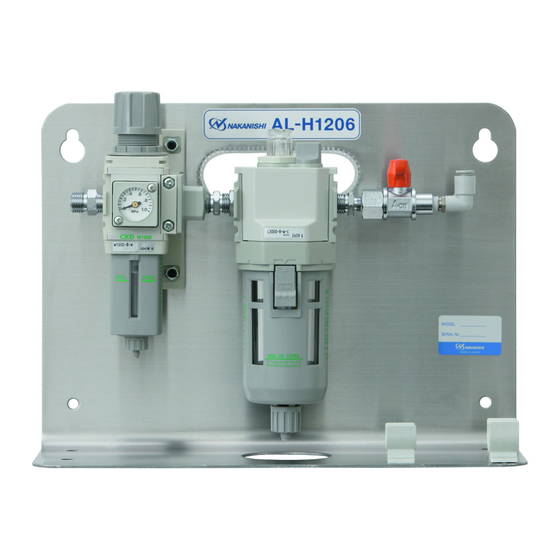
Page 6: Parts Name
7 . PARTS NAME Regulator Knob Adjusting Dome Oil Filler Cap ① Filter Regulator ON / OFF Valve Connection Hose Secondary Joint 6 One-Touch Joint Primary Joint ② Lubricator Connector for Air Hose Oil Reservoir Tool Holder Fig. 1 If the Filter Regulator or Lubricator are damaged, all components are replacable by the end-user (Refer to Table. 2 and Table. -
Page 7: Operation
8 . OPERATION 8 - 1 Filter Regulator (Fig. 2) (1) Regulator Section < Lock and Release of the Regulator Knob > Regulator Knob Regulator Knob is equipped with Lock mechanism. Release Release : Pull the Regulator Knob OUT to unlock. Lock : Push the Regulator Knob IN to the Lock position. - Page 8 (3) Adjustment of Oil Drip Rate (Fig. 4) O : Increase S : Decrease ① Set the air pressure to the motors recommended Adjusting Dome maximum air pressure. ② Adjust the Oil Drip Rate to the recommended volume which is 1 to 3 drops / min. O direction Increase.
- Page 9 9 - 2 Connection of the Air Line Kit (1) Connect the Connection Hose (Standard Accessory) to the Primary Joint of the Air Line Kit. (2) Connect the Filter Joint of the air motor to the Secondary Joint ( 6 One - Touch Joint) on the Air Line Kit. (3) Place "...
-
Page 10: Troubleshooting
10 . TROUBLESHOOTING If a problem or concern occur, please check the following items prior to consulting your dealer. Trouble Inspection / Corrective Active Broken connection hose and supply Replace the connection hose and supply air / oil hose. air / oil hose. No air Àow. - Page 11 2015.06.20 002...
Need help?
Do you have a question about the AL-H1206 and is the answer not in the manual?
Questions and answers