Advertisement
Advertisement
Table of Contents

Subscribe to Our Youtube Channel
Related Manuals for CamFive EMB HT Series

Summary of Contents for CamFive EMB HT Series
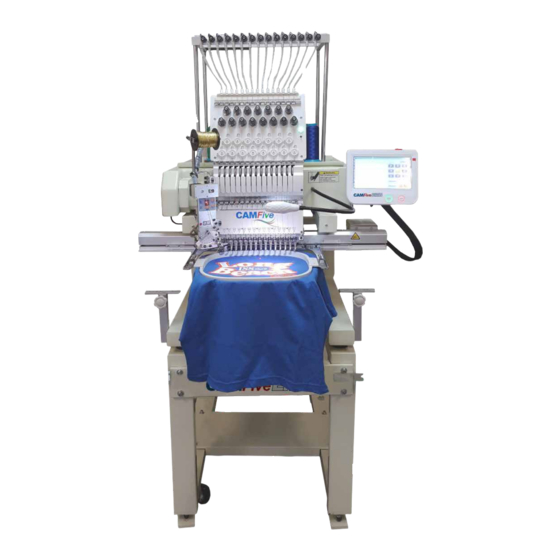
- Page 1 HT1501 / HT1502 OPERATION MANUAL...
- Page 2 Pág. Pág. Button Descriptions Beginning Setting up the hat hoop onto Pág. the embroidery machine Pág. Pág. Setting up a hat Loading a Design Pág. Pág. Maintenance Troubleshooting and FAQ...
-
Page 3: General Info
General Info The main screen displays embroider- ing design and its status, please touch the surrounding buttons to act corre- sponding operations, please use the direction keys to move the frame and set the moving speed. -
Page 4: Button Descriptions
Button Descriptions Machine is in “Emb Release” state, click Set Color change sequence of current to take “Emb Confirm” (confirm the Embroidery Design design) operation. Machine is in “Emb Confirm” state, click Activate main shaft origin (main shaft to take “Emb Release”(delete design/ stops at 100 degrees). - Page 5 Beginning In order to start, you must make sure all designs are in DDB or DST Format, onto the USB disk you will be utilizing. Setting up Connect the USB drive onto your material the side of the Control Panel. Setting up a flat item What will you need? A shirt or cloth you will like to embroider over...
- Page 6 The proper size hoop to mount the material to the machine Pull away backing (material to embroider over) To begin, lay your material on a flat surface and stretch in order to remove any creases.
- Page 7 Place the bottom hoop under the material you would like to embroider (for shirts it would be in the inside of the shirt). Make sure the pull away backing is also under the shirt but on top of the hoop that is inside the shirt.
- Page 8 Now you can slide the hoop into the machine work arms, if working with a shirt make sure the neck hole goes thru the center bar. Both ends of the hoop should click into each side of the embroidery machine.
- Page 9 Setting up the hat hoop onto the embroidery machine First make sure the hoop is in the center of the metal bar that is coming from the embroidery machine and the tracks should align. Then push the hoop all the way to the back, until the screws align with their...
- Page 10 Now tighten the screws with an allen key, and you are now able to place a hat onto the hoop. Setting up a hat Place the stationary hat hoop on a flat surface, and secure it tightly onto the surface.
- Page 11 Place the metal hat lock onto the hoper until both locks click. Next, place the pull away backing onto the metal hat lock.
- Page 12 Now unfold the hat’s sweat band and place the hat onto the hat lock all around the rim of the hat lock. Now lock the metal band around the hat.
- Page 13 Unclip the hat lock from the hoop and lock in the hat lock onto the hoop that is on the machine. You are now able to place the hat onto the hoop you placed on the embroidery machine.
-
Page 14: Loading A Design
Loading a Design • In order to load your design into the Control Panel screen, you must begin by pressing the “Activate design managing function and other management functions” button (see below) • Next press on the Floppy Disk button (see below) on the bottom of the screen to open up the devices menu. -
Page 15: Selecting Colors
Selecting Colors • With the DM 1501, you are able to select different colors for your designs. If your design has multiple layers, you may want to give each layer different colors. • Here we will show you how. • In order to set the colors for your design layers, press the Set Color change sequence of current Embroidery Design (see below) •... - Page 16 Setting the Needle Origin and Verifying the work area • Before starting the design, you must check your work area to ensure that the needles do not collide with the hoop bar. • In order to do this, press the directional button on the top right corner, and move the needle to a corner where the origin point is safe within the material.
- Page 17 Flipping the design • When working with different types of clothing (shirts, hats, sheets, etc.) you may need to adjust the direction of your design in order for the design to face the correct direction. • To flip the design into the correct way, you must press the open machine parameter button and here you are able to rotate or flip the design as needed.
-
Page 18: Maintenance
Maintenance Lubrication • The DM 1501 has multiple lubrication points, that should be maintained once every two weeks. • For best results, please utilize the oil that comes with the tool kit upon purchase: • There are multiple lubrication points, these are below:... - Page 19 Front View Close Up Front View Close Up...
- Page 20 Needles • You may need to replace the needles from time to time, either because they broke or if they are dull. To replace the needles follow the directions below: Using a needle nose plier (or your hands) to hold the needle you would like to replace, while unscrewing...
-
Page 21: Troubleshooting And Faq
Now you are able to replace the needle, and tighten the screw. Make sure that the curve part of the needle is facing away from the front of the machine or towards the needle arm. See pics below Troubleshooting and FAQ Sometimes when utilizing the DM1501, unseen errors may occur and here at CAMFive we want to make sure you have all the tools to be successful. - Page 22 • Error Code EC9:Back to the beginning then pull backward bar again- This error will come up when you are pressing the Stop button when already stopped, meaning you are trying to go back to the origin point. This error code is telling you that you are already at the origin point, and no more action needs to be taken.
- Page 23 Utilizing an Allen key on the left side of the machine to manually bring the needle downward. Using the silver knob behind the right side of the head, on the x-motor, you can adjust the embroidery head to the left or right to ensure the needle goes through the center of the needle plate.
- Page 24 www.camfiveemb.com TECH SUPPORT: support.us@camfive.com SALES: sales.us@camfive.com CALIFORNIA 626-855-4515 219 S. 3rd Ave Suite 3, Los Angeles, CA 91746 Florida 407-851-5525 1629 Prime Ct Suite 700, Orlando, FL 32809...
Need help?
Do you have a question about the HT Series and is the answer not in the manual?
Questions and answers
QUE FORMATO RECONOCE LA BORADODA CAMFIVE