Advertisement
INSTALLATION GUIDE
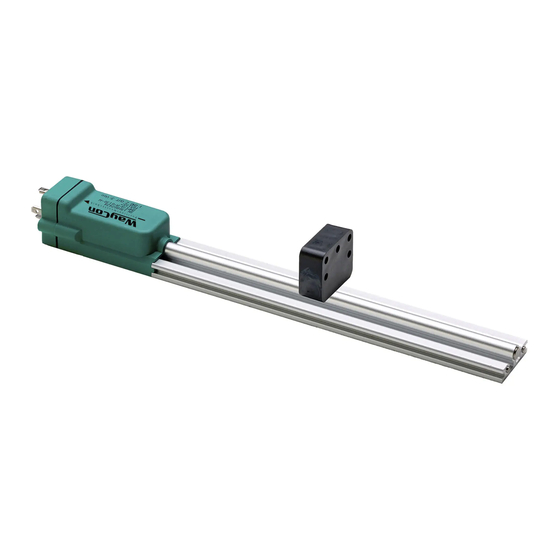
Magnetostrictive Sensor Series MAP
For more information please see the data sheet at
www.waycon.biz/products/magnetostrictive-transducers/
FIRST STEPS
WayCon Positionsmesstechnik GmbH would like to thank you for the trust you have placed in
us and our products. This manual will make you familiar with the installation and operation of our
magnetostrictive sensors. Please read this manual carefully before initial operation!
Unpacking and checking:
Carefully lift the device out of the box by grabbing the housing. After unpacking the device, check
it for any visible damage as a result of rough handling during the shipment. Check the delivery for
completeness.
If necessary consult the transportation company, or contact WayCon directly for further assistance.
GENERAL NOTES
The transducer must be installed away from sources of magnetic fields, both static and 50 Hz (electric
motors, solenoids, etc.). The sensors must be powered with non-distributed networks and always at
lengths of less than 30 mt.
The transducer connection cable must be wired separately from power cables and/or solenoid controls,
drives, or remote switches. The line used for power supply must be dedicated to the transducers or
must be drawn directly from the power terminals and as near as possible.
The transducer's cursor is a magnet. Therefore, if there are iron filings or small magnetic metal
fragments in proximity of the transducer, avoid the use of sliding cursors, as there would be a risk of
material accumulation on the cursor, creating problems for sliding. Use a floating cursor instead.
MAGNETIC CURSORS
Magnetic cursors (please order separately)
Cursor
PCUR220
guided sliding, axial joint, low
PCUR221
guided sliding, axial joint, high
PCUR222
guided sliding, angled joint
PCUR202
The adjustment has to be done 2...7 mm above the MAP-profile.
1)
Allowed lateral deviation ±2 mm. Installation only on a support
made of non-magnetic material.
Description
standard version;
unguided floating
1)
PCUR220
PCUR222
PCUR221
PCUR202
Advertisement
Table of Contents

Related Manuals for Waycon MAP Series


Summary of Contents for Waycon MAP Series
- Page 1 FIRST STEPS WayCon Positionsmesstechnik GmbH would like to thank you for the trust you have placed in us and our products. This manual will make you familiar with the installation and operation of our magnetostrictive sensors. Please read this manual carefully before initial operation! Unpacking and checking: Carefully lift the device out of the box by grabbing the housing.
- Page 2 MOUNTING THE SENSOR Brackets (please order separately) 1 set includes 2 brackets. We recommend to use 1 set for each 250...300 mm of the measurement range. Distance of bores Screws Length Material PKIT590 42.5 mm 56 mm steel PKIT591 50 mm 63.5 mm steel measurement range + 154...
- Page 3 ELECTRICAL CONNECTION MAP-A-A: Connector M12, 5 pins, male Power supply: 24 VDC, ±20 % Function Signal Signal n. c. Supply Accessory connection cable Cable with mating connector M12, female, 5 pins, IP67 Cable colour K5PXM-S-M12 X m, straight connector, shielded K5PXM-SW-M12 X m, angular connector, shielded MAP-A-M:...
- Page 4 DECLARATION OF EU-CONFORMITY WayCon Positionsmesstechnik GmbH Mehlbeerenstrasse 4 82024 Taufkirchen / Germany This is to certify that the products Classification Magnetostrictive Sensors Series fulfill the current request of the following EU-directives: EMV-directive 2004/108/EG (until April 19 2016) 2014/30/EU (from April 20...
Need help?
Do you have a question about the MAP Series and is the answer not in the manual?
Questions and answers