Table of Contents
Advertisement
Quick Links
Advertisement
Table of Contents

Related Manuals for Sailrite ULTRAFEED 120931

Summary of Contents for Sailrite ULTRAFEED 120931
- Page 1 ULTRAFEED INDUSTRIAL ® TABLE SET-UP GUIDE #120931, #120934 & #121091...
- Page 2 Ultrafeed Industrial Sewing Table With this table you can create a solid, stationary workstation for your Ultrafeed sewing machine. This industrial-style table stand will provide a larger work surface for projects of all sizes. These instructions will help you set up your Ultrafeed Industrial Sewing Table (#120934) as well as the Ultrafeed Industrial Sewing Table with Workhorse Servo Motor (#120931, #121091).
-
Page 3: Table Of Contents
Table Of Contents Sewing Machine Safety ..........Ultrafeed Industrial Table Setup ® Power Stand Assembly ..........Installing the Drawer ........... Adjusting the Height ........... Oil Tray Installation ............. Mounting the Thread Stand ........Machine Installation ............ Installing the Workhorse Servo Motor Installing Foot Treadle .......... -
Page 4: Sewing Machine Safety
SEWING MACHINE SAFETY Please observe the following when using your Sailrite sewing machine • Do not operate in conditions where you or the • Always use the proper voltage required for machine are or may become wet. the motor and light. -
Page 5: Power Stand Assembly
Power Stand Assembly Find parts A, B, (Figure 1). Stand both k-legs upright. Bolt the back support bar (H) to the k-legs using the bottom hole on the back of each leg (Figure Find parts E, and G. Turn the k-legs upside down. - Page 6 Using a pencil, trace around the perimeter 6). With of each slot in the k-legs (Figure the legs removed, use a 5/32" drill bit to drill approximately 1/2" into the tabletop within each pencil outline. Do not drill completely through the tabletop. Sailrite.com...
- Page 7 Realign the k-legs on the tabletop with the pencil marks. Use the hex head lag screws (J), locking washers (L) and washers (M) (Figure to bolt the frame to the tabletop at each position (Figure Ultrafeed Industrial Table Set-Up Guide...
-
Page 8: Installing The Drawer
Secure the rails using 6 of the included screws (Figure Tip: Do not over tighten the screws or they will prevent the drawer from sliding freely. FRONT Installing Rubber Foot Pads Stretch the rubber foot pads onto each of the k-leg's rectangular metal feet (Figure 11). Sailrite.com... -
Page 9: Adjusting The Height
Adjusting the Height Flip the table upright. Sit in front of the table and assess the table height. If adjustments are needed, loosen the 12). four bolts toward the top of each leg (Figure Raise or lower the tabletop to the desired position then tighten the bolts. -
Page 10: Oil Tray Installation
15). Use the 4 nails (D), slot cutout (E) (Figure to secure the tray. Note: Positioning the oil tray too far to the right can cause the timing belt to rub against it causing unnecessary wear on the belt. Sailrite.com... -
Page 11: Mounting The Thread Stand
Sailrite's Integrated Thread Stand (not included) can now be installed via the threaded insert (Figure 17). If another thread stand is being used, it can be placed on or screwed into the table near this same location. -
Page 12: Machine Installation
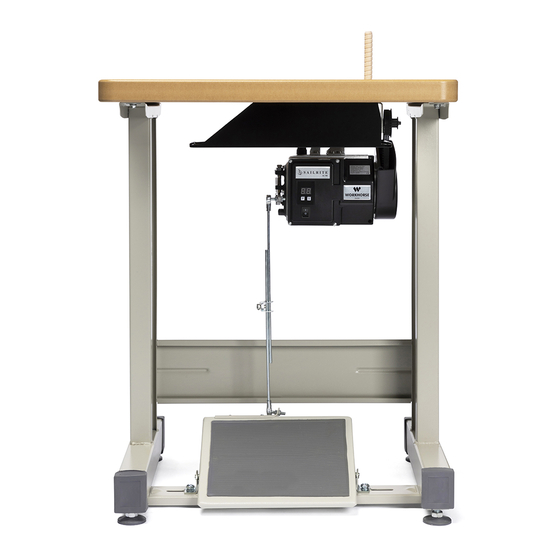
• Cogged Timing Belt 42" #120580 • Belt Cover & Bracket for Ultrafeed with Workhorse #120930 • Support Pin for Sailrite Utlrafeed Industrial Sewing Table #120866 • Idler Pulley for Ultrafeed #W061-A Note: A new idler pulley is only required for Ultrafeed sewing machines purchased prior to March 17, 2016. - Page 13 The Ultrafeed Industrial Sewing Table & Workhorse Servo Motor #120931 & #121091 This package transforms the portable Ultrafeed Sewing Machine into a stationary, industrial machine! The Workhorse Servo Motor provides top notch power at the slowest speeds so you can sew stitch- by-stitch in even heavy assemblies.
-
Page 14: Installing Foot Treadle
L-bracket (page 12, E) should be facing towards the back of the table. Once the treadle is in place, tighten the bolts. Test the treadle to be sure it moves freely once the bolts are tightened. 11 | Sailrite.com... - Page 15 Install the L-bracket (E) on the back of the treadle starting with the hole farthest to the right on the treadle. Hand tighten the bolts. Then slide the L-bracket over so that the curved end is directly over the second hole from the left on the treadle.
-
Page 16: Check Motor Rotation
Workhorse provides, do not set the top sewing speed above 25. The motor will arrive pre-set at 30. Be sure to turn the speed down to 25 prior to sewing. For more information, reference “Operation” in the Workhorse Servo Motor Instructions. 13 | Sailrite.com... -
Page 17: Machine Installation
Machine Installation To remove the Ultrafeed from its carrying case or wooden base, tilt the machine back and loosen the two set screws (A) that hold the 25). Carefully machine on the hinges (Figure slide the sewing machine off the case/base hinges. -
Page 18: Removing Ultrafeed Motor Housing
(H). Then remove the motor and housing. Place all of these components in a safe location so you can make your machine portable again. Replace the balance wheel, Posi-Pin and Posi-Pin nut. 15 | Sailrite.com... -
Page 19: Belt Adjustment For The Workhorse Servo Motor
Belt Adjustment for the Workhorse Servo Motor Before installing the drive belt, loosen the adjustment screw (A) at the top of the motor bracket to allow the Workhorse Servo Motor to freely pivot (Figure 29). This will prevent the belt from being stretched out of shape before proper adjustments are made. -
Page 20: Installing The Linkage Bar
Note: Ensure the motor operation lever (C) is in the upmost position. If it is not, the motor will not work when turned on. BEFORE CONTINUING: See “Installing the Pulley Cover” in the Workhorse Servo Motor Instructions. 17 | Sailrite.com... -
Page 21: Attaching The Balance Wheel Belt Cover
Attaching the Balance Wheel Belt Cover Find the screw set aside from the section, “Removing Ultrafeed Motor Housing.” Use the screw to install the L-shaped belt cover bracket (A) to the back of the machine (Figure 32). Note: If your machine has a metal idler pulley (B), you'll need to replace it with the new Delrin idler pulley provided. -
Page 22: Support Pin Installation
The fit may be tight. Push until snug (Figure 37). Assembly of the Ultrafeed Industrial Table & Workhorse Servo Motor (#120931, #121091) is now complete. Enjoy! 19 | Sailrite.com... - Page 23 2-Year Limited Warranty The Sailrite Workhorse Servo Motor comes with a 2-year limited warranty. This guarantee covers defects in material and workmanship. Damage due to improper use, neglect, impact or normal wear are not covered under this warranty. Furthermore, this warranty is voided by disassembly, repair or alteration by owner or unauthorized third parties.
- Page 24 120932*1 Instructions for Sailrite Ultrafeed Equipping you to sew at home & on the water. Industrial Table Packages Copyright ©2017...
Need help?
Do you have a question about the ULTRAFEED 120931 and is the answer not in the manual?
Questions and answers