Table of Contents
Advertisement
Quick Links
BrewCommander
Assembly, Operation, & Maintenance
Congratulations on your purchase, and thank you for selecting the BrewCommander™
Gas Brewhouse Controller from Blichmann Engineering™. We are confident that it will
provide you years of service and many gallons of outstanding beer. This manual will
familiarize you with the use and assembly procedures for the product.
PLEASE READ AND THOROUGHLY UNDERSTAND THIS MANUAL PRIOR TO USE
WARNING:
Sections labeled "Warning" can lead to serious injury or death if not followed. Please thoroughly read these sections
and understand them completely before use. If you do not understand them or have any questions, contact your
retailer or Blichmann Engineering (www.BlichmannEngineering.com) before use.
CAUTION:
Sections labeled "Caution" can lead to equipment damage or unsatisfactory performance of the equipment. Please
read these sections thoroughly. If you have any questions, contact your retailer or Blichmann Engineering
(www.BlichmannEngineering.com) before use.
IMPORTANT:
Sections labeled "Important" should specifically be followed to ensure satisfactory results with the product.
Gas Controller
aBrewCommander-G-C
SparkBox™
aBrewCommander-SB
BrewCommander™
© Blichmann Engineering, LLC 2019
V. 1 - Firmware Ver1.1:1.2
Gas
™
IMPORTANT INFORMATION
FOR IMPORTANT SAFETY INFORMATION!
What' s In the Box?
Temperature Sensor Probe
BE-001500-00
36 in. Ground Clip Wire
BE-0001541-00
Ignition Electrode
TOP-020-00
Adapter Fittings
BE-500008-0
Temperature Sensor
Bulkhead Assembly
Solenoid
TOP-016-01
BE-500009-0
See Page 3 for
entire list of
Part #' s located
under Temperature
Sensor Assembly.
6ft. Solenoid Cable
TOP-017-00
3 ft. Ignition Cable
BE-001536-00
1
Advertisement
Table of Contents

Related Manuals for Blichmann BrewCommander Gas

Summary of Contents for Blichmann BrewCommander Gas
- Page 1 Blichmann Engineering (www.BlichmannEngineering.com) before use. CAUTION: Sections labeled “Caution” can lead to equipment damage or unsatisfactory performance of the equipment. Please read these sections thoroughly. If you have any questions, contact your retailer or Blichmann Engineering (www.BlichmannEngineering.com) before use. IMPORTANT: Sections labeled “Important”...
-
Page 2: System Requirements
Burner: The Brew Commander™ has been tuned to work seamlessly with a Blichmann HellFire™ burner, however other burners can be used with the controller if they meet the necessary requirements. Your burner must be capable of operating well at low power settings. If you cannot maintain a flame at about half power your system stability will suffer. - Page 3 ALWAYS Check that all fasteners are properly tightened prior to each use. ALWAYS Use the propane tank shutoff valve or a separate valve when not in use. ALWAYS Use genuine Blichmann Engineering replacement parts. INSTALL THE GAS SOLENOID VALVE The gas solenoid valve is turned on and off by the controller as needed to maintain the temperature of the tank. Locate it as close to the burner as possible but DO NOT locate it in an area that will expose it to excessive heat.
- Page 4 We have provided an electrode that can easily be modified (cut and/or bent) to fit nearly all burners. If you are installing in the current version of the Blichmann Engineering™ HellFire™ burner simply use the flame inspection hole as shown in Figure 5 for installation. For other burners, you will need to drill two holes to fasten and ground the electrode to the burner frame.
- Page 5 WARNING: Inspect all cables, wires, and connectors for wear and/or damage before every use. Do not use if cables, wires, and/or connections are damaged, loose, or worn. Replace damaged and worn parts with genuine Blichmann Engineering™ parts available online at BlichmannEngineering.com.
- Page 6 Ignition Cable Port Igniter installed on the burner. This connection must be made with a genuine Blichmann Engineering™ Ignition Cable or the BrewCommander™ may malfunction due to electromagnetic interference. Power In – This is the communication port between the BrewCommander™...
-
Page 7: Sensor Installation
For installation of the temperature sensor in Hot Liquor Tanks and boil kettles , a ½” inch hole is required. Temperature sensors can be installed in the existing BrewMometer™ hole in Blichmann Engineering BoilerMaker™ kettles. Install the temperature sensor and bulkhead as shown in Figure 6. -
Page 8: Feature Callout
POWER IN ON / OFF TEMPERATURE SENSOR PORT WIRED FROM BOTTOM NOTE: For wiring out the bottom of the controller and for wall mounting, please visit our website at blichmannengineering.com to view the instructional video. BrewCommander™ © Blichmann Engineering, LLC 2019... -
Page 9: Wall Mounting The Controller
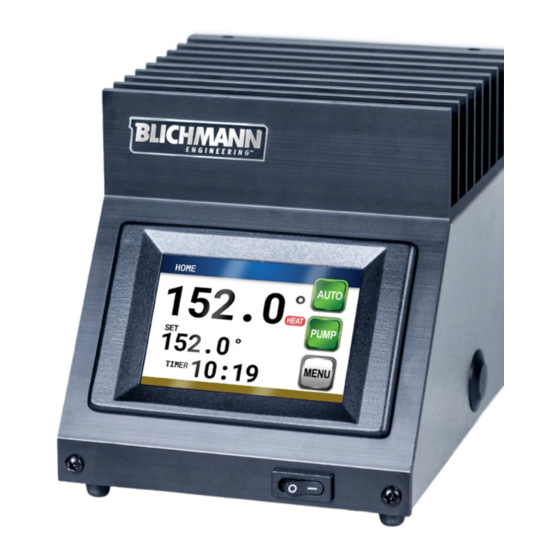
8/32 set screws. Hardware for fastening the DIN rail to the wall is not included. Steps: 1) Rewire your controller out the bottom by following the instructions given in the rewiring video on our Blichmann Engineering™ YouTube channel. 2) Trim the included DIN rail to be 1/8” shorter than with width of the controller. - Page 10 MENU - Pressing this button will open the main menu screen. MENU SCREEN TIMER - Set a timer. MASH - Mash Profile. BOIL - Boil Profile. SETTINGS HOME - Return to the HOME Firmware 1.1:1.2 Screen. Firmware Version: Ver 1.1:1.2 BrewCommander™ © Blichmann Engineering, LLC 2019...
- Page 11 PLAY / PAUSE - Start / pause the selected profile. This button will become a pause button when a profile is active. RESET - When a profile is active, press the RESET button to end the profile. To reset an active timer, press pause and then press reset. HOME - To the Home Screen. BrewCommander™ © Blichmann Engineering, LLC 2019...
-
Page 12: Basic Settings
HEAT RATE. RIMS OFFSET - This offset is used for Recirculation Infusion Mash System (RIMS), Heat Exchanger Recirculation Mash System (HERMS), or the Blichmann Engineering™ BrewEasy™ Kettle RIMS system. In these systems the temperature at the sensor will read an average of a few degrees higher than the actual temperature in the mash due to heat losses. - Page 13 The controller will never call for the burner to turn on for a length of time that less that the ignition delay setting. This value is preset for a Blichmann Hellfire® burner. If a different burner is being used, set it in accordance with that particular burner’s operation.
- Page 14 0.0˚ F 2.0˚ F RIMS OFFSET: RIMS OFFSET: Mash Tun Mash Tun Actual Temp: Actual Temp: 148˚F 150˚F Wort Flow Path Wort Flow Path Actual Average Temp: Actual Average Temp: 150˚F 152˚F BrewCommander™ © Blichmann Engineering, LLC 2019...
- Page 15 HERMS system to reach the next mash step. 0.0˚ F 3.0˚ F RIMS OFFSET: RIMS OFFSET: HLT w/ HERMS HLT w/ HERMS Actual Temp: Actual Temp: 150˚F 153˚F Mash Tun Mash Tun Actual Temp: Actual Temp: 147˚F 150˚F BrewCommander™ © Blichmann Engineering, LLC 2019...
- Page 16 A. Limited Warranty 1. Blichmann Engineering warrants to the original purchaser that this product will be free from manufacturing defects in material and workmanship for a period of one (1) year from the date of purchase by the customer. Proof of purchase is required.
Need help?
Do you have a question about the BrewCommander Gas and is the answer not in the manual?
Questions and answers