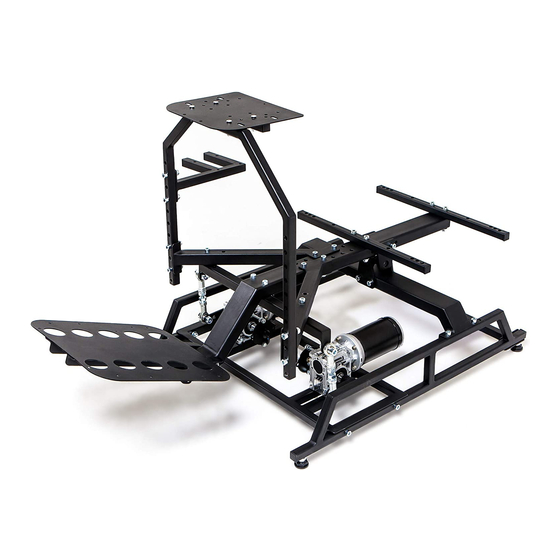
DOF Reality H2 Assembly Instructions Manual
Hide thumbs
Also See for H2:
- Assembly instructions manual (18 pages) ,
- Assembly instructions manual (33 pages)
Advertisement
Quick Links
WARNING! Assembled platform will have exposed motors moving parts. Neven operate it with the
small children around or use optional protection caver.
During initial assembly don't tight bolts completely, do it at the end. First you need to assemble
full frame and fight screws and bolts after.
The following arrow highlights the spot on the diagram or details that you need to pay extra
attention:
Please check and if needed put back the motors power and sensors plugs as they were to match
the colors. This is very important. Never change wiring. Mixed of colors in connectors can damage the
motors and platform controllers.
Our platform is very lightweight and simple die to its perfect weight balance. This allows us to
use affordable motors and gearboxes. If you plan to put something besides standard wheel, pedals,
yoke, gear shifter, throttle and HOTAS you need to plan and implement it properly. Each additional even
light element on the moving platform should be well positioned and counterbalanced (same weight X
same arm length). You can't put even light screen/monitor on our simulator. It is always better to
consult us first, before installing any extra equipment on the platform.
Don't put ANY controllers on the platform before it is completely tested and proven to be
working as desired. After assembly attach the seat only. Nothing extra. When you ensure proper
behavior start adding controllers one by one, doing movement tests with person seating at the pilot seat
after implementing each new add on to platform weight.
Each platform control box is shipped preset to the voltage of the destination country. If you not
sure about the proper voltage settings, turn it upside-down and check ALL 2 or 3 red switches inside the
box and consult us.
1
Assembly Instructions DOF Reality H2 and P2
Advertisement

Related Manuals for DOF Reality H2


Summary of Contents for DOF Reality H2
- Page 1 Assembly Instructions DOF Reality H2 and P2 WARNING! Assembled platform will have exposed motors moving parts. Neven operate it with the small children around or use optional protection caver. During initial assembly don’t tight bolts completely, do it at the end. First you need to assemble full frame and fight screws and bolts after.
- Page 2 Assembly Instructions DOF Reality H2 and P2 Step by step assembly instructions:...
- Page 3 Assembly Instructions DOF Reality H2 and P2...
- Page 4 Assembly Instructions DOF Reality H2 and P2...
- Page 5 Assembly Instructions DOF Reality H2 and P2...
- Page 6 Assembly Instructions DOF Reality H2 and P2...
- Page 7 Assembly Instructions DOF Reality H2 and P2...
- Page 8 Assembly Instructions DOF Reality H2 and P2...
- Page 9 Assembly Instructions DOF Reality H2 and P2...
- Page 10 Assembly Instructions DOF Reality H2 and P2...
- Page 11 Assembly Instructions DOF Reality H2 and P2...
- Page 12 Assembly Instructions DOF Reality H2 and P2...
- Page 13 Assembly Instructions DOF Reality H2 and P2...
- Page 14 Assembly Instructions DOF Reality H2 and P2...
- Page 15 Assembly Instructions DOF Reality H2 and P2...
- Page 16 Assembly Instructions DOF Reality H2 and P2...
- Page 17 Assembly Instructions DOF Reality H2 and P2...
- Page 18 Assembly Instructions DOF Reality H2 and P2...
- Page 19 Assembly Instructions DOF Reality H2 and P2...
- Page 20 Assembly Instructions DOF Reality H2 and P2 Here are few video on the H2 assembly https://www.youtube.com/watch?v=9RxO4pIlg88&t=234s P3 assembly https://www.youtube.com/watch?v=4DVa2-J_feY https://youtu.be/gz8i9lYWZcY?t=113 for your reference. https://youtu.be/QbTnt5a_C6w...
- Page 21 Assembly Instructions DOF Reality H2 and P2 2. Options mounting Please follow this video for the dampers kit installation https://youtu.be/nwBFJHvygJM https://www.youtube.com/watch?v=c3RVBrvVeYQ https://www.youtube.com/watch?v=3mt4mT2cNXc https://www.youtube.com/watch?v=09ArKeDUpww Different dampers model: https://dofreality.com/wp-content/uploads/2020/04/ld1.jpg https://dofreality.com/wp-content/uploads/2020/04/ld2.jpg https://dofreality.com/wp-content/uploads/2020/04/ld3.jpg https://dofreality.com/wp-content/uploads/2020/04/ld4.jpg Extra rigid wheel support bracket installation: https://dofreality.com/wp-content/uploads/2020/03/supportR1.jpg https://dofreality.com/wp-content/uploads/2020/03/supportR2.jpg Your order might include Oculus camera mount and some spare parts. For flight HOTAS sim configuration attach throttle mount support same way as main wheel stand.
- Page 22 Assembly Instructions DOF Reality H2 and P2 3. Balancing When all is moving and working, and you mounted all your game controllers on the platform it is perfect time to Balance it. It is mandatory step. This is a very important and crucial steep to get the best performance and lifespan from your platform.
-
Page 23: Software Installation
SRS or DOF Reality (Check your spam folder). If you can’t find your license, please recover it: go to license tab, click recover, enter the email used to purchas 4.2 CONFIGURE HARDWARE... -
Page 24: Playing The Game
Assembly Instructions DOF Reality H2 and P2 4.4 GAME SETUP (PC INSTRUCTIONS) For console, please check here: https://www.simracingstudio.com/console Check if your game requires anything special. Go to SETUP-> GAMES and click CONFIG or INSTRUCTIONS if needed. There are 4 possible status 1) Game not installed. - Page 25 Assembly Instructions DOF Reality H2 and P2 1) STAND BY: Game not running 2) GAME RUNNING: Game is detected…no telemetry to move platform is yet been received. For Some games, this is NORMAL as they only send telemetry once you are in the track or in the air…...
- Page 26 Assembly Instructions DOF Reality H2 and P2 4.8 VR You can use any VR headset. Most of the customers find no need for compensation / cancellation https://youtu.be/oi8yvWzZXVw . But we provide different ways to provide motion Compensation cancellation. In some articles you may find two terms - motion Compensation and motion Cancellation used to describe the same goal.
-
Page 27: Troubleshooting And Maintenance
Assembly Instructions DOF Reality H2 and P2 Troubleshooting & Maintenance The simulator does not need much maintenance, but it is wise to check for loose bolts or other abnormalities occasionally. - Checking bolts and nuts every few weeks to ensure nothing is getting loose. - Page 28 Assembly Instructions DOF Reality H2 and P2 5.2 If one or more of your motors are stuck in an improper position and doesn’t seem to respond It happens if motor somehow got into protection zone. It should not happen. It got locked in software.
- Page 29 24. Exit SMC3 tool and you are ready to go. If this is not fixing your problem please review and repeat steps very closely. Next step would be to contact DOF Reality.
- Page 30 Assembly Instructions DOF Reality H2 and P2 5.4 Something is wrong with my platform ! 0) check all cables and motor connections, and any loose wires inside the control box. 1) close and exit SimRacingStudio 2) Download http://dofreality.com/SMC3Utils.zip 3) unpack all archive contents into any local folder on your PC 4) Open with notepad file SMC3Utils.ini and set COMM_PORT= to proper COM port number...
-
Page 31: Technical Specifications
Assembly Instructions DOF Reality H2 and P2 - The rig might be too heavy. 6 Reparation The simulator should under no circumstances be repaired by unauthorized personnel without consulting us first. Failing to comply may cause damage to equipment and/or injury to the personnel.
Need help?
Do you have a question about the H2 and is the answer not in the manual?
Questions and answers