
Related Manuals for Sinister Sound 98-13 STREET GLIDE

Summary of Contents for Sinister Sound 98-13 STREET GLIDE
- Page 1 9 8 - 1 3 S T R E E T G L I D E / U LT R A INSTAL L AT ION I NSTR UCTI ONS P A G E R E V 0 0 2...
-
Page 2: Table Of Contents
98-13 STREET GLIDE/ULTRA INSTALLATION INSTRUCTIONS Kit Parts ....................Base Kit Parts: ..................... With Amplifier ....................With Head Unit ....................Prepare the Bike ..................Installation of Head unit ..............Installing the PAC Handle-bar Audio Control Interface ......Installation oF SinisterSound Fairing kit ........... -
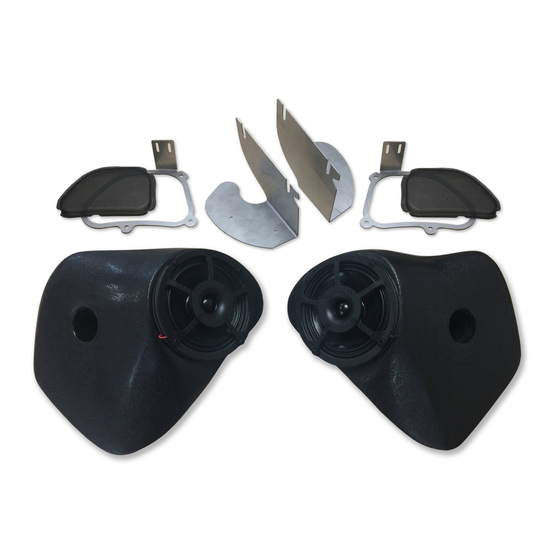
Page 3: Kit Parts
KIT PARTS BASE KIT PARTS: 1 - SinisterSound speaker enclosure, Clutch side 1 - SinisterSound speaker enclosure, Brake side 1 - Fairing speaker bracket, Clutch side 1 - Fairing speaker bracket, Brake side 6 - Fairing speaker bracket screws 2 - Speaker covers 2 - Fairing brace brackets 4 - Fairing brace bracket to enclosure screws WITH AMPLIFIER... -
Page 4: Prepare The Bike
PREPARE THE BIKE Remove the outer fairing and old audio equipment. Move any wiring harnesses that would interfere with the new SinisterSound enclosures toward the radio. If you already have a Head unit and Amplifier go to the Installation of SinisterSound Fairing Kit section. If you are installing a Head Unit or Amplifier, continue. -
Page 5: Installation Of Head Unit
INSTALLATION OF HEAD UNIT If you already have a head unit installed, go to the Installation of the SinisterSound Fairing kit section. Follow the instructions included with your head unit. We recommend the Kenwood Marine KMR-M series or JVC KD-X37MBS head unit. INSTALLING THE PAC HANDLE-BAR AUDIO CONTROL INTERFACE Connect the Yellow, Black and Red wires from the head unit harness to the Yellow, Black and Red wires of the PAC Harness. -
Page 6: Installation Of Sinistersound Fairing Kit
INSTALLATION OF SINISTERSOUND FAIRING KIT The fairing speaker brackets are labeled per their installation location (Brake and Clutch sides). The smaller fairing brace brackets are interchangeable. The included screws must be used to avoid damage to your fairing. Mount the main enclosure brackets with grills between the fairing and bracket using the screws included in the kit. - Page 7 Attach the enclosures to the brackets using the supplied screws. If you already have an amplifier and head unit, continue to step 5. If you are installing an amplifier, skip step 5 and go to the Installation of Amplifier section. Connect your speaker pods to your amplifier using the appropriate output connections per amplifier instructions For Arc Audio amplifier wiring and settings, see Arc Audio Amplifier Wiring and Settings.
-
Page 8: Installation Of Amplifier
INSTALLATION OF AMPLIFIER Follow the instructions included with your amplifier. The amplifier is mounted on top of the head unit and can be secured with velcro or double sided tape. ARC AUDIO AMPLIFIER WIRING AND SETTINGS ARC AUDIO MOTO720 Remove the fuse from the SinisterSound power and ground cable. Connect the SinisterSound power and ground cable to the amplifier and route towards the battery through the cable channel under the tank. -
Page 9: Moto720 Stock Hd Head Unit - Sinister Fairing Kit
MOTO720 STOCK HD HEAD UNIT - SINISTER FAIRING KIT HD - Head Unit Cig Lighter Piggyback Positive Set Input Levels INPUT INPUT TURN Set Load Selects CH1 CH2 CH3 CH4 INPUT INPUT LEVEL LEVEL to SPEAKER SPEAKER SPEAKER MIN. MIN. CH 3-4 BRIDGED BRIDGED... -
Page 10: Moto720 Aftermarket Head Unit - Sinister Fairing Kit
MOTO720 AFTERMARKET HEAD UNIT - SINISTER FAIRING KIT Aftermarket - Head Unit Set Input Levels INPUT INPUT TURN Set Load Selects CH1 CH2 CH3 CH4 INPUT INPUT LEVEL LEVEL to RCA SPEAKER SPEAKER MIN. MIN. CH 3-4 BRIDGED BRIDGED SinisterSound Fairing Speakers Amp Settings (CH1-2 IN) -
Page 11: Moto720 Aftermarket Head Unit - Sinister Fairing Kit + Lids
MOTO720 AFTERMARKET HEAD UNIT - SINISTER FAIRING KIT + LIDS Aftermarket - Head Unit Set Input Levels Set Load Selects INPUT INPUT TURN CH1 CH2 CH3 CH4 INPUT INPUT to RCA LEVEL LEVEL SPEAKER SPEAKER MIN. MIN. CH 3-4 BRIDGED BRIDGED SinisterSound Fairing Speakers... -
Page 12: Moto720 Aftermarket Head Unit - Sinister Fairing Kit + Crazy 8'S
MOTO720 AFTERMARKET HEAD UNIT - SINISTER FAIRING KIT + CRAZY 8' S Aftermarket - Head Unit Set Input Levels Set Load Selects to RCA SinisterSound Fairing Speakers Amp Settings Set FREQ to 50 Adjust the gain on CH 3-4 per instructions in Testing and Tuning section. -
Page 13: Moto720 Aftermarket Head Unit - Sinister Fairing Kit + Ultra Rears
MOTO720 AFTERMARKET HEAD UNIT - SINISTER FAIRING KIT + UL TRA REARS Aftermarket - Head Unit Set Input Levels Set Load Selects INPUT INPUT TURN CH1 CH2 CH3 CH4 INPUT INPUT LEVEL LEVEL to RCA SPEAKER SPEAKER MIN. MIN. CH 3-4 BRIDGED BRIDGED SinisterSound... -
Page 14: Diamond Audio Amplifier Wiring And Settings
DIAMOND AUDIO AMPLIFIER WIRING AND SETTINGS DIAMOND AUDIO MICRO 2V2 Remove the fuse from the SinisterSound power and ground cable. Connect the SinisterSound power and ground cable to the amplifier and route towards the battery through the cable channel under the tank. Connect the RCA harness to the amplifier Input port and the RCA’s to the output ports of the head unit. - Page 15 DIAMOND AUDIO MICRO 4V2 Remove the fuse from the SinisterSound power and ground cable. Connect the SinisterSound power and ground cable to the amplifier and route towards the battery through the cable channel under the tank. Connect the RCA harness to the amplifier Input port and the RCA’s to the output ports of the head unit.
-
Page 16: Soundigital Amplifier Wiring And Settings
SOUNDIGITAL AMPLIFIER WIRING AND SETTINGS SOUNDIGITAL 400.2D EVO Remove the fuse from the SinisterSound power and ground cable. Connect the SinisterSound power and ground cable to the amplifier and route towards the battery through the cable channel under the tank. Connect the RCA harness to the amplifier Input port and the RCA’s to the output ports of the head unit. -
Page 17: Testing And Tuning
TESTING AND TUNING Turn bike ignition switch to Accessory. Choose a music source and play. We recommend setting the head unit volume to 70% then slowly increase the gain until you start to hear distortion. Then back the gain off a few clicks. About Adjusting the Gain (from Arc Audio Manual): “Because of the wide range of head unit output configurations all ARC Audio amplifiers have an adjustable input sensitivity or “Gain”. -
Page 18: Finishing The Installation
FINISHING THE INSTALLATION Reinstall fairing. Reinstall seat if previously removed. Enjoy your new system! P A G E R E V 0 0 2...
Need help?
Do you have a question about the 98-13 STREET GLIDE and is the answer not in the manual?
Questions and answers