
Related Manuals for Traffic Logix SAFEPACE GUARDIAN STANDALONE CAMERA

Summary of Contents for Traffic Logix SAFEPACE GUARDIAN STANDALONE CAMERA
- Page 1 RAFFIC OGIX ® G UARDIAN TANDALONE AMERA NSTALLATION UIDE Traffic Logix Speed Awareness Copyright © 2018 Traffic Logix Corporation All rights reserved.
- Page 2 Trademarks Traffic Logix® is a registered trademark of Logix ITS Inc. All other product and company names are trademarks or registered trademarks of their respective owners. This document may contain confidential and proprietary information of Traffic Logix Corporation and/or other third parties which is protected by copyright, trade secret and trademark law and may not be provided or otherwise made available without prior written authorization.
-
Page 3: Table Of Contents
Contacting Technical Support Chapter 2 Installing SafePace Guardian Standalone Selecting a Location for your SafePace Guardian Standalone Positioning your SafePace Guardian Standalone Camera System Mounting a SafePace Guardian Standalone Camera System Mounting the External Radar Mounting the Camera Mounting the (Optional) Illuminator... -
Page 4: Introduction
Chapter 1 NTRODUCTION SafePace® Guardian Standalone Camera Installation p. 4 Guide... -
Page 5: Description
Description Description The SafePace Guardian Standalone Camera System is an entry-level camera system which detects speeds via an external radar unit and captures images of vehicles that exceed the specified speed threshold. The system tracks vehicles in one lane only and is ideal for low-volume roads such as campuses and private communities. -
Page 6: About This Guide
» Pointing the camera » As your SafePace Guardian Standalone Camera System could include any one of several different radar signs, the installation of the radar sign is described in the radar sign installation manual included with the sign. Documentation Conventions... -
Page 7: Using Additional Customer Resources
Provides convenient access to the latest versions of our software applications and utilities. Support Videos Provides access to several videos that can help you get up to speed with your Traffic Logix product. Product Documentation Provides access to the most recent versions of our product documentation. If you are unable to access our online documentation, please contact our Technical Support Department to discuss alternatives. -
Page 8: Installing Safepace Guardian Standalone
Chapter 2 NSTALLING UARDIAN TANDALONE SafePace® Guardian Standalone Camera Installation p. 8 Guide... -
Page 9: Selecting A Location For Your Safepace Guardian Standalone
Selecting a Location for your SafePace Guardian Standalone Selecting a Location for your SafePace Guardian Standalone The site you select for the camera may vary with the application in which it is being used. However, you should generally adhere to the following guidelines: Choose a location where the line of sight from the camera to the roadway will be uninterrupted. -
Page 10: Positioning Your Safepace Guardian Standalone Camera System
Positioning your SafePace Guardian Standalone Camera System Positioning your SafePace Guardian Standalone Camera System SafePace Guardian Standalone needs to be located at the side of the road being monitored. Depending on the option you purchased, the camera, radar head and illuminator(optional) should be one of the following: Front facing - facing oncoming traffic to capture front license plates »... -
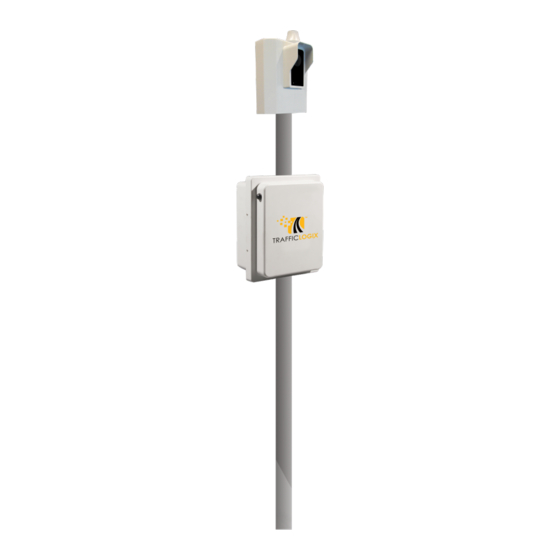
Page 11: Mounting A Safepace Guardian Standalone Camera System
Mounting a SafePace Guardian Standalone Camera System Mounting a SafePace Guardian Standalone Camera System Mounting your SafePace Guardian Standalone Camera System requires that you mount and connect each of the following components of the system: The external radar head »... - Page 12 Mounting the External Radar To install the sign using the standard pole banding mounting system: Attach the supplied banding brackets to the top and bottom of the rear of the sign with the supplied screws as shown below. Make sure that both brackets are aligned vertically. Insert the stainless steel banding strap into the bracket and fasten the sign to the pole.
-
Page 13: Mounting The Camera
Mounting the Camera Mounting the Camera You can mount the camera either above or below the external radar head. We recommend that you mount the camera below the external radar head as this leads to better images for your tickets. However, if the possibility of vandalism is an issue, we recommend that you mount the camera above the external radar head, as long as it is not more than 4 meters above the roadbed. -
Page 14: Mounting The (Optional) Illuminator
Mounting the (Optional) Illuminator Mounting the (Optional) Illuminator If you also purchased the optional illuminator for night time operation, we recommend that you mount it either just above or just below the camera. The illuminator comes with a Pole Banding Mounting system. As this is a standard type of mounting it requires no special knowledge to easily install the illuminator. -
Page 15: Connecting The Camera To The External Radar
Connecting the Camera to the External Radar Connecting the Camera to the External Radar The external radar also supplies the power for the Guardian camera. The Guardian camera has two cables that you need to connect to the external radar. There is a power cable and there is an Ethernet cable for data transfer between the external radar and the camera. -
Page 16: Connecting The Illuminator
Connecting the Illuminator When they are properly inserted, screw the cover on the camera connector over the joint. Be careful not to over-tighten it. Connect the camera's Ethernet cable to the Ethernet port on the radar. Unscrew the cover from the radar's Ethernet port. Insert the Ethernet cable from the camera into the radar's Ethernet port. - Page 17 Connecting the Illuminator When it is properly inserted, screw the cover on the illuminator connector over the joint. Be careful not to over-tighten it. SafePace® Guardian Standalone Camera Installation p. 17 Guide...
-
Page 18: Safepace Guardian Standalone Operation And Maintenance
Chapter 3 UARDIAN TANDALONE PERATION AND AINTENANCE SafePace® Guardian Standalone Camera Installation p. 18 Guide... -
Page 19: Operating Your Camera
Operating Your Camera Operating Your Camera After you have mounted, aligned and powered on your camera, you can connect to and manage it remotely using SafePace Cloud. For information on operating your camera with SafePace Cloud, refer to the SafePace Cloud Online User Guide. -
Page 20: Warranty
Terms of Use and any Applicable Safety Laws. Buyer agrees that there shall be no coverage or benefits of any kind under this limited warranty if it is determined by Traffic Logix that the Product was not installed or used in accordance with the Conditional Terms of Use or Applicable Safety Laws, or if the Product has been SafePace®... - Page 21 Warranty altered in any way by anyone other than Traffic Logix, or if the Product has been subject to any misuse or accident. In addition, Buyer assumes and agrees to indemnify Traffic Logix for all risk, liability or expense that results from any installation or use of the Product that is not in accordance with the Conditional Terms of Use or any Applicable Safety Laws.
Need help?
Do you have a question about the SAFEPACE GUARDIAN STANDALONE CAMERA and is the answer not in the manual?
Questions and answers